This article is a brief informal introduction to CIAM. This article is intended to level set a deeper and broader discussion on CIAM which will take place in future blog articles.
CIAM differs in many ways from an organizations IAM systems. A subset of these differences are explained below. These differences are mandated by the different requirements for each system. IAM supports an organizations systems and workforce.
Whereas CIAM supports the organization’s customers or clients. IAM is used to control access to internal systems and data much of which is typically sensitive. Therefore, the users that have Identities in IAM must be more thoroughly vetted and inspected. In addition, the users of the internal IAM system rely on access to perform their job functions therefore the process can have more friction then a customer-based system. This is not to say that customers also do not need to be vetted. Customers often need to be vetted for risk or to prove who their actual identity is. However, with CIAM the goal is to remove as much friction as possible and make user actions be as simple as possible. The reason is that with customers you are usually in a state of either maintaining a relationship or in the customer acquisition phase. And any friction especially in the sign-up process can result in customer’s potentially seeking to do business with someone else. In addition, any complicated actions the user must take has the potential to either make them want to do business elsewhere or will require additional support from you, which is typically costly.
There are many other differences between CIAM and IAM. IAM usually needs to support a limited number of users. Even in a large organization the number of users is going to be in the thousands, tens of thousands, or hundreds of thousands. Where the number of customers can potentially be in the millions, the tens of millions, or more. In addition, a company’s application or website is potentially the main way that the customer interacts with the business. Therefore, ensuring customer satisfaction with their interaction with the application including logging-in is of critical importance. CIAM is also a valuable tool for compliance with customer related laws and regulations such as privacy, whereas IAM systems are important for corporate and industry regulation such as SOX or PCI. In addition, due to the nature of the systems the type of authenticators may be more restrictive with IAM to ensure security while with CIAM there may be more flexibility to meet the customer’s needs such as supporting federation with Facebook or Google for AuthN.
CIAM requirements and capabilities
At its core CIAM is responsible for assigning a digital identity for a customer. CIAM is responsible for providing a reasonably secure way for that customer to authenticate as this identity. And also, of importance is reducing the likelihood that the customer’s credentials can be compromised and protecting the customer’s identity from impersonation attacks.
Also, as part of the primary security responsibilities of CIAM is to protect the customer’s privacy and data. In banking there are some additional responsibilities that may not either be present in other industries or of less significance. These includes going to great lengths to know your customer to comply with financial regulation. Also, since CIAM gates access to a customers finances it is extremely important to inspect in detail the customers interaction with the company’s systems through CIAM to detect attempts to impersonate the user, fraudulent behavior, and the risk level of the customer or potential customer.
Therefore, in banking CIAM should either handle these activities or securely connect to systems that can. Then depending on the feedback from these systems be able to gate access.
In addition, CIAM is going to perform authentication and potentially maintain state for other resources that may be called when the customer is interacting with the company’s systems. This includes pulling account information from a database, feeding, or receiving information from CRM, notification systems, and any other systems that the user will directly or indirectly come in contact while interacting with the company’s systems.
Then there are customer journeys that are primarily driven through CIAM. These includes tasks such as resetting a password, attaching an authenticator such as a passkey, updating the user’s email, updating the user’s profile, alerting customer of potentially fraudulent behavior taken on their accounts, and letting the customer flag fraudulent behavior. Many of these more identity related tasks should be native to the CIAM, others such as notifications, or updating profiles may require integration with other systems.
In many ways CIAM is the glue that pieces all of the systems that a user may interact with together. Because typically all experiences are essentially going to begin with a login and potentially end with a logout. So, not only should CIAM be fully capable as an Identity Provider but also be intuitive to use and can interact with disparate systems. Friction should be reduced with CIAM systems. Making it simple for the user to create and maintain an identity. Using authenticators that the customer is familiar with whether that be passkeys, or federation with a 3rd party IDP such as Facebook, Google, Microsoft, or Apple. User Identity related actions such as adding passkey, MFA, or resetting a password should be simple and easily understandable to even the most non-technical customer.
Specific requirements
So, I have spoken in more conceptual way about CIAM. To help you understand actual requirements for CIAM in a more deliberate and detailed way here is a detailed list of common requirements that are often required of CIAM.
Centralize authentication, authorization, identity, and credential management for customers
Support of modern AuthN and AuthZ protocols including SAML, OIDC, and Auth 2.
Ability to perform fraud, risk, and threat analysis or the capability to hand the necessary data to 3rd party systems to perform this analysis and act based on the output of this analysis.
The ability to support federation via OpenD or SAML.
The ability to work with a variety of 3rd party IDPs including Microsoft, Google, Facebook, and Apple.
Support customer journeys either natively or by passing key information to 3rd party apps that can implement the customer journeys.
Support of more advanced authentication options including Passkeys, MFA, and passwordless.
Ability to acquire, store, and retrieve key profile information that is required for authentication as well as threat, risk, and fraud analysis. This includes information such as keystrokes, mouse movements, page scrolling, email address, phone number, First and Last Name, address, social security number, and any other pertinent information
Support collection, retrieval, and retention for data used to comply with Know your customer (KYC) regulations
Ability to store and ask for consent.
Ability to store and ask for login and other authentication preferences
Ability to manage and secure PIl
Support APls wherever possible instead of proprietary code such as SDKs
Ability to be hosted in AWS
Ability to support multiple regions and multiple availability zones in AWS or Azure
My next blog posting will be more technical where I will discuss CIAM Architecture.
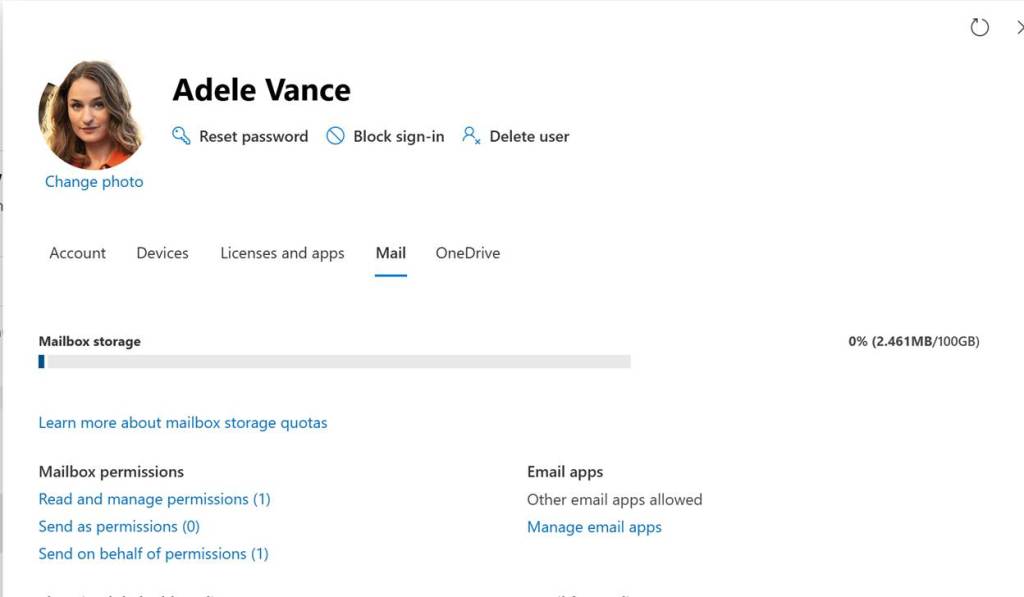
So, I recently received some Outlook/EXO questions. The first question is how to delegate access to a mailbox. The second question is how to leave messages unread in that mailbox after the person that has been delegated access reads that email. I am not an Office, EXO, or email expert, but here are the steps I found to accomplish this. If Office is your expertise and you have any feedback on these steps, please reach out to me on LinkedIn. My username on LinkedIn is chdelay.
My steps were slightly different I am guessing due to changes in Office. In the Admin Portal I opened up the user properties and then selected Mail. Then I can configure Read and Manage, Send as, or Send on behalf permissions.
Leaving Emails Unread
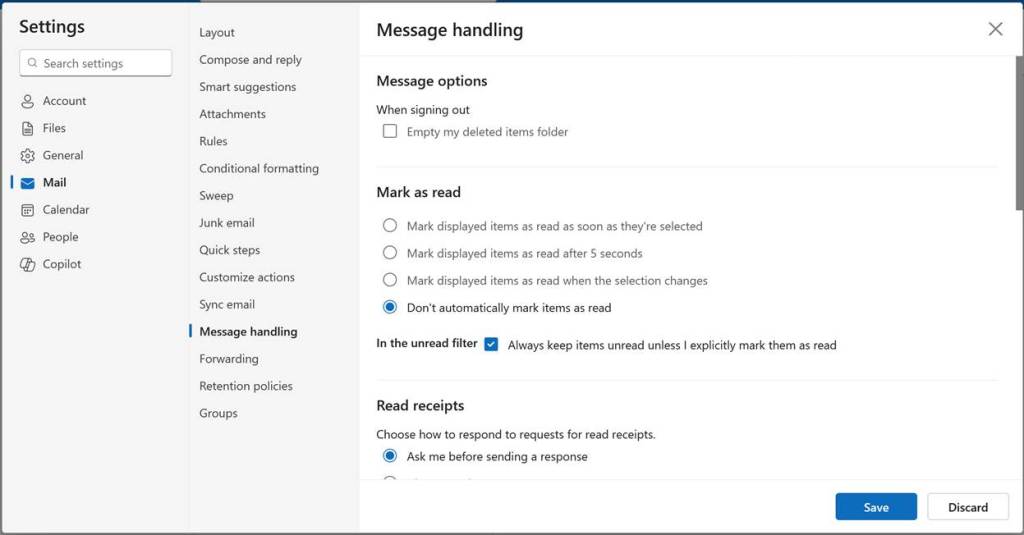
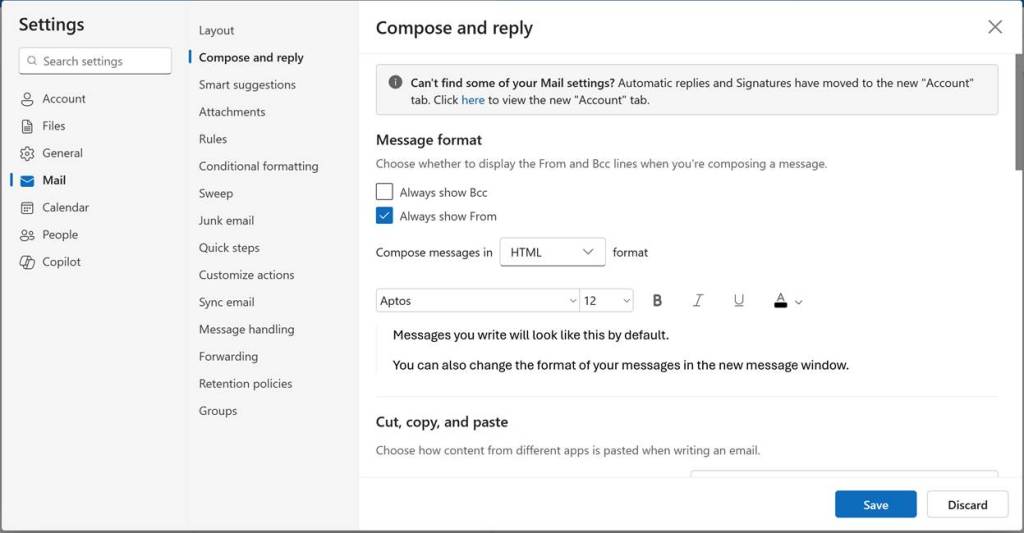
The only way I have found to accomplish this is to set up Outlook to not mark read emails as read. The problem is this is a global setting for the client, so it would affect the person’s own mailbox as well. So, the only way I currently can figure to do that is to use two clients. Maybe use the Outlook standalone client for one’s own email and have that configured to mark emails as read and then use the Outlook web client for accessing the delegated mailbox and configure that one to leave emails as unread. Here is the associated setting in the Outlook web client:
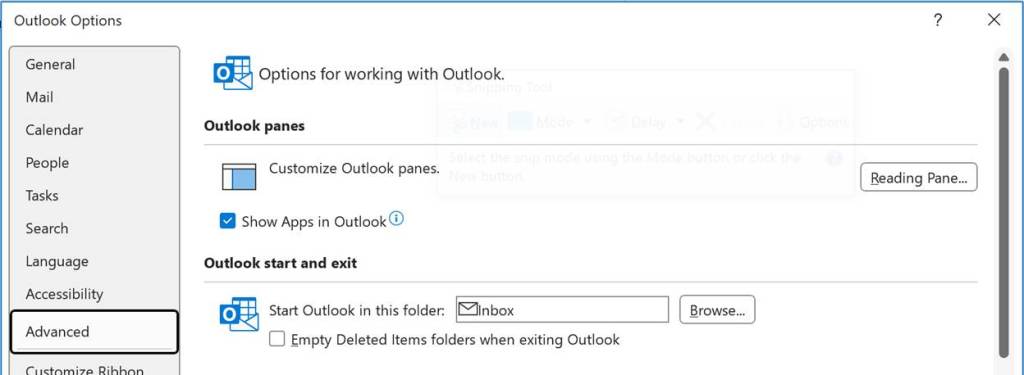
If using the Outlook client, go to File then Options. Then click Advanced. Then click on Reading Pane…
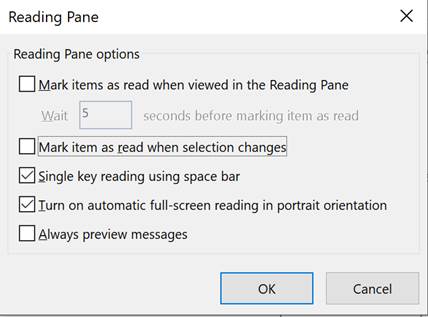
Then uncheck Mark item as read when selection changes
Then click OK
Sending Messages
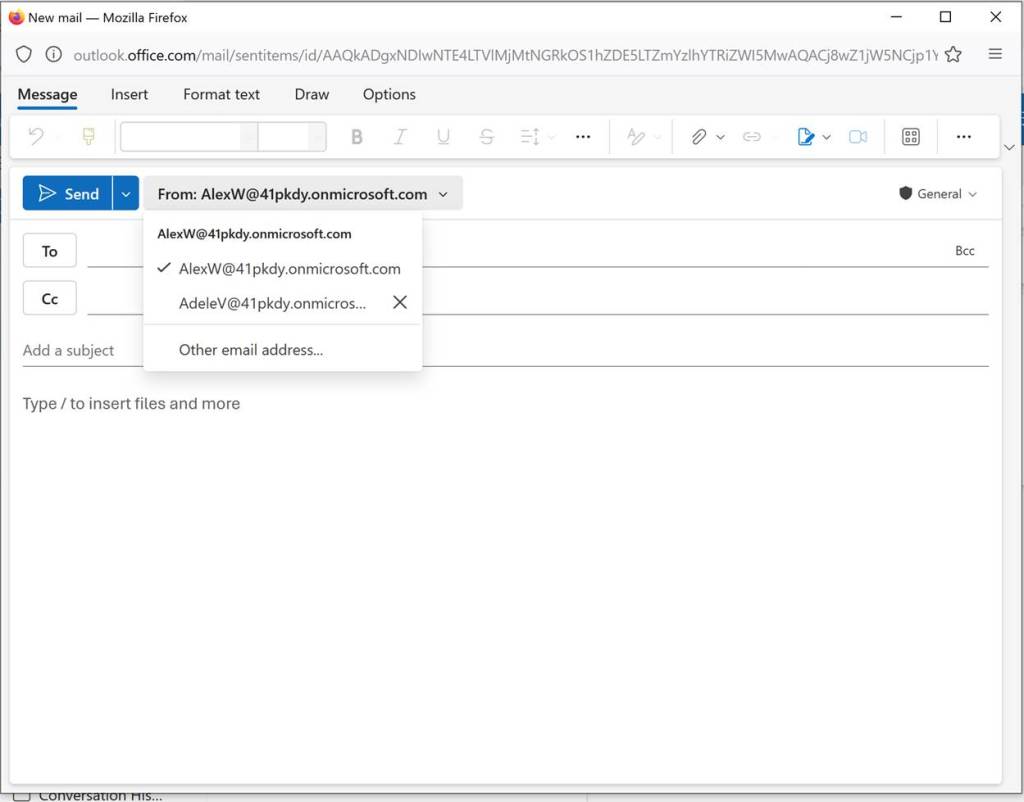
If you want to send emails from the delegated mailbox you will need to display the From field when composing emails. Below is a screenshot on how to add this in the Outlook web client.
If using the full Outlook client the steps would be (no screenshot) to open a new email. Then go to Options and then under Show Fields select From.
Then when composing an email you can select your own mailbox or the mailbox you have been delegated access to.
Hello, this blog posting is a high-level description of Azure Key Vault for those looking to sort out exactly what AKV is. This will be followed by postings providing a more detailed description and walk throughs on how to use Azure Key Vault. This blog posting will most likely evolve over time to include updated an expanded information.
What is Azure Key Vaults Purpose?
To increase security you need to limit who knows the private key for a key or certificate, or who knows the secret. Azure Key Vault is the tool used to limit who can access and hence gain knowledge of the keys or secret. Also, since Azure Key Vault lives in Azure it can be accessed over the Azure network which means those keys and secrets can be secured and used across Azure. So, my definition of Azure Key Vault is: A security service that allows secrets, keys, or certificates to be securely access and managed in Azure.
Azure Key Vault Common Uses
What are some common uses for Azure Key Vault? Common scenarios include encryption for Storage Accounts, Azure Disk Encryption, SQL Server Always Encrypted, secrets store for Azure Kubernetes Service. Also, securely storing and accessing keys, certificates, and secrets for Azure App Service. You can also code your application to use Key Vault to secure and securely access keys, secrets, and certificates that are utilized by said application.
Azure Key Vault Standard vs Azure Key Vault Premium
The main differences between Standard and Premium is higher level of FIPS compliance with Premium and that Premium uses an HSM to protect keys.
Keys, Certificates, and Secrets
Many services leverage keys, certificates, or secrets for security. Keys and certificates can be used for authentication or encryption.
Secrets
Secrets can be leveraged for authentication. A secret is just a string of characters that is kept private or secret. One example of a secret is a password. An application or identity provider knows the secret that is used to authenticate a user, unlock an application, or decrypt data. And that secret is inputted into the application and if it matches the secret the application or identity provider is expecting you get authenticated or unencrypt the data. A secret can be thought of as a symmetric key.
Keys
Keys and certificates are kinda similar in that a certificate has keys, it’s just the public key and hence the private key are bound to a digital document called a certificate. The certificate includes additional information used for a number of purposes, but the main purpose of the certificate is to include a digital identity such as a person, services, computer, and so on. In that way the keys can be used as proof of ownership of that identity. So, keys and certificate in terms of Azure Key Vault are a asymmetric keys. Meaning there is a public/private key pair. And hence Keys are going to use Public Key Algorithms such as RSA.
Certificates
Certificates are a digital document that binds and identity to a public key. So, certificates have keys, asymmetric keys. So, like keys which is covered above, the private key needs to be protected. That means that the key must not only be protected from export, but also that processes that use that key are protected so that the keys are protected. Such operations are encryption and signing.
Secrets, Keys, and Certificates Summary
So, to summarize the previous paragraph keys, certificates, and secrets can be used to access an application, service, or data.
Azure Key Vault Access
Permissions
Access to Secrets, Keys, and Certificates are restricted by permissions on the Key Vault and the Keys, Secrets, and Certificates themselves. This permissioning can follow and RBAC model or more of an ad hoc model where individual permissions are given. There are a number of pre-defined RBAC roles that can be used to provision access.
Network Security
Network Access to the key vault can be restricted. You can have access wide open, disable network access, or restrict what networks have access to the key vault. You can also restrict access to Private Endpoints.
Summary of Access
So, at the Key Vault level you can protect the key vault by restricting what networks have access to the Key Vault. Also, at the Key Vault you can use access control to limit who has access to the Key Vault. At the Secret, Key, or Certificate level you can use access control to limit access. Role assignments are inherited from the Key Vault level to the Secrets, Keys, and Certificates level.
Monitoring
Alerts
You can setup alerts so that when certain thresholds are reached or certain events happen that an action is taken such as an email alert or app notification.
Metrics
Similar to performance monitor in Windows you can setup monitors to view when certain thresholds are reached via a graph that is generated.
Diagnostic Settings
You can configure where you want the logs generated by AKV to be sent for collection.
Logs
Logs are sent to Log Analytics, however, this must be configured. Once logs are sent to Log Analytics you can use tools like KQL and Workbooks to report on the collected data.
Insights
Insights are pre-defined graphs and tables. These are data sets that Microsoft feels are important and relevant in terms of monitoring AKV and AKV usage.
Workbooks
Workbooks are used to summarize and report on logs sent to Log Analytics.
Conclusion
This posting was a high-level definition of Azure Key Vault. Next blog posting will be a more in-depth description of Azure Key Vault for those looking for more technical details.
After an extended hiatus, I am back. My domain name xdot509.blog expired and it’s like $100 to renew it. That in combination with the fact that I will be blogging more about Entra and Azure Security I just decided to change the domain name to chdelay.blog. “See” you soon.
Zero Trust is a methodology for securing your IT infrastructure. It changes the model for securing an organization’s IT infrastructure. Zero trust as a methodology has been developing for the last 20 years.
Originally, an organization’s IT systems were closed off from the world. To access resources, you had to travel to an office. That office would have networking equipment that connected the endpoints to server-based resources.
Since organizations are more dynamic than users coming into an office, the network and infrastructure had to open up to facilitate work with partners, travelling workers, and so on. Systems such as VPN and Citrix were implemented to allow this more dynamic workplace. In addition, during an organization’s digital transformation, more tools needed to be made available to customers. This began with an organization’s website and grew into more complex digital tools. These tools increased a company’s efficiency as customers had access to self-service portals where they can conduct business from anywhere in the world, at any time. These new tools necessitated a secure way to provide these resources on the internet. This led to DMZ and extranet networks, which allowed the company to open up to the world yet maintain segmentation and security.
As time passed there became more entry points into an organization’s network. It was no longer the case that you could keep your network closed off and assume a certain level of trust within the network. This also became true with the advent of wireless networking. Tools were developed to provide real-time health assessments of endpoints prior to being allowed on the corporate network. These included security technologies such as Cisco’s Network Admission Control (NAC) and Microsoft’s Network Access Protection (NAP). Again, these tools accessed the endpoints health and allowed the endpoint on the wireless network if it was healthy and isolated the endpoint on a remediation network until the device was brought back to a healthy state.
So, what we saw was the opening of the corporate network and attempt to put security controls in place to mitigate the security issues that were brought about by the opening up of the network.
At the same time, we saw the intensity and sophistications of attacks rapidly increase over time. Early attacks such as the “I Love You” virus and Morris worm were very basic in their implementation and aims. Also, early attacks were driven more by curiosity and experimentation, as well as for bragging rights. Those attacks have escalated over the years. Now many attacks are done either by nation state actors or by organized crime whose goal is financial reward. Hacking tools are predominant and easily accessible by anyone with an internet connection. There are tools such as Metasploit Framework that allows an attacker to choose their target, the exploit, the payload, and execute an attack with a simple command.
The understanding that corporate networks are full of various entry points has been understood for some time, as mentioned before. Early in my career when attending security conferences corporate networks referred to as the M&M model. With a hard exterior, but a soft chewy inside. The point of this comparison is to illustrate that once an attacker had penetrated a firewall or was able to utilize one of the established ingress points there was no security to prevent access to any internal resources.
Obviously, this change in the way that technology and networks were utilized in combination with the increase in threats, something had to change.
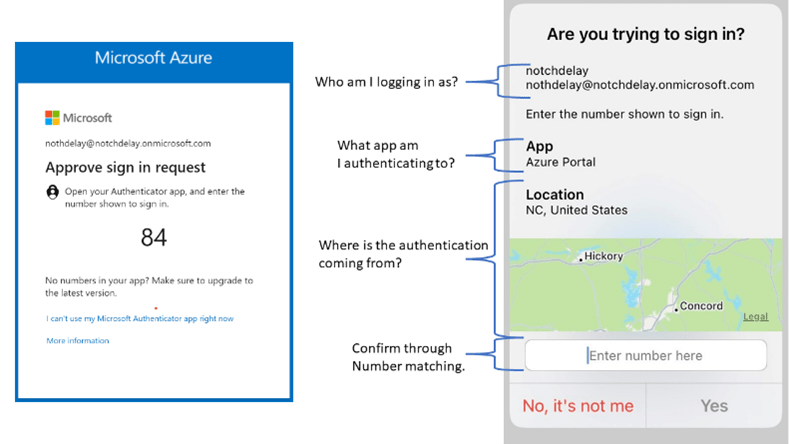
Verify explicitly: This means that the health and security posture needs to continuously be evaluated in real time. As an example, let us use the example of a user accessing an application. In the past if the user simply presented the correct username and password, they were granted access to an application. When Zero Trust is implemented the user risk and sign-in risk is evaluated in real time, based on risk data collected on the internet and characteristics of the typical user sign-in. If the user or sign-in is determined risky by this real time evaluation, the user is prompted to MFA. A message is delivered to the Microsoft Authenticator app on their mobile phone, if the user initiated the sign-in the user approves the sign-in on their Microsoft Authenticator verifying that it is in fact them logging in. The Machine Learning (ML) engine that identified the sign-in as risky now understands that this sign-in was legitimate and can learn that this type of sign-in is normal for the user. This will result in less MFA prompts for the user without decreasing the secure validation of the sign-in.
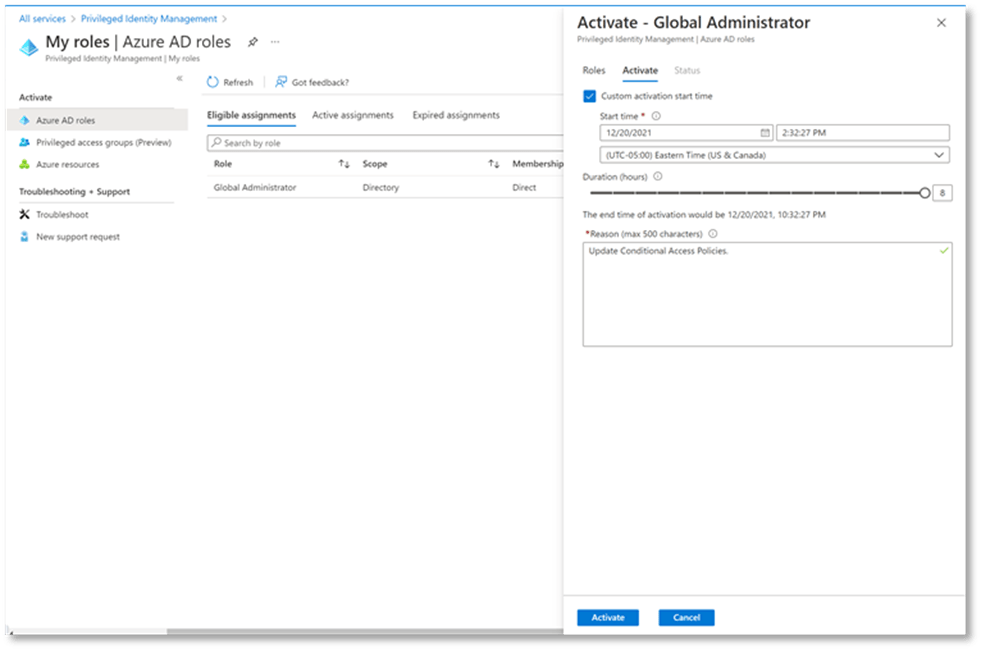
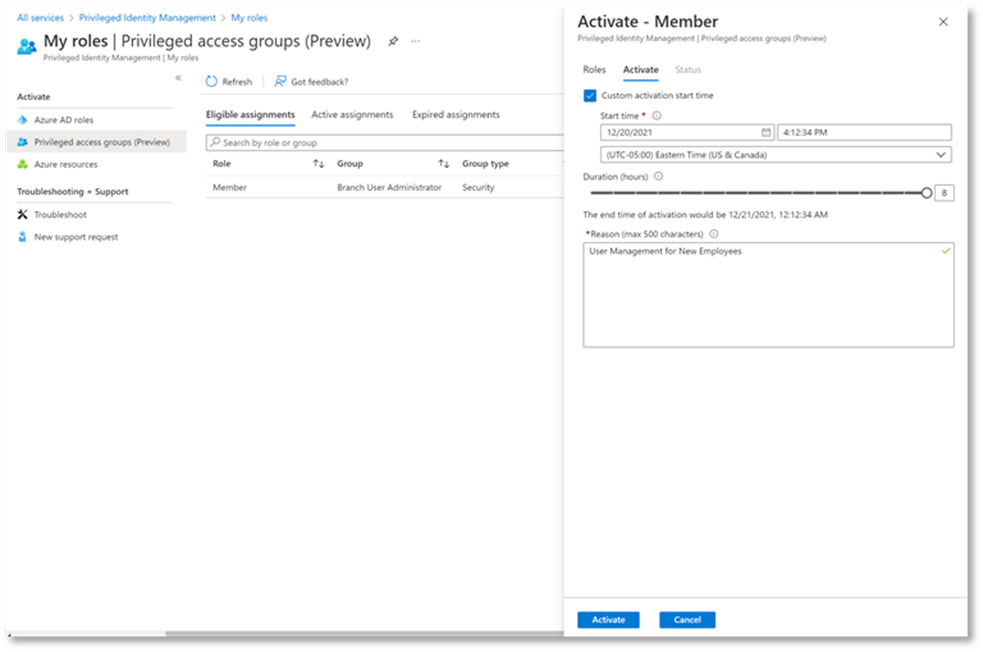
Use least privilege: The goal is to give each user just the privileges that they need to complete their job or a given task, and no more. Additionally, there is a just in time (JIT) component to least privilege. This means giving that user that access just for the time that they need that access. So, if that user typically works 9 AM – 5 PM, they most likely do not need that level of access outside of those hours. Azure PIM can provide this level of least privilege and JIT. For administration a role can be selected that just gives the user the permissions they need for their task. And in addition, the user can be made to elevate just prior to beginning their work. And their elevation can be time-bound, so access goes away after a pre-determined amount of time has passed.
Assume breach: The security posture of Assume breach forces an organization to take many steps that they would not otherwise take. These steps include use of the previous two cited principles of Use least privilege and verify explicitly. It also includes additional steps like hardening services by implementing a secure hardened configuration. It also includes the use of encryption to protect data at rest and in transit.
There are six areas where Zero Trust needs to be implemented. Those six areas include Identity, Devices, Apps, Infrastructure, Networking, and Data.
Identity: It has been commonly said that Identity is the new perimeter or control plane. That is because identity is how access is gated. Identity is the most important component of Zero Trust.
There are 3 authentication options for synced Azure Active Directory Identities: Federation, Password Hash Synchronization (PHS), and Pass-through Authentication (PTA).
Federation is where you leverage ADFS to create a trust between the on-premises Active Directory and Azure Active Directory. With this configuration identities are validated on-premises.
Password Hash Synchronization is a combination of two technologies. The first is sync, in other words synchronizing identities and their passwords with Azure Active Directory. The second is leveraging the passwords that are synced to Azure to authenticate users. The two are distinct. For example, you can use Pass through Authentication to authenticate users to Azure AD, while still having their passwords synced to Azure AD.
Pass through Authentication authenticates users to the on-premises Active Directory. Typically, organizations use this configuration when they are not yet ready to sync passwords to Azure Active Directory.
The recommended configuration is to use Password Hash Synchronization for both synchronization and authentication.
Using Password Hash Synchronization has many benefits. These benefits include using the high availability of the Azure to service logins instead of having a dependency on on-premises servers that are limited in availability and scalability. Additionally, Azure AD Password Protection can be utilized to secure all of those authentications including using features such as Smart Lockout.
Longer term and this could be much longer term would be to move to cloud identities instead of synced identities. So, the beginning state would be to start with on-premises identities that are synced to Azure AD. Next, your organization would identify roles that have no on-premises identities, or in other words identities that rely only on cloud workloads. Then as you hire new employees in those roles you could add them as Cloud accounts. Once you verify that everything is working well with those employees you could work on migrating existing synced accounts to cloud accounts.
Conditional Access is a key driver of Zero Trust for Identities. Conditional Access is an authorization rules engine that secures access to cloud applications. With conditional access you can leverage a variety of conditions and controls to ensure that authentications are done in a secure manner.
Conditional access policies should apply to every app. Where possible minimize the number of conditional access policies. Before deploying conditional access policies to production, use report-only mode to determine the impact of conditional access policies.
Implement a naming convention for conditional access polices. The recommended naming convention is: <Sequence Number><Cloud App><Response>For<Principal>When<Conditions>.
At the very least you should include a sequence number as a pre-fix. This makes it easier to communicate about policies, especially when submitting and reviewing change control.
Within Azure Active Directory it is necessary back practice to configure Break Glass accounts. These accounts are to be utilized only during emergencies when other administrative accounts are not working. These accounts should only be used for emergencies and not logged into during any other time. Azure AD sign-in logs should be monitored to ensure that these accounts are not being used. There should be a minimum of two break glass accounts.
In terms of conditional access at least one of the break glass accounts should be excluded from MFA and should be excluded from all conditional access policies.
One thing to consider to ease the implementation of Conditional Access Policies is the use of Log Analytics and KQL. The first step is to move your Azure AD logs to Log Analytics. Then you can start using Kusto Query Language (KQL) to filter the logs to find any potential issues, such as service accounts which may not work well when interrupted by a required actions such as MFA, that is imposed by a Conditional Access Policy. However, prior to doing this you will need to create the Conditional Access Policy in Report only mode. Then based on the analysis of the logs you may decide to add exclusions to your policy. Then once you have added the appropriate exclusions you can change the policy to the On state.
Multifactor Authentication is a strong authentication method that can be leveraged to enhance the security of identities. MFA can use authenticator apps such as Microsoft Authenticator, Phone Calls, and SMS. Passwords by themselves do not provide a high level of security. This is due to the many problems associated with passwords. Since users must remember passwords for so many services including personal services, users end up using the same password across services. So, if a user uses the same password for a social media account as they do for the work account, this is problematic. This is problematic because if the user’s social media account is compromised then their work account is effectively compromised.
There are various strategies for leveraging MFA. Some organizations MFA every login. The issue with this is that it can become very tedious for the user. This is assuming you are not leveraging Windows Hello for Business. WHfB authenticates a user and sends an MFA claim. This is a great solution as MFA is transparent to the user. A more common approach is to use MFA for untrusted scenarios. For example, if the user is not on a trusted network, or is not a managed device. However, a common Zero Trust approach is to use Identity Protection to determine whether the application access should require MFA. For example, if the user is at high risk, they are forced to MFA.
Identity protection determines the risk of the User or the Sign-in. Identity Protection determines risk by characteristics of the authentication, such as location or OS. Identity Protection also accounts for behavioral characteristics such as impossible travel, unlikely travel, and access from previously not used locations. In addition, Microsoft through its analytics and telemetry data can determine if an account has been compromised or the user’s password has been exposed.
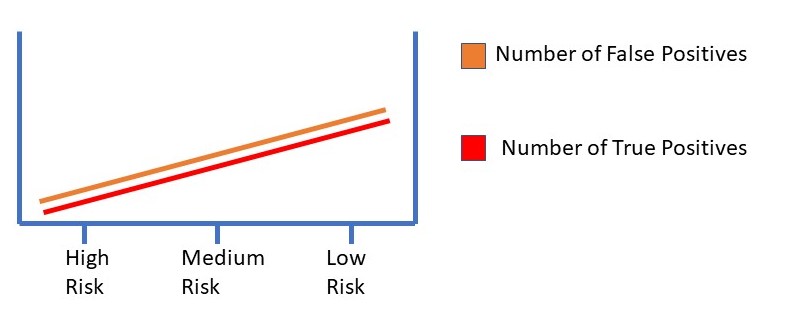
For Identity Protection there are 3 settings high risk, medium risk, and low risk. As you make your decision on what policies to enable it is important that you have a better understanding of the differences in the implications of these risk levels.
High Risk is going to have a very low False Positive Rate. The implication is that if a user or sign-in is identified as high risk that it is very, very likely that the account or sign-in is compromised. However, the downside/trade-off to this precision is that true positive rate is lower. Which basically means there are users and/or sign-ins that are compromised but have not been detected.
So, when you leverage the High or Medium Risk scores the False Positive Rate is going to be higher. In other words, more accounts or sign-ins that are identified as compromised will in fact not be compromised. However, what you gain from these settings is a true positive rate. So, again in other words, it identifies more accounts that are compromised than with the high-risk settings.
Some applications use legacy authentication methods such as basic authentication and ActiveSync instead of Modern Authentication. Some examples are Exchange Online (EXO) and SharePoint Online (SPO). These applications can use modern authentication, but require a process to eliminate legacy auth. For example, legacy authentication for EXO typically happens when using older mail clients. Newer clients such as Outlook can use Modern Authentication. For SharePoint there may be applications that interact with SPO that use legacy authentication. Those applications or services need to be determined. Then those apps should be updated to use Modern Authentication.
Conditional access can be used to block legacy authentication. It is recommended to block legacy authentication. However, as mentioned above removing legacy auth will require proper planning and a process to ween applications off it and move it to modern authentication.
Terms of use allow you to present an Acceptable Use policy or notice to the user. The user then must acknowledge the text before they can continue to the application. Terms of use are used to present a written policy to the user, prior to the user accessing the application. The Terms of use can be a block of text or for longer policies a PDF file can be displayed to the user.
In addition, user acceptance of the Terms of use is tracked. The terms of use documents are shown inline in the browser. And expiration and re-acceptance periods are configurable
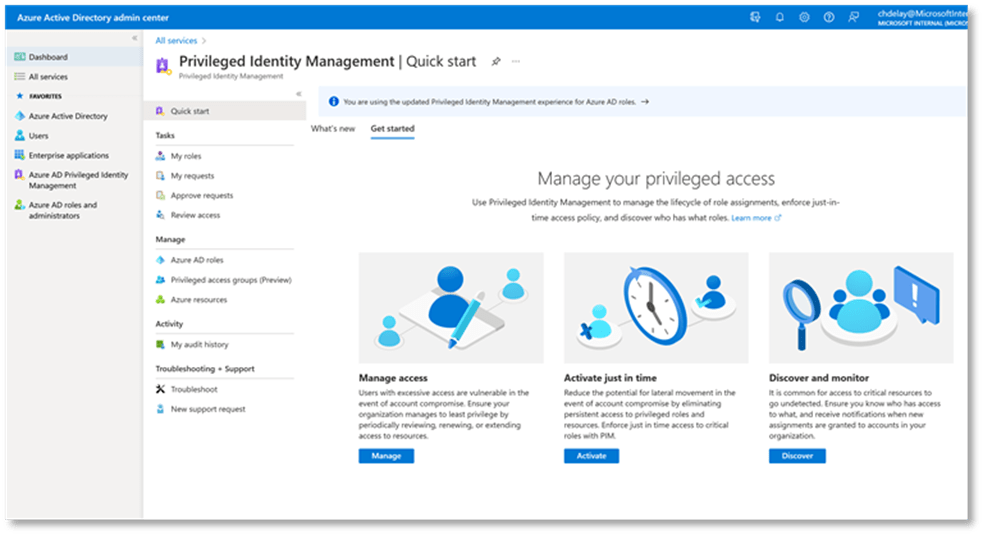
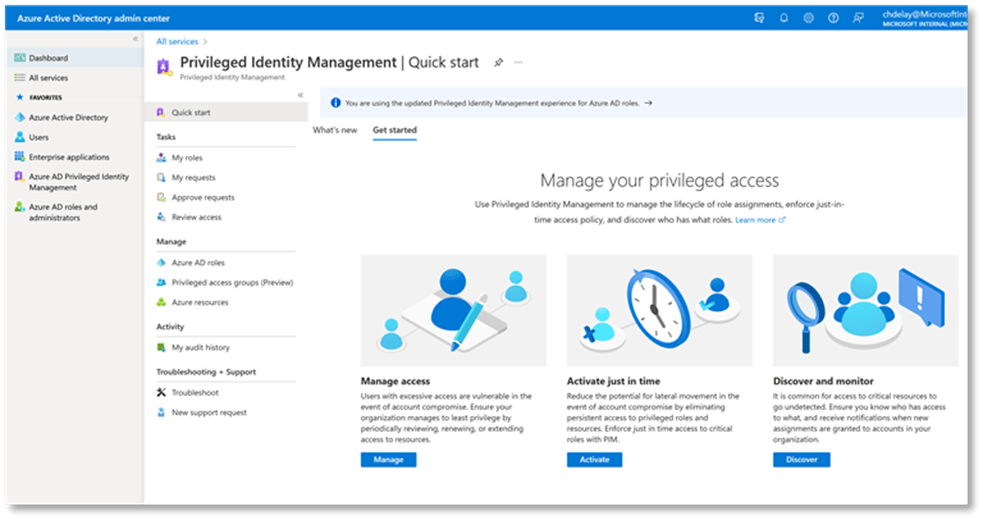
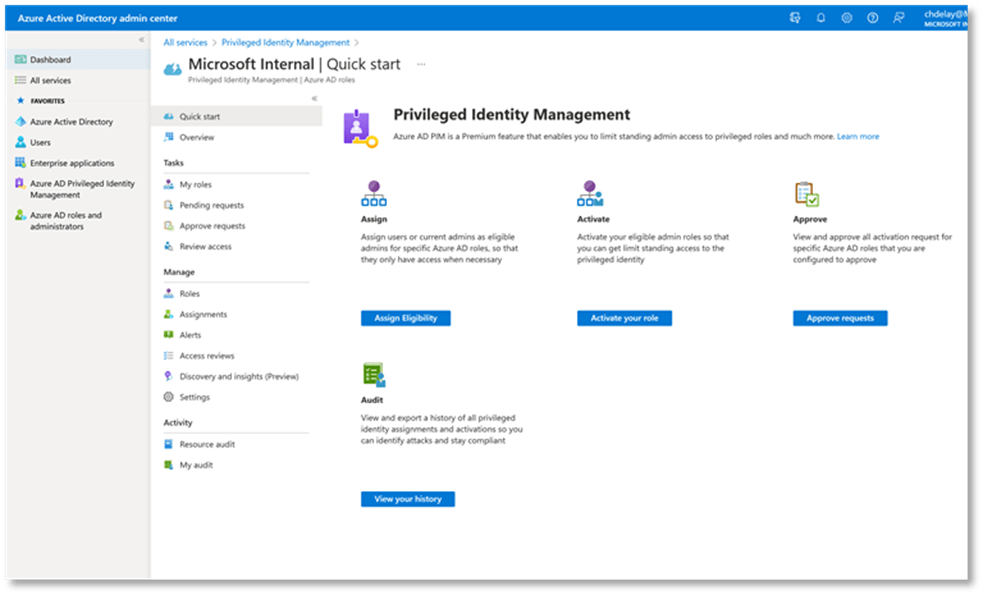
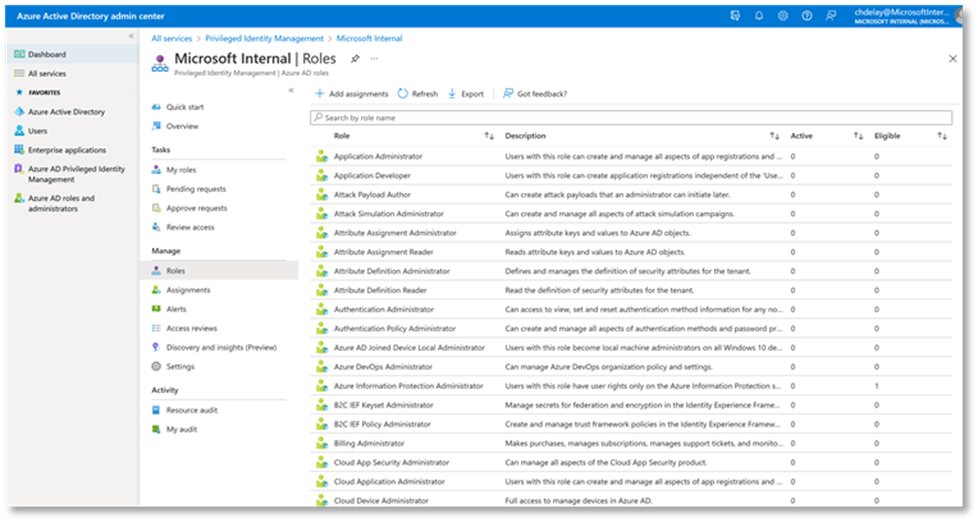
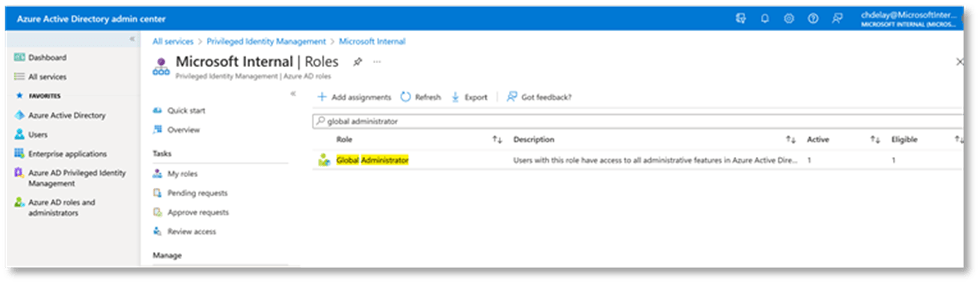
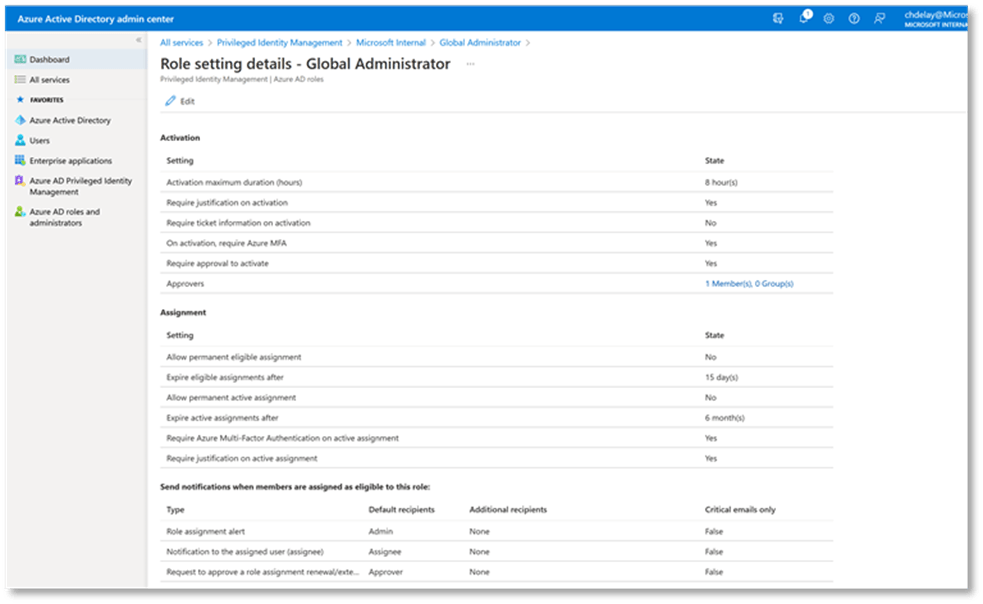
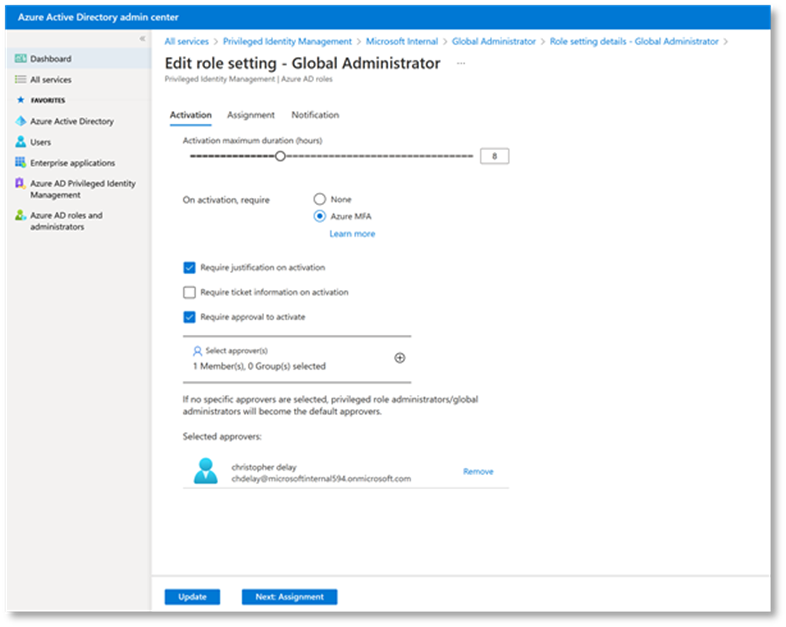
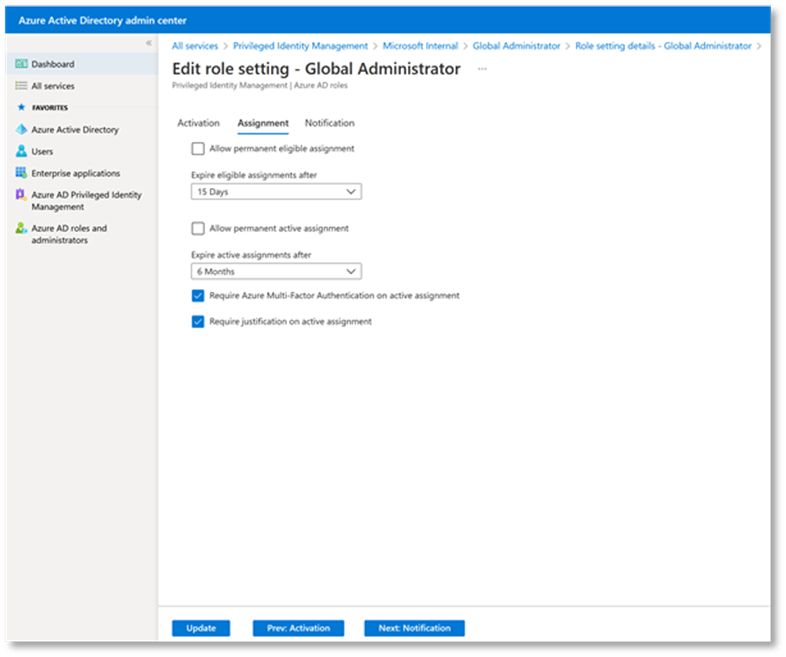
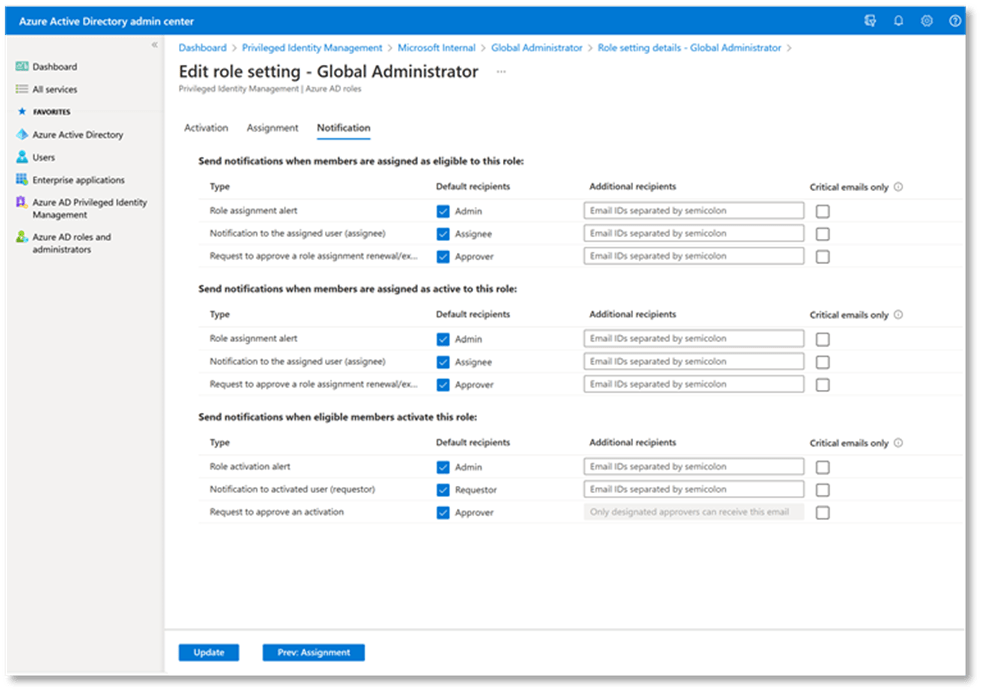
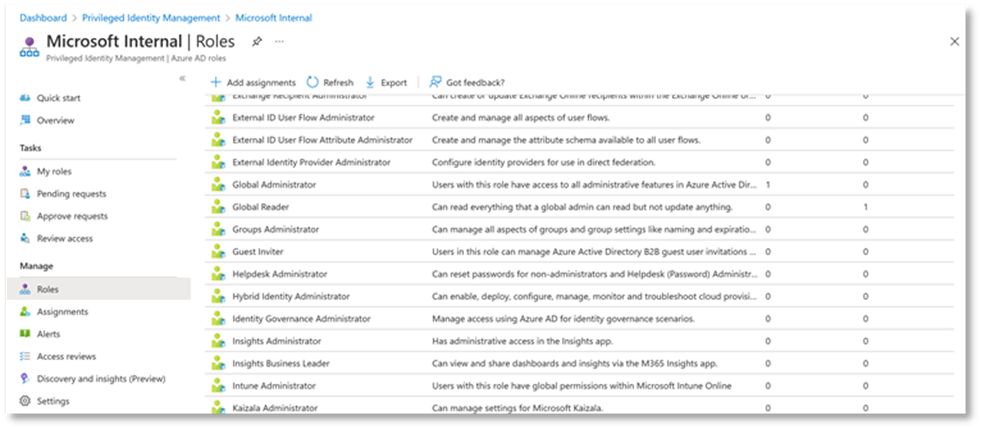
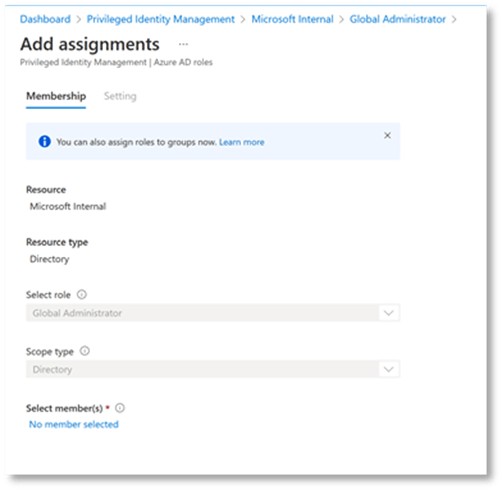
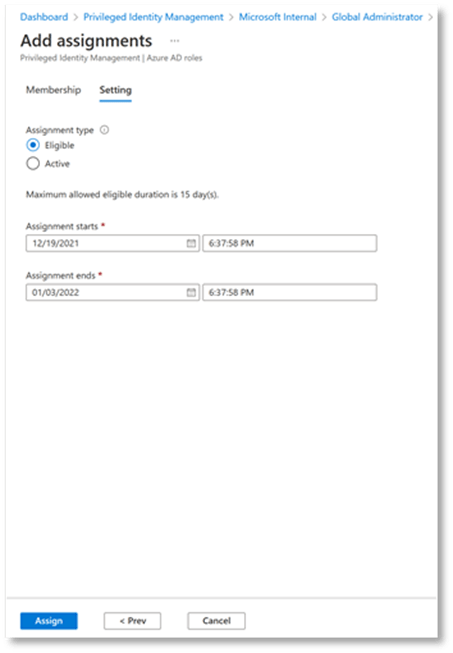
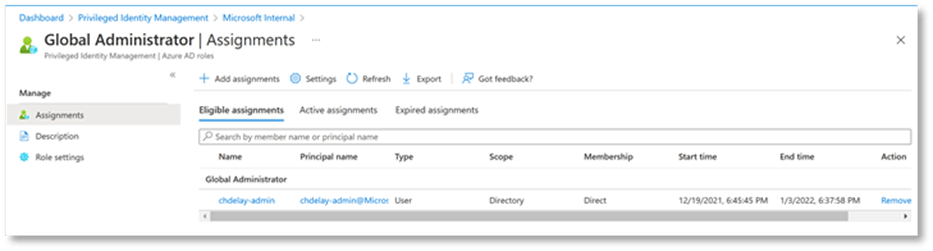
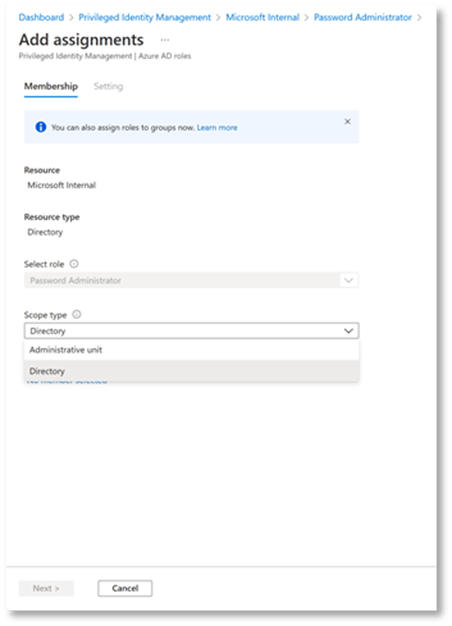
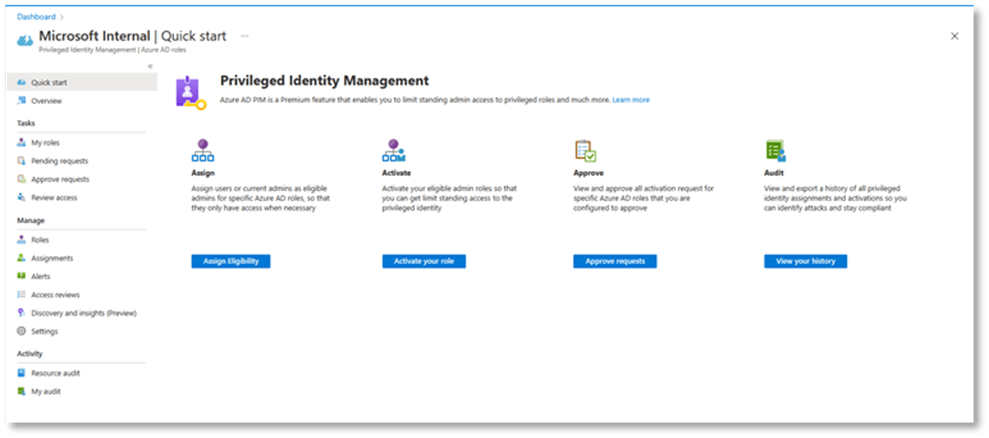
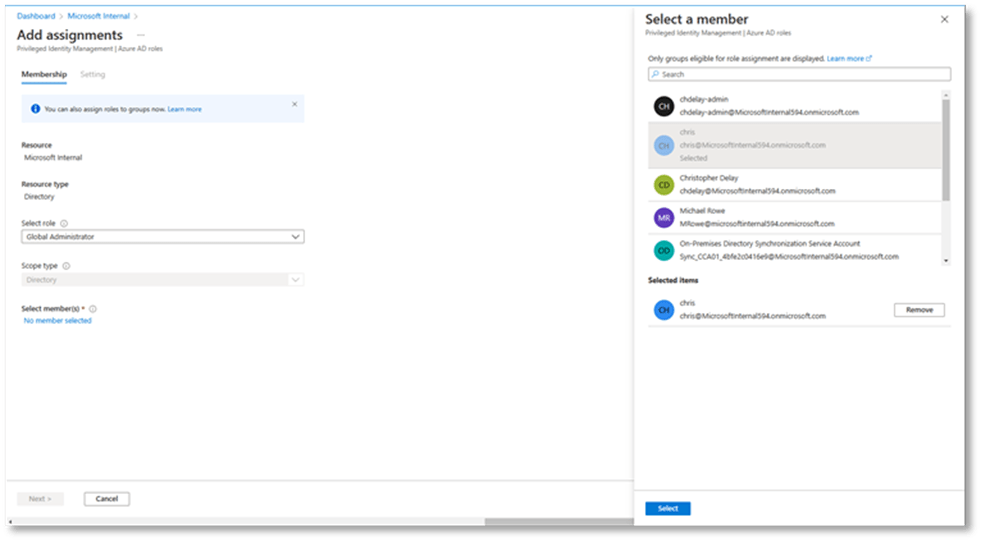
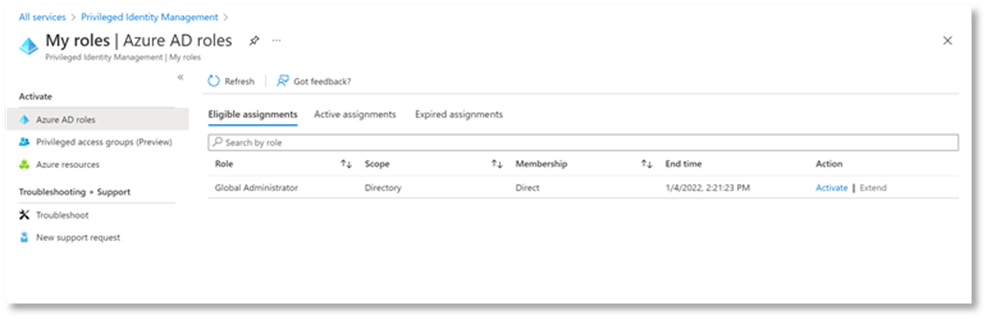
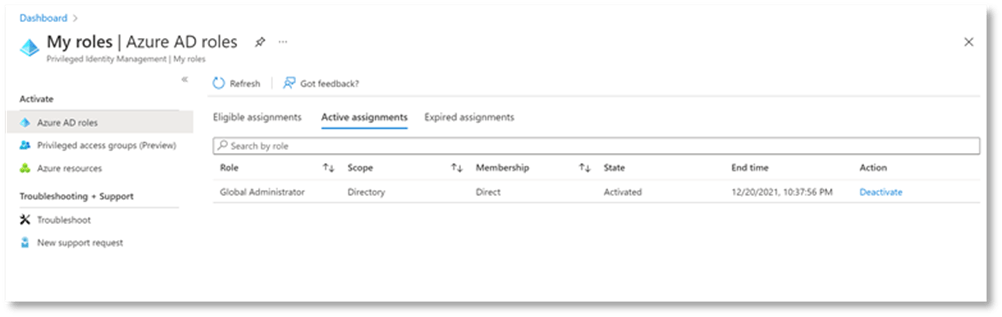
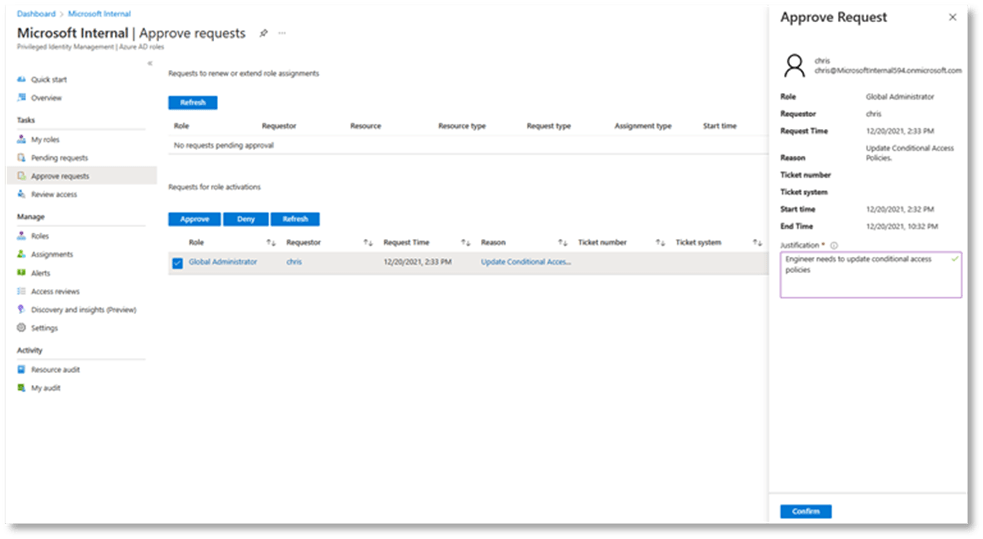
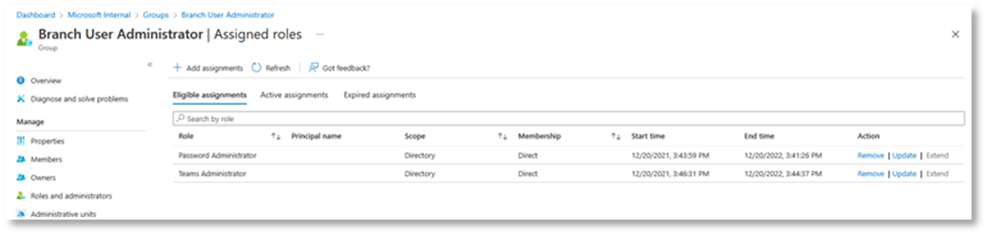
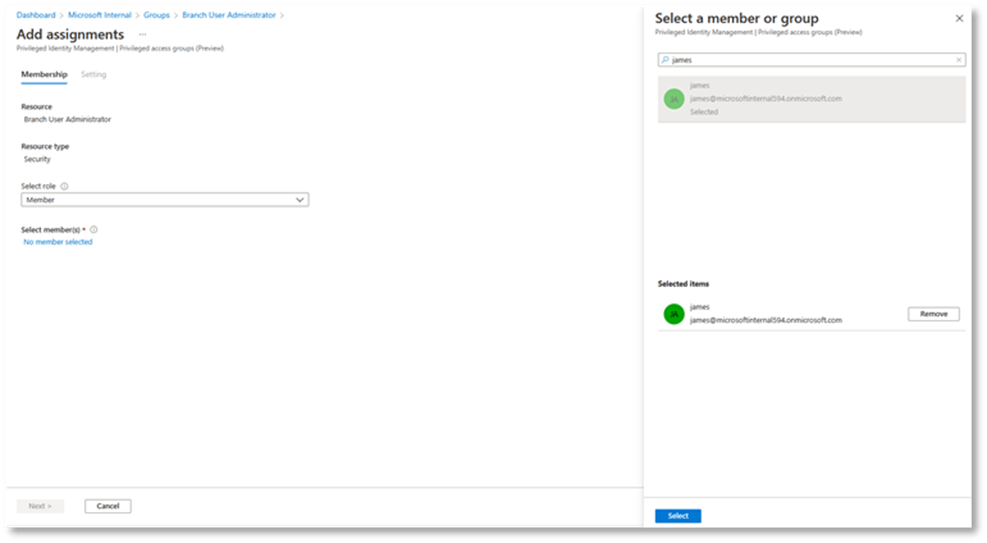
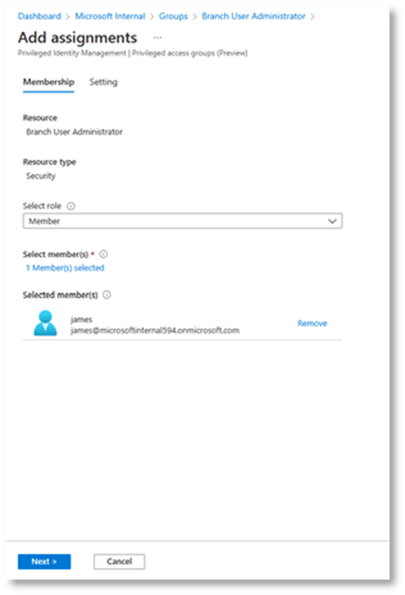
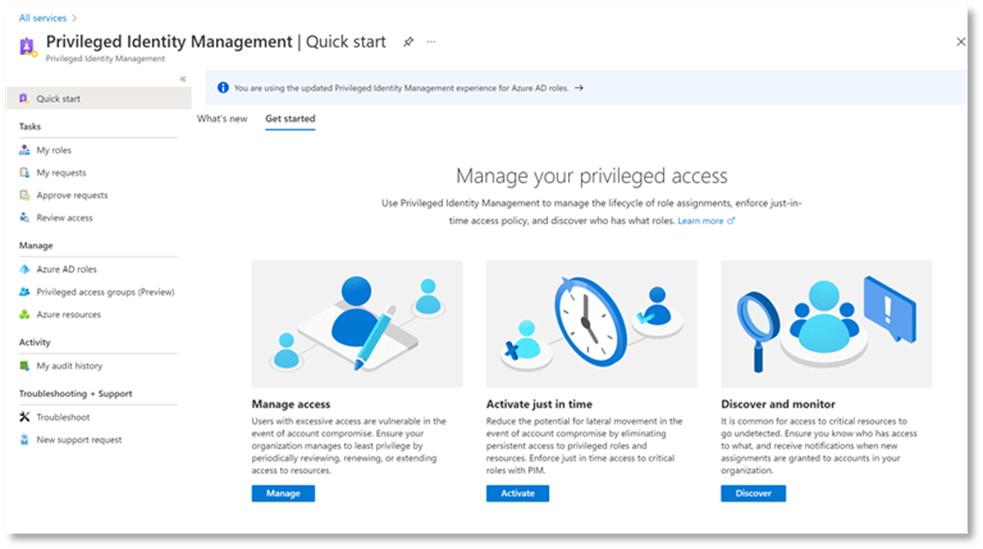
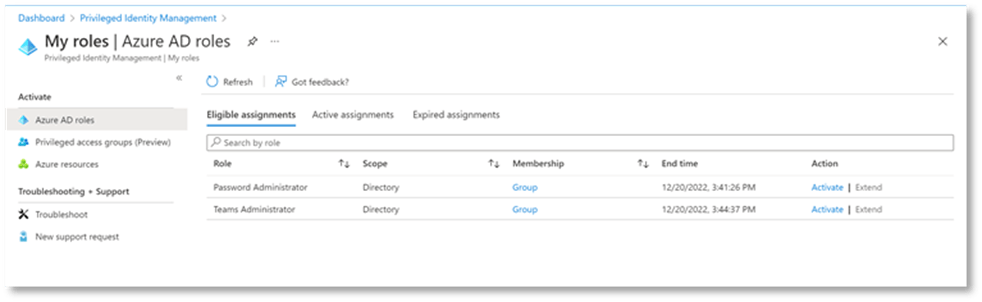
Privileged Identity Management (PIM) is a tool that allows you to securely manage Privileged Identities in Azure. PIM allows you to assign which users are allowed to elevate to Privileged Roles. Elevation can be time bound, limiting the time that those accounts are elevated. Elevation can require approvals, which provides control over when elevations occur. Additionally, there is strong auditing and reporting on elevations, approvals, and assignments.
The primary goal with PIM is to limit the time that accounts are elevated to a privileged role. The less time that a user is elevated the less time it is available to be used by an attacker if compromised. Generally, most organizations start using PIM with Global Administrator and slowly expand the number of accounts that are covered by PIM.
You have two options for the types of accounts you use for administrative/privileged accounts in Azure and Azure Active Directory. You can use synced accounts, which are accounts synced from an on-premises Active Directory. Alternatively, you can use cloud only accounts. These accounts are accounts that exist only in Azure. The use of synced accounts for privileged roles should be avoided. The reason for this avoidance is that if the on-premises account is compromised and that account is a privileged account in Azure AD, then Azure AD will be compromised as well. If using synced accounts is necessary for your organization, consider using cloud accounts just for the Global Administrator role.
Access Reviews is a tool that can be used for reviewing membership in a group and membership in a privileged role. It can also be used to review application access. One of the issues with trying to maintain the least privilege is removing users from a privileged role after they have moved on to a new job or left the organization. Additionally, users as they move from role to role may over time be added to more and more privileged groups without ever being removed from a previous role. Maintaining the hygiene of user’s access can be challenging, especially if attempted to be done manually. Access Reviews can be setup and run periodically. Access Reviews can be used to determine whether a user should still be in a group or a privileged role. Then if the user no longer needs to be in that role, they can be manually or automatically removed.
Access Packages is a tool for entitlements management. It is used to provide access to a user. For example, let us use an HR generalist as an example. That role may require membership in certain groups and require access to a set of applications. You can setup this role in Azure AD. Then when an employee is hired in an HR generalist role, they can request access to an access package. The reviewer for the access package can then approve/deny access to the access package. Types of access that can be managed by access reviews are:
Membership of Azure AD security groups
Membership of Microsoft 365 Groups and Teams
Assignment to Azure AD enterprise applications, including SaaS applications and custom-integrated applications that support federation/single sign-on and/or provisioning
Self Service Password Reset is self-explanatory. SSPR allows users to reset their password if they have forgotten their password. It allows self-service, which minimizes help desk costs. It can be used with both cloud and synced accounts. SSPR can require up to 2 methods of verification.
The following methods can be used for verification/authentication: Microsoft Authenticator app notification, Microsoft Authenticator app code, email, phone, or security questions. There are pre-configured questions that can be used, and the organization can create their own custom questions as well.
Azure AD Password Protection is a security tool that prevents users from changing their password to an easily guessable or commonly known password. Azure AD Password Protection can add this protection to both Azure AD and on-premises Active Directory accounts. There are two password lists that are used to provide this protection. The first in a Global banned password list. This is a list that is maintained by Microsoft. The second is a custom banned password list that is maintained by your organization. For the on-premises protection there are some lightweight components that need to be installed. The password lists are updated periodically to keep the domain controller’s policy up to date. This is done without exposing Domain Controllers directly to the internet.
Azure Password Protection also includes a feature named Smart Lockout:
Smart lockout helps lock out bad actors that try to guess your users’ passwords or use brute-force methods to get in. Smart lockout can recognize sign-ins that come from valid users and treat them differently than ones of attackers and other unknown sources. Attackers get locked out, while your users continue to access their accounts and be productive. https://docs.microsoft.com/en-us/azure/active-directory/authentication/howto-password-smart-lockout
Azure supports 3 methods of Passwordless: Windows Hello for Business (WHfB), Microsoft Authenticator, and FIDO2 security key.
Windows Hello for Business (WHfB) is a strong authentication method that leverages Windows Hello for authenticating the user. Methods for authenticating are facial recognition, fingerprint, or PIN. WHfB provides an MFA claim when authenticating to Azure AD. Therefore, it is a seamless method of MFA.
Microsoft Authenticator is an authenticator app. It is used to prompt the user when they authenticate. Acknowledging the prompt communicates to Azure AD that the user is in fact the source of the original authentication.
FIDO2 security key leverages a public/private key pair and is typically used in conjunction with a biometric authenticator such as fingerprint. When the user attempts to authenticate they are sent a challenge. The challenge is signed with the private key on the FIDO2 device. Typically, the user must submit their thumbprint or perform some task to acknowledge they are the source of the authentication.
There are two features that enhance B2B with greater controls. These two features are Cross Tenant Access Policies (XTAP) and Tenant Restrictions. Cross Tenant Access Policies provide the following features:
Inbound Controls – Allows admins to define tenants from which users are allowed to be invited. This can also be scoped to a group in an external tenant.
Inbound Trust Settings – Allows admins to accept MFA, HAADJ, and Compliant Device claims from external tenants which can be used to satisfy Conditional Access policies.
Outbound Controls – Allows admins to control what external tenants their users are allowed to authenticate to. This can be scoped on a per user/group basis.
Tenant Restrictions – allows admins to control the external accounts used on their network. This can be scoped by app, group, and user on a per-foreign-tenant basis.
Log Analytics is a tool in the Azure portal used to edit and run log queries with data in Azure Monitor Logs. You may write a simple query that returns a set of records and then use features of Log Analytics to sort, filter, and analyze them. Or you may write a more advanced query to perform statistical analysis and visualize the results in a chart to identify a particular trend. Whether you work with the results of your queries interactively or use them with other Azure Monitor features such as log query alerts or workbooks, Log Analytics is the tool that you’re going to use to write and test them.
Workbooks allow you to create visualizations of data collected in Azure. Typically, the data that is visualized comes from logs and Log Analytics. Azure AD has several workbooks already created.
Kusto Query Language is a powerful tool to explore your data and discover patterns, identify anomalies and outliers, create statistical modeling, and more. The query uses schema entities that are organized in a hierarchy similar to SQL’s: databases, tables, and columns.
It is tremendously important that at least some of your IT staff be trained in KQL. This will make it much easier to implement many of these technologies. For example, let us take Identity Protection. When you roll out Identity Protection, it will be initially rolled out initially it will be in report only mode. You can then use KQL to query the logs to see what applications or service accounts might not work well with Identity Protection. You can also use it to validate that Identity Protection is behaving the way you expect. However, first your logs must be sent to Log Analytics.
Microsoft for Identity is an important tool for protecting your on-premises identities.
Microsoft Defender for Identity (formerly Azure Advanced Threat Protection, also known as Azure ATP) is a cloud-based security solution that leverages your on-premises Active Directory signals to identify, detect, and investigate advanced threats, compromised identities, and malicious insider actions directed at your organization.
Defender for Identity enables SecOp analysts and security professionals struggling to detect advanced attacks in hybrid environments to:
Monitor users, entity behavior, and activities with learning-based analytics
Protect user identities and credentials stored in Active Directory
Identify and investigate suspicious user activities and advanced attacks throughout the kill chain
Provide clear incident information on a simple timeline for fast triage
Early on in the journey, most organization adopting Azure AD start with Trusted Locations. In other words the organization will require the authentication to originate from a trusted location. A trusted location is based on IP addresses. So, Conditional Access is used to require this. There are Named Locations that can be created. Normally, those Named Locations are associated with the IP addresses that originate from the corporate network.
There are limitations to this approach. The limitation is that all this does is allow authorization to a user coming from a particular IP address. Since, this is just based on IP address, the state of the machine is not evaluated. With a Zero Trust approach you want to validate that the authentication is coming from a managed machine. A managed machine has policies applied to it, to help harden the device, and make it more sescure. However, ultimately you want to only allow devices that are evaluated for their risk level, and are evaluated for their compliance to policies.
The first way is to use Filter for Devices. You can use Filter for Devices to require Hybrid Azure AD Joined devices, Azure Joined Devices, and Compliant devices. Compliant devices is the only one of these options that provide real time status of the device.
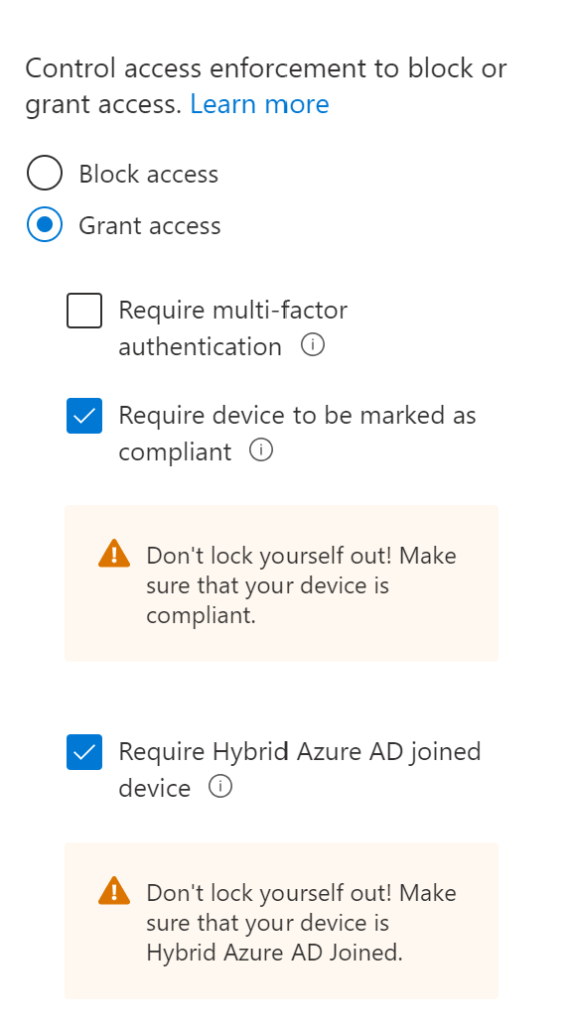
The second way is to use Grant controls. There are two Grant Controls associated with this: Require device to be marked as compliant and Require Hybrid Azure AD joined device. Require device to marked as compliant is the preferred control as it gives real time compliance status of the device. However, as you adopt the cloud model, there will be a period of time where not all machines are managed by Intune. So, to help bridge that time you would use both compliance and Hybrid Azure AD joined. So, policies would be configured to require either one of those configurations.
Intune management of all devices is the desired end state. The reason for this is that Intune compliance can be used to validate the secure configuration of the device. So, preferably Hybrid Azure AD Joined devices, Azure AD Joined device, and Azure AD registered devices, would all be managed by Intune.
Implement Compliance Polices to enforce:
OS and Patch Level
Disk Encryption
Password Policy
Firewall
Anti-Virus
Anti-Spyware
And in conjuction with Microsoft Defender for Endoint (MDE), the real time risk of the device can be evaluated.
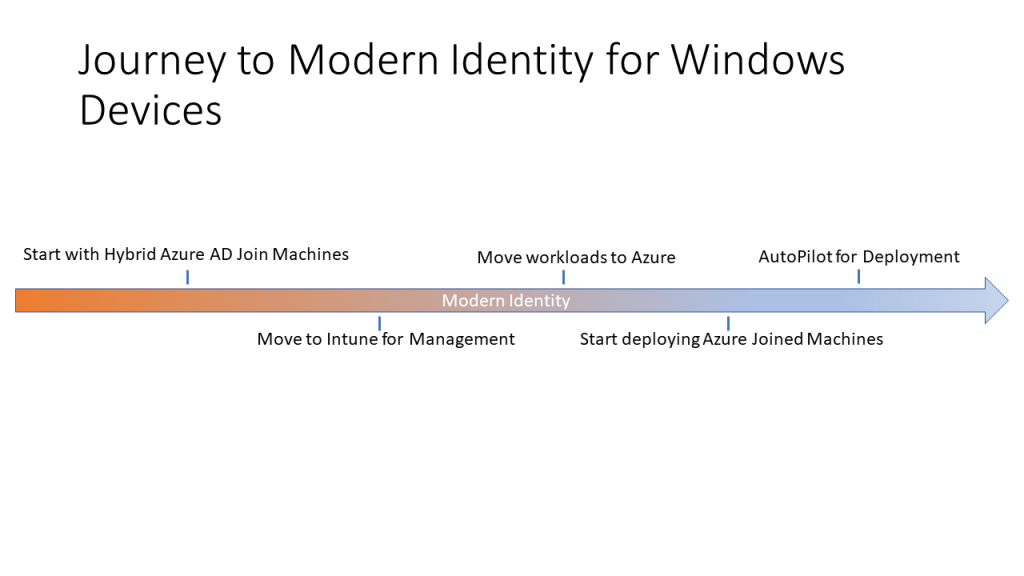
As mentioned above there is a journy that begins with Hybrid Azure AD Joined devices and continues through moving to Azure Joined Machines.
As organizations adopt Azure they need to a starting point. And that starting point is Hybrid Azure AD Joined devices. Hybrid Azure AD Joined devices are devices that are joined to both on-premises Active Directory and Azure Active Directory. So, to get to this first state the devices that are joined to on-premises AD need to be joined to Azure AD. This is accomplished by configuring Azure AD Connect.
The next step in the journey is to moving all devices to be managed by and report their compliance status to Intune. This is an important step for Zero Trust as getting real time compliance and risk data is important for maintaining the security of your environment. While Hybrid Azure AD Joined devices may be managed by Group Policy, there is typically no method in place to report compliance to those policies. Moving to Intune allows you to not only monitor compliance to those policies but in combination with MDE can be used to identify risk. An important aspect of moving to Intune is to transition your Group Policies to Intune policies. So, you will need to map your policies as close to Intune policies as you can. Keep in mind this policy migration process is a great oppurtunity to get rid of policies that are no longer necessary or particularly useful.
As we move along the journey the next step would be to move workloads to Azure or the cloud. This is especially true for workloads that are commonly used by desktop clients. Some common scenarios are moving File Shares to OneDrive, Exchange to Exchange Onlne (EXO), and SharePoint to SharePoint Online (SPO).
Once workloads are moved to Azure, then you can start considering moving to Azure Joined devices. Keep in mind that Azure Joined devices can still work on-premises. Those machines can continue to leverage Kerberos and NTLM for authentication to application that are on-premises and only support legacy authentication.
Usually inline with moving to Azure Joined devices it is common to move to AutoPilot for deployment. AutoPilot eases deployment. It allows you to ship a new device to a user, they connect it to the network, login, and it gets setup with the settings and applications that are necessary for them to work.
The journey above can be separated into a number of journeys and those journeys can be used to hep plan your deployment of each of these technologies. Those journeys are detailed below:
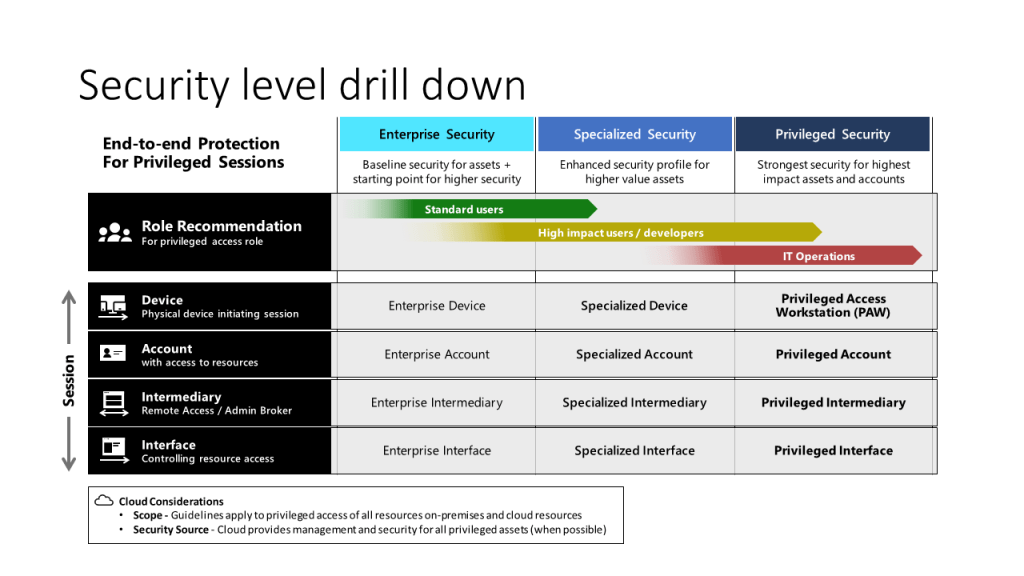
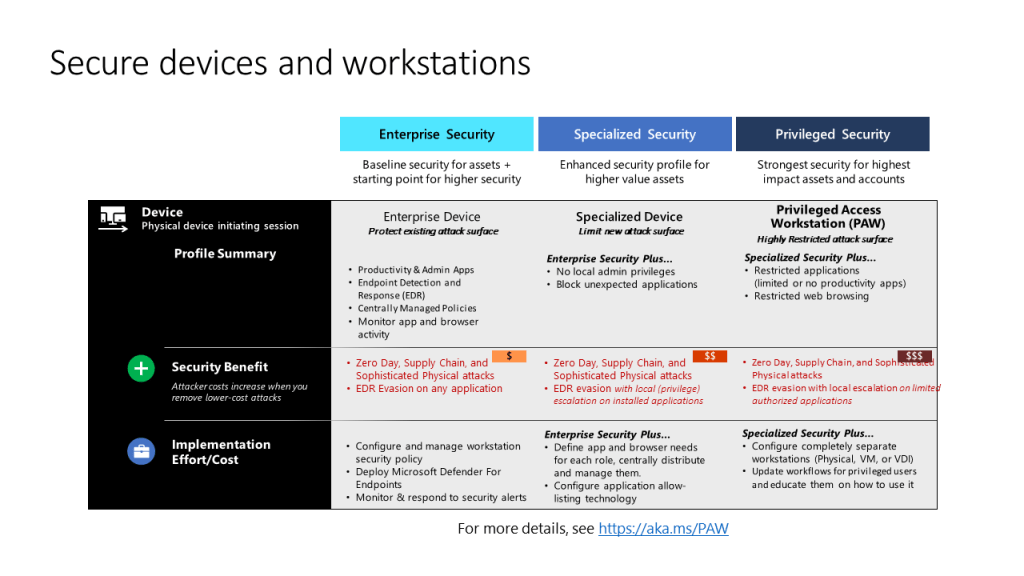
Enteprise Access Model is a model for securing Devices, Accounts, Intermediaries, and Interface. For the purpose of this dissussion we will be focusing on devices.
As seen in the graphic below, devices are logically separated into 3 categories: Enterprise Security, Specialized Security, and Priviledged Security. The Enterprise Security would be an ordinary users workstation, Specialized Security would be for a user that has additonal privileges or access, and Privledged Security would be for a user that uses a Priviledged account to perform administration, or has access to very sensitive data.
As illustrated in the graphic below, as you move to the right additional security controls are applied. Additonally, as you move to the right, the cost of securing those machines goes up, as additional security tools and specialized administration will be required. And finally, as you move to the right the security becomes more burdersome on the user. Fore example, a user that is on an Enterprise Security machine will be able to browse the internet, while a user on a Priviledged Security machine will only be able to access internet sites that are used for administration, such as the Azure Portal.
When it comes to Zero Trust and especially the controls around applications many of the controls control data as well as applications. The two are closely linked as the pupose of application is to view, create, and interact with data.
For securing applications and implementing Zero Trust conditional access provides a number of tools in combination with other technologies. Conditional Access can be used in conjuction with the Mobile Application Management (MAM) tools available in Intune to protect applications and data. In addition, Microsoft Defender for Cloud Apps (formely known as Cloud App Security) can be leveraged through conditional access to protect applications and data.
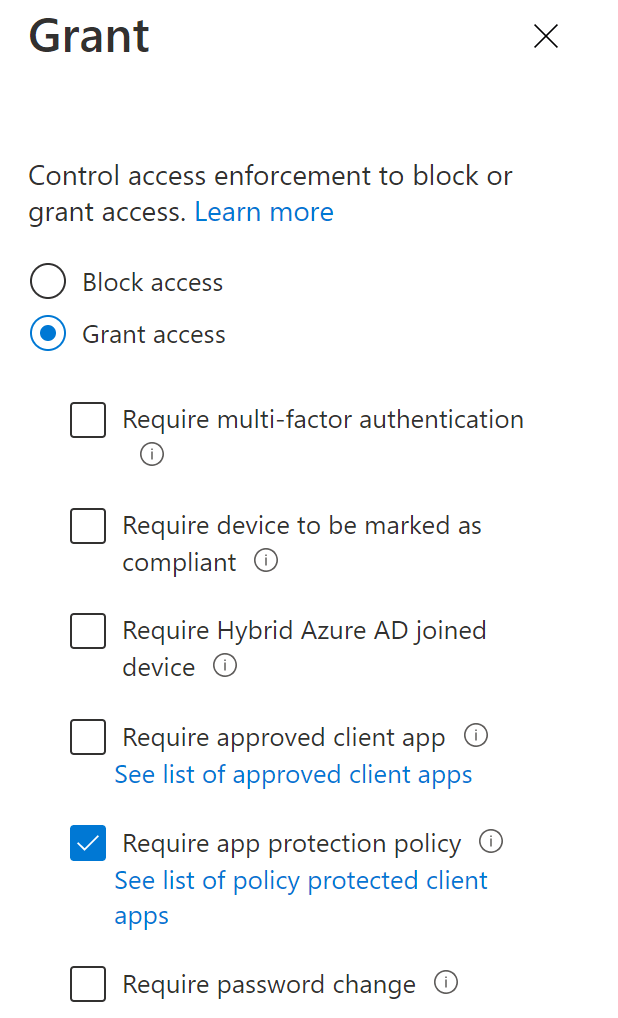
App Protection Policies are a component of Intune Mobile Application Management. Application Policies are used to enforce rules on applications that in turn protect data. Below are the controls that can be implemented via App Protection Policies:
Prevent backups of corporated data
Prevent saving copies of cororate data
Control transferring corporate data between apps
Control the sources from where applications can open data
Resrict cut/copy/paste
Encrypt corporate data
Restrict printing of corporate data
Require PIN to access application
In addition App Protection Policies can implement Conditional Launch. Conditional Launch can be used to prevent launching an app if:
The mobile devices does not meet a minimium OS levelr
The iOS devices is jailbroken
Device exceeds a predefined threat level
All of these tools in combination secure the data that is accessed by the application. In addition these tools prevent the launch of an application if the underlying platform is not in a healthy state.
Once the App Protection Policies are created they can then be implemented via Conditional Access Policies.
In addition to App Protection Policies, there are also a Conditional Access driven feature named Conditional Access App Control. Conditional Access App Control allows Microsoft Defender for Cloud Apps (previously named Microsoft Cloud App Security) to be used to secure applications and data. Microsoft Defender for Cloud Apps proxies the users connection to the application the user is accessing. Proxying the connection allows for inspection of the application data and allows controls and monitoring to be implemented.
Conditional Access App Control can be used to implemnent a Monitor policy, a block downloads policy, or a custom policy. In combination with the MCAS policy, the following can be accomplished:
Block Cut/Copy/Paste
Content inspection
Control downloads based on Classification, DLP, or Malware detection
Control uploads based on Classification, DLP, or Malware detection
Sensitive files are stored in a number of locations within an organization. Files are stored in SharePoint, on file shares, and on devices. Due to this there are a variety of tools that can be used to discover these sentitive files.
Information is classified based upon the contents of the file. Examples of classification are High Business Impact, Medium Business Impact, and Low Business Impact. Such an example of classification can be based upon a number of factors including the disruption to the business if the information was made widely available.
Labelign is adding tags or labels to documents that indicates the classification level of the document. This labeling is important for several reasons. The first is employees can be trained on how to handle each level of classification, and based on the labeling how to properly handle the labeled documents. In other words, labeling communicates the classification level of that document.
Data that is labeled then needs to be protected. One level of protection is by employees knowing how to properly handle data. For example, an employee should know to protect customer data from exposure. In additoin there are software tools that can enforce protection. For example Azure Information protection can scan for documents and label them based upon their contents. More importantly, AIP can encrypt documents to prevent unauthorized access to the documents.
It is important to segment resources in the network. Let us take for example a web site. A web server is segmented from the internet with a Firewall typically. Of course the data for the website comes from another resource server, typically a SQL server. The Web Server can connect to the SQL server to access the data, however the client that is loading the web page cannot, that is because the SQL server is segmented from the Client and the Web Server. In, addition the Web Server does not have unfettered access to the SQL server. The Web Server can retrieve data from the SQL server over a port such as 1433, however, it cannot connect to an RDP port like 3389.
In total, this is the concept of segmentation and requires planning to implement properly. Some common tools for implementing segmentation in Azure is Network Security Groups and Azure Firewall.
Bastion Host
In my previous example I mentioned RDP. RDP is a technology to connect to the desktop of a server or client remotely. Many organizations still manage servers via Remote Desktop. When you have Virtual Machines in Azure you may manage them via RDP. However, from a security perspectve you would not want to make RDP for your servers available directly on the internet. To allow you to manage your servers with RDP, but to still do it a secure manner there is a feature named Bastion Host. Bastion Host is essentially a web page that is accessed via the Azure Portal that provides an RDP session. So, the system admin logs into the Azure Portal, accesses the Bastion Host webpage over TLS, and then that service connects to RDP on the server. This allows secure administration via the internet, without making RDP directly over the internet.
Azure Firewall
Azure Firewall is a network firewall that provides protection for Layers 3 through 7 of the OSI model. It can be used to secure entry points to networks and Virtual Networks in Azure. Azure Firewall has a Premium SKU which adds additional features for finding and blocking malicious traffic.
Network Security Groups (NSG)
Network Security Groups allow or deny traffic to a Virtual NIC, Subnet, or Virtual Network. NSG rules can be created to allow or deny traffic from the Internet, VNETs, or Azure services. Like many firewalls the NSG rules for traffic end with a deny all rule. So, if network traffic is not specifically allowed with a rule that has a higher priority (lower priority number) then the traffic is blocked.
Azure Web Application Firewall
Azure Web Application Firewall is a service that protects your web applications from attacks and malicious activity. Azure Web Application Firewall works at Layer 7 of the OSI model. For example, Web Application Firewall has protections for the Open Web Application Security Project (OWASP) Top 10. For example the OWASP Top 10 vulnerabilities for 2021 are the following: Broken Access Control, Cryptographic Failures, Injection, Insecure Design, Security Misconfiguration, Vulnerable and Outdated Components, Identification and Authentication Failures, Software and Data Integrity Failures, and Server-Side Request Forgery. https://owasp.org/Top10/
Azure Web Application Firewall can be used to secure traffic passing through Azure Application Gateway, Azure Front Door, and Azure Content Delivery Network (CDN). Azure Application Gateway is a regional load balancing solution for Web applications. Azure Front Door is a global load balancing solution. Azure Front Door recieves traffic at an endpoint that is local to the user and then uses high bandwidth backend services to deliver traffic back and forth to the Web Application. This leads to lower latency and a better experience for the client. Azure CDN is Microsoft’s implementation of a CDN. A CDN is to provide highly available and local access to static content, such as images and videos. A CDN leverages caching on servers around the globe to provide quick access and low latency to the client accessing the static content.
Aside from segmentation and encryption there are additional security considerations, especially from a Zero Trust perspective. Zero trust is about being able to proactively identity and prevent threats, this is accomplished by constantly evaluating the health of the network and network traffic.
Distributed denial of service (DDoS) attacks are some of the largest availability and security concerns facing customers that are moving their applications to the cloud. A DDoS attack attempts to exhaust an application’s resources, making the application unavailable to legitimate users. DDoS attacks can be targeted at any endpoint that is publicly reachable through the internet.
Azure DDoS Protection Standard, combined with application design best practices, provides enhanced DDoS mitigation features to defend against DDoS attacks. It is automatically tuned to help protect your specific Azure resources in a virtual network. Protection is simple to enable on any new or existing virtual network, and it requires no application or resource changes.
Zero Trust for Infrastructure is the remaining pillar of Zero Trust. Infrastructure refers to the workloads that are hosted in Azure, or even othe cloud services. These workloads include Virtual Machines, Containers, and SQL.
Implementing Zero Trust for Infrastructure includes: Secure Dependant identity systems, Establish a platform security baseline, Harden service communications, Secure administrative access, and Monitor for anomolous behavior.
Secure dependent identity systems
Identity is the new security boundary. And ultimately if Identity and Identity systems are not secure, securing workloads to some degree will be ineffective. This includes securing identity systems such as Active Directory and Azure Active Directory. Imlementing the Zero Trust for Identity findings will assist in securing these systems. In addition, Identity Secure Score can be used to further secure Azure Active Directory: What is identity secure score? – Azure Active Directory | Microsoft Docs.
Establish a platform security baseline
Platform security baselines are critical to maintaining security. You need to be able to compare a current state to a previous state to determine if any, including malicious changes have been made to a system. In order to establish a baseline for Azure itself there are a number of tools that can be utilized. These include tools such as Azure Blueprints, Azure Resource Manager Templates, and Azure Policy. Azure Blueprints are used for the initial configuration of the management and can be composed of different building blocks including ARM templates, resource groups, and Azure Policy. Azure Resource Manager Templates are JSON files that define an Azure resource and can be used to deploy Azure Resources. Finally, Azure Policy are the rules for Azure, including what permissions are allowed, and what monitoring must be in place for a given resource. In addition, Azure Arc can be used to control configuration of Virtual Machines across cloud service, including Azure, Google Cloud Platform, and Amazon Web Services.
Harden Service Communications
Protecting data in transit is critically important for services that are accessible over the internet. This includes encryption for data security and signing for data integrity. TLS is the mechanism for securing service communications. TLS is implemented throughout Azure and Azure AD. Currently, Azure is being migrated to TLS 1.2. This migration is estimated to be completed in September 2022.
Secure Administrative Access
Controlling what users can modify services is an important aspect of maintaining a secure configuration of a system. Minimizing the amount of time that a given user has the privleges to change a system is critilcal as well. Administrative access can be secure in a number of ways. This include using Privileged Admin Workstations for privileged users. The accounts that are used for privileged administration should be cloud accounts, and not synced accounts. Privileged Identity Management should be used for provisioning privileged access. Users should elevate when required to use their privileges (JIT), and their elevatin should be time bout to limit the duration of their elevation. Finally, access to Virtual Machines should require JIT access.
Monitor for Anomlous Behavior
From a monitoring perspective you want to be able to detect changes to systems, including attempted changes. Specifically, you want to be able to identify attacks and threats to those systems. There are several tools for monitoring for Anomolous Behavior. Azure Arc has monitoring capabilities for many types of workloads including SQL, Kubernetes, and Virtual Machines. And these virtual machines can be on premises, in Azure, in GCP, or in AWS. Microsoft Defender for cloud plans has threat protection for a number of workloads including: Servers, App Service, Databases, Storage, Containers, Key Vault, Resource Manager, and DNS.
Zero Trust centers on the capability to continaully evaluate for risk. It also centers on the capability to use a risk determination to gate access to resources. Most of this capability is delivered through Conditional Access. However, there are still many tools and technologies that work with Conditional Access, such as Intune and Microsoft Defender for Identity.
Azure MFA is a very complex topic, but I’m going to attempt to cover it in one blog posting. Below is a brain dump of all the thing to think about when it comes to MFA, but I’m sure I’m missing something.
MFA Registration
Step-up authentication scenarios: These include Identity Protection, Privileged Identity Management, and I believe Authentication context.
Conditional Access
Secure defaults
Understanding when you are and are not prompted
MFA methods
Basic Terminology
This is for those that are new to IT or IT Security (or CyberSecurity which is the fashionable term these days). We all start somewhere. These are my definitions.
Authentication: Shorthand for authentication is AUTHN. This is the process of a digital identity proving that it is in fact that identity. For example, a user proving they are that are the user that is represented by a user account. The user typically proves this by entering a password. Keep in mind not all identities are users. There are many types of identities and different types of systems have identities. For example, Active Directory has user accounts, computer accounts, and managed service accounts.
Authorization: Shorthand for authorization is AUTHZ. This is the process of determining if an identity has permission to access a resource. This resource can be but is not limited to data and applications. Resources can be controlled by rulesets and Access Control Lists (ACLs).
Identity Provider (IDP): And IDP provides authentication services. In other words, it authenticates identities. To authenticate identities and Identity Provider maintains identities such as users.
So, what is MFA?
There are several different factors you can use when authenticating. And the source of those factors come from 3 places. Something you know, something you have, and something you are. The more of these that you use to authenticate the more secure the authentication will be. And what we mean by secure is that the IDP authenticating you has a higher confidence that it is you based on how and the number of ways that you authenticate. Keep in mind some authentication methods may use more than one authenticator. For example, if you use a smart card to login, it uses something you have (smart card), and something you know PIN. Anyways, here are some common authenticators:
Factors
Something you know
Examples: Password, PIN, answer to a security question
Pros: Easy to manage, does not require any additional hardware or software
Cons: Can be stolen or compromised
Something you have
Examples: Smart Card, FIDO 2 Key, Windows Hello for Business enabled laptop, Authenticator app
Pros: Less likely to be stolen or compromises. Usually, they require a second factor. For example, FIDO2 keys usually require a PIN of fingerprint, WHfB requires a PIN or biometric, Authenticator app requires you to unlock your phone, and so on.
Cons: More complex to manage due to the fact that there is hardware that must be distributed and maintained. Also, processes must be in place to replace lost or stolen devices.
Something you are
Examples: Fingerprint, facial recognition, and retina scan
Pros: Management is minimal since the user is the authenticator. Also, it can be used across multiple devices.
Cons: Some people have a misunderstanding that their fingerprints or other biometrics can be stolen. Some support may be required for the enrollment process.
Why use MFA?
I can’t really express how important MFA is for securing authentication. MFA dramatically increases the security of authentication. And this is because it increases the confidence that the user is actually who they report to be. And once again this is because passwords are very commonly compromised. There are just so many attacks against passwords. Some ways passwords can be compromised:
Shoulder surfing: watching a user type in their password
Password re-use: For example, a user uses the same password for all their accounts. There is a password breach with one of their accounts due to weak security of the organization. Now the password for all their accounts is compromised.
Password breach: An organization stores passwords in an in-secure way or the password for a password vault is compromised. You see a lot of red team exercises where admins use a password vault that gets compromised. I have also seen passwords sniffed from chat conversations and also from authentications that do not use encryption. Active Directory Database being dumped can be another source of passwords for attackers. Rainbow tables can be used if you have a password database to determine the password.
Brute-force attacks: Guessing every possible password until you guess one that works. A lot of IDPs have throttles and account lockouts that make this type of attack less likely to succeed.
With WHfB you can of course sign in with a username and password. This is of course not considered MFA. However, there are some other options. You can use PIN, facial recognition, or thumbprint. One concern is that a PIN might be similar to a password. And it is not similar. A password is a shared secret that both parties need to have to authenticate the user. So, the server and the client both must have a copy of the password or a hash of the password for authentication to work. PIN is different because it is unique to the device and only authenticated on the device, which then uses it to unlock keys that can then be used for secure authentication.
Anyways, unless you are using username and password with a WHfB machine, then you are performing MFA. This means if you have conditional access policies that require MFA, MFA will be satisfied. The mechanics of course is a little more nuanced than this.
So, there are 3 types of tokens in the scenario that I am going to cover. A Primary Refresh Token which can be used to request additional tokens (access tokens). Refresh tokens which are usually application specific. So, an RT for Outlook can request an access token for Outlook. If a user attempts to access Outlook, the system will attempt to locate an RT for Outlook. If it has an RT, it will use the RT to request an AT. If it does not have an RT, then it will use a PRT to request an AT.
When you login with WHfB using an MFA method, the PRT gets the MFA claim added to the PRT. PRT is valid for 14 days and sign-in frequency is set to 90 days. However, if the user is active the PRT will continually be refreshed. Which means that if a user authenticates with a WHfB MFA method that claim will persist in the PRT until the 90-day mark. So, people being people, they get excited about this, and not in a good way. They feel that there is some degradation of security because the MFA claim persists. But this is borderline idiotic. Because even though the MFA claim persists in the PRT, that PRT is only associated with the MFA method. For example, if I login with fingerprint on a WHfB machine that MFA claim will persist in the PRT that is associated with fingerprint login. But so, what? The user is still going to use a fingerprint to login every time and so does it really matter whether the claim gets injected every time or persist.
Now to be fair there are situations outside of WHfB MFA where it will persist as well. So, username and password on a WHfB machine is not MFA. But if after I login I get prompted for MFA while accessing an application, I know have an MFA claim that can persist with username and password. So, why is this? Azure AD is designed to minimize prompting the user as much as possible, and it is very easy to correlate this to security in the physical world. For example, when you started your job, you were required to bring in a government ID on your first day to verify your identity or in other words to authenticate. That ID along with some paperwork from HR allowed you to get a proximity card that allows you to enter the building. So, think of the government ID and the HR paperwork as your MFA. Once you passed this MFA you weren’t checked again. You just used your PRT (proximity card) to continue to access the building. It would be silly for you to bring the HR paperwork and your government ID every day to enter the building. And using that same login we can see that it requires the user to perform MFA every time they access an application as at least equally silly.
On premises Active Directory is limited in terms of the built in Authentication Methods. The authentication methods available to on-premises AD are password and smart card authentication. Although, there are 3rd party methods available such as RSA Tokens.
However, Azure Active Directory has many authentication methods available. The default option is password. For most organizations those passwords come from on-premises Active Directory. The user is then authenticated natively in Azure AD or the password is validated by on-premises Active Directory. There are two general trends in terms of security. One trend is Passwordless which is a movement away from passwords for authentication. And the second trend is Multi-Factor Authentication (MFA) where a user is initially authenticated with a password and then need to perform a second authentication with another method.
FIDO2 Security Key
FIDO2 Security Key is the next authentication methods we are going to discuss. In terms of Azure Active Directory, a FIDO2 Security Key can be used for Passwordless authentication. A FIDO2 Security Key uses asymmetric cryptography to authenticate a user to an Identity Provider (IdP). A key pair is generated and the private key is secured on the Security Key and the public key is submitted to the IdP during registrations. The user that has access can prove their identity due to the cryptographic relationship between these two keys. The FIDO Security Key usually requires some sort of authentication before it can be used to authenticate the user. This many time is a biometric such as thumbprint, but can take on other methods such as a PIN. If you feel my description is inadequate the FIDO Alliance has an overview on the topic available here: How FIDO Works – Standard Public Key Cryptography & User Privacy (fidoalliance.org)
Microsoft Authenticator
Microsoft Authenticator is an application that installs on your mobile device. Microsoft Authenticator can be used for MFA, as well as for Passwordless sign-in. By default the user will receive a prompt in Microsoft Authenticator when using Passwordless or MFA to click No, it’s not me or Yes. However, there are a number of features that help increase the security of this process. These three security features are: Require number matching for push notifications, and Show geographic location in push and passwordless notifications. Require number matching for push notifications: A user is prompted with a number in their browser, they will then either need to select that number or key in the number to complete the authentication. Show application name in push: This simply displays the application to which they are authenticating. Show geographic location in push and passwordless notifications: This displays the location from which the authentication originated.
SMS
SMS is another authentication method, and it is currently in preview. This allows the user to receive an SMS message. Then the user can login with the code that is sent to their mobile phone. SMS cannot be used for MFA.
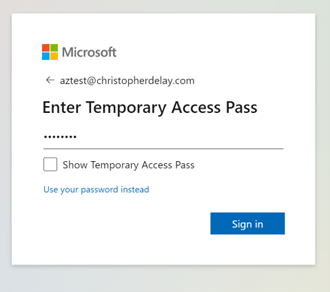
Temporary Access Pass
Temporary Access Pass is a self-descriptive feature. TAP allows the administrator to generate a one time pass code that can be used for authenticating to Azure Active Directory. TAP is ideal if you require MFA for a user enrolling their authentication methods. Since a user does not have authentication methods yet registered, they cannot MFA even if this is required. To get through this limitation a user can be given a TAP and use that as their MFA credential. The downside to this feature is there a lot of administrative overhead since sending a TAP must be completed on a user by user bases.
Certificate Based Authentication (Preview)
Certificate Based Authentication (Preview) allows a user to login with a certificate or Smart Card. There are of course some setup steps like importing your Root CA certificate and configuration of the policy. However, this is a nice addition, especially if you would like to leverage your existing smart card infrastructure. I will post a blog entry on setting this up in the near future.
Authentication Strength (Preview)
Authentication Strength (Preview) assigns an authentication strength to different types of authentication. For example, one authentication strength is named Phishing-resistant. In order for an authentication to be considered Phishing-resistant the authentication method must be Windows Hello for Business (WHfB), FIDO2 Security Key, or Certificate based Authentication. You can then use conditional policy to require a certain authentication strength before a user is given access to an application.
Next time
Next time I will probably divert from this intro series to cover Certificate Based Authentication.
So, it’s important to distinguish Azure AD from on-premises AD. There are few similarities between the two. They are both Identity Providers (IdP). However, they used different protocols, structures, and so on. So, let’s look at some of the differences.
Both Azure AD and AD contain identities such as users, groups, and devices. And each identity has attributes that contain information and characteristics about that identity. So, that is a similarity.
Architecture
On-premises Active Directory is hierarchical. In other words, you have a domain then under the domain you have containers, OUs, and sub-containers, and sub-OUs. Azure Active Directory is a flat structure where everything falls directly underneath the Azure AD “Domain”.
Accessing attributes and data
However, how that information is accessed is very different between the two. For both, you can of course use PowerShell to pull information. Also, both have GUIs that can be utilized. Azure AD has the Azure Portal and AD has the Microsoft Management Consoles. In Azure AD you also have the option to use the Azure Command Line Interface (CLI), as well. The protocols that are used to access that information are of course different. The most common protocol for on-premises AD is LDAP. Most applications and tools leverage LDAP to some degree to pull information. Azure AD the primary way to access as well as change information is Graph API.
Authentication Protocols
Active Directory leverages Kerberos and NTLM to for authentication.
Whereas Azure Active Directory uses Oauth 2.0 and Open ID Connect. However, you will see SAML used quite a bit, especially for Single Sign On (SSO)
Configuration of Devices
In Active Directory, Group policy is used to configure computers. Many of the settings in Group Policy center around configuring security settings
In Azure Active Directory, Intune is used to manage the configuration of computers and devices.
Users, Groups, and Devices
Users
Synced Users
On-premises Active Directory contains user accounts. However, Azure AD has many types of user accounts. For most organizations the majority of the users are sourced from Active Directory. In other words, users are synced from Active Directory. These are called synced accounts. Keep in mind that on-premise Active Directory is authoritative for these accounts including for the password
Cloud Users
Additionally, users can be created natively in the cloud. These are named cloud users. These users do not exist in the on-premises Active Directory.
Guest Users
Finally, there are also guest users. Azure AD has a feature named B2B. B2B allows users from other Azure AD tenants to be given access to applications in your tenant. So, for example lets imagine a user is from the Contoso organization and his UPN is john@contoso.com. Continusing this example there is another organization named Fabrikam and hosts the Fabrikam.com domain. Fabrikam can invite john to the Fabrikam tenant as a guest account. Then when accessing an application hosted by Fabrikam, John would log in to the Contoso tenant and that authentication would be trusted by Fabrikam, and John could access the application. I will go into much more detail in an upcoming posting.
Groups
Below are the group types available in Azure AD. One nice feature that Azure AD possess is dynamic groups. With dynamic groups the group is built dynamically based on one or multiple attributes of the user or device.
Synced Groups: Groups synced from on-premises Active Directory
Assigned Group: A cloud group whose membership is assigned.
Dynamic Group: A cloud group whose membership is determined by an attribute query.
M365 Group: A group used in M365 for collaboration, especially with Office 365 applications
M365 Dynamic Group: An M365 group whose membership is dynamically assigned by an attribute query.
Devices
Devices can be added to Azure Active Directory. There are 3 device states that Azure AD supports: Hybrid Azure AD Joined, Azure AD Joined, and Azure AD registered. I will just cover the basic here and save the details for an upcoming posting.
Hybrid Azure AD Joined: This is Windows computer that is joined to both on-premises Active Directory and Azure Active Directory. An Active Directory user or Azure AD user can login to these types of machines.
Azure AD Joined: This is a Windows computer that is joined to Azure Active Directory. Azure AD Users can sign into these devices. Keep in mind an Azure AD User can be a user synced from on-premises Active Directory.
Azure AD Registered: Is a device, usually a phone or tablet that is joined to Azure Active Directory. A local user account is able to login to this device. For example, with an iPhone you effectively login to the phone with your iCloud account and not an Azure AD account.
Administrative Units
In on-premises Active Directory you delegate access to users, groups, and devices by OU. Azure AD is a flat structure, so there are no OUs to delegate access. In Azure AD you delegate access through Administrative Units. In order to accomplish this, you must first create the Administrative Unit. Then you add Users, Devices, or Groups to that AU. Finally, there is a set of roles that have certain rights and permissions over the objects contained in that AU. So, you add the users you would like to delegate access to, to one of those roles.
Conclusion
This concludes Part 1. In Part 2, I will discuss Authentication methods. Keep in mind that this posting was an overview, and I will go into a more detailed explanation once I cover the most common aspects of Azure AD at a high level.
Priviledged Identity Management (PIM) is an tool that allows you to securely manage Priviledged Identities in Azure. PIM allows you to assign which users are allowed to elevate to Priviledged Roles. Elevation can be time bound, limiting time that those accounts are elevated. Elevation can require approvals, which provides control over when elevations occur. Additionally, there is strong auditing and reporting on elevations, approvals, and assignments. In this article, I will cover how your organization can leverage PIM to securely Manage Priviledged Identities in Azure Active Directory. However, many of the concepts covered can be utilized for Privileged Identities in Azure. The difference is that these identities are delegated at the Subscription, Management Group, or Resource Group level.
As a side note, there is an aspect of my writing that you might find annoying. And if you do I apologize. I tend to capitalize words that represent aspects of technology. So, you will see me write Resource Group instead of resource group.
Our starting point is the Azure AD Portal. You can of use the Azure Portal. However, I find the AAD Portal less distracting.
Next you will want to Favorite Azure AD Privileged Identity Management, so that it shows up on the left-hand menu.
Next, click on Azure AD Privileged Management
Now, let’s become familiar with the UI. Tasks is where you will perform the majority of your work, once you have PIM configured. Tasks is also where your administrators will spend most of their time interfacing with PIM. Manage will be used primarily for setting up PIM. Activity is used for reviewing your activity in PIM. If you ever feel something strange is happening with your account, you can use this to determine if that is in fact the case.
Configuration Click on Azure AD Roles to begin the configuration.
Here are your AD Roles that you can now configure. As you can see there are many roles. Some you will become familiar with, some you will not. No need to memorize every role. When you need to delegate access to perform a specific task, you can at that time investigate which role meets your needs.
We will use Global Administrator for an example of how to configure a role. So, locate that role either by scrolling or searching. Next, double click on Global Administrator to begin configuration.
Next, click on Settings to bring up, well the Settings : )
Here, we can see the Settings for the role. Click Edit to configure.
Activation Page Activation maximum duration (hours) This setting allows you to configure the duration of time for which a user will be elevated before they are “de-elevated”. Generally, you would want to set this at the average time a change normally takes for a Priviledged User. The maximum you should consider is a “typical” workday. So, generally 8 hours. So, many of us unfortunately do not have an actual workday that short, you have to draw the line somewhere to increase or maintain a certain level of security.
On activation require This is where you can configure users to have to have MFA enabled to elevate. If the user has not previously configured MFA, they will need to register when they elevate for the first time. I personally think you would be making a huge mistake if you did not require MFA for elevation.
Require justification on activation This requires the user to enter some text explaining why they are elevating. While it may seem like an inconvenience to users, it is actually in part to their benefit. If there are ever any questions on why they elevated, they can be quickly answered and justified with the information provided here.
Require ticket information on activation In your environment you should without question require a change control entry prior to making changes to Azure AD. Most if not all change control systems leverage ticket numbers. For reporting and auditing purposes, it is extremely helpful if this is required. Again this protects the user, because if they are ever questioned on if they opened a change control entry for their change, they can reference it here.
Require approval to activate So, this is a setting that definitely considers additional consideration as there are definitely some tradeoffs. The advantage to requiring approval is that it makes the environment secure. Because a user cannot act on their own to elevate. The disadvantage is what if a user needs to make an emergency change at 3:00 AM in the morning. Is the approver going to be awake to approve? Can you contact the approver? Will the approver be available at that time? If both the person that can make emergency changes and the approver are required to be available 24 x 7, or you otherwise have 24 x 7 coverage, then definitely utilize this setting. As with all of these settings these should be reviewed by your Information Security department, to ensure you meet the security requirements of your organization.
Assignment Allow permanent eligible assignment This allows the user to elevate, without their ability to elevate ever expiring. In other words, as you will see later, you can configure a period of time after which a user’s access needs to be removed. I would strongly advise against allowing permanent eligible assignment. As you are aware most organizations do a remarkably poor job of cleaning up accounts that should no longer have access. And this can be sort of a self-remediation for those accounts.
Expire eligible assignments after As mentioned above this is a restriction of for how long the user has the ability to elevate. Your options at the time of this writing are 15 Days, 1 Month, 3 Month, 6 Months, or 1 year. Unless you have a lot of turnover you may want to go longer rather than shorter.
Allow permanent active assignment So, based on what I mentioned above you may have been lead to believe that you would not want to Allow permanent active assignment. However, we have not discussed Break Glass accounts. These are Privileged accounts that persist in case no other accounts have access. These type of accounts are typically excluded from Conditional Access Policy. This is done so that if an administrator really misconfigures Conditional Access Policy, you still have a way to recover. So, for Break Glass Accounts you would want to have this configured. Which means you are really going to have two class of accounts Break Glass accounts and non-Break Glass accounts. Break Glass accounts would typically be permanent active assignments and non-Break Glass accounts would be temporary eligible accounts.
Expire active assignments after If for whatever reason you decide to have temporary active assignments, then you can select how long before those active assignments expire. Your options at the time of this writing are 15 Days, 1 Month, 3 Month, 6 Months, or 1 year.
Require Azure Multi-Factor Authentication on active assignment This setting does what it says that it does. If you are using active assignments for Break Glass accounts then you should not enable this setting. Any setting that interferes with a Break Glass account from logging in should not be configured. Obviously, extra controls need to be in place for these accounts. Some examples are restricting knowledge of the password, perhaps keeping in a physical or digital safe that is offline. Enabling auditing and especially alerting that sets of all sorts of alarms when someone logs in with the Break Glass account.
Require justification on active assignment. It would obviously be good to have a user have to give a justification when accepting an active assignment.
Notifications I am not going to cover every option on this page as it is mostly self-explanatory. Basically, you can control whether the email alerts go to the Admin (Global Administrators), Assignee, and Approver. Additionally, you can additional recipients. And you can also configure the alerts so that Critical emails only are sent, which according to the page are: A mode where PIM only sends out emails requiring an immediate action.
And obviously you can complete configuration by selecting Update.
Assigning Roles Now I am going to assign the Global Administrator role to a user. Step 1: Starting from the PIM home, click on Azure AD roles
Step 2: Click on Roles
Step 3: Search for or locate the Global Administrator role
Step 4: Click Add assignments
Step 5: Under Select member(s), click on No member selected
Step 6: Search for or scroll to the user you want to assign this role Step 7: Select the user and click Select
Step 8: Click Next or Setting
Step 9: Select Eligible or Active Note: Previously I discussed the differences between Eligible and Active. However, for greater clarity I am going to use Microsoft’s verbiage to provide a second explanation. Eligible assignments require the member of the role to perform an action to use the role. Actions might include performing a multi-factor authentication (MFA) check, providing a business justification, or requesting approval from designated approvers. Active assignments don’t require the member to perform any action to use the role. Membersassigned as active have the privileges assigned to the role at all times. Assign eligible owners and members for privileged access groups – Azure Active Directory | Microsoft Docs Step 10: If necessary adjust the assignment start and end date Step 11: Click Assign
You can now view your assignment for this role
Delegation So, roles such as Global Administrator are delegated at the Directory level. However, there is another level at which you can delegate. You can delegate at the Administrative Unit level. Administrative Units are basically a container if you will, that you add users or groups to, and then they can be controlled by a user who is delegated “permissions” to the Administrative Units. Some, like to compare Administrative Units to Organizational Units in Active Directory. Others do not prefer that comparison. I personally do not like to make the comparison because these are two different and distinct things.
The following roles can be delegated to an Administrative Unit: • Authentication Administrator • Groups Administrator • Helpdesk Administrator • License Administrator • Password Administrator • SharePoint Administrator • Teams Administrator • Teams Devices Administrator • User Administrators When assigning roles that can be assigned to Administrative Units, you have the option to select Administrative unit or Directory.
Then in order to select the Administrative unit, under Selected scope click on No scope selected
Then either search for or scroll to the Administrative Unit and click Select
Alternative Method to Assign Roles Step 1: When in the Privileged Identity Management view, select Assignments
Here you will see all of the Eligible assignments Step 2: Click Add assignments
Step 3: Select the role you want to assign. In this instance I selected Global Administrator Step 4: Click on No member selected Step 5: Choose a member and click Select
Step 6: Select Next
Step 7: Decide on whether to make the assignment Eligible or Active. Remember Active assignments should be reserved for Break Glass accounts.
The account is now eligible to elevate to Global Administrator
Elevating Below is the process for the user to elevate Step 1: Starting from the Privileged Identity Management view, click on My roles
You will now see your Eligible assignments Step 2: For the role you want to elevate to, click Activate
Step 3: Enter whatever information is required to elevate. In this case a Reason is required. Enter a Reason and click Activate. Optionally, configure a Custom activation start time.
Once your elevation is approved, it will show up under Active assignments
Approving requests Step 1: To approve requests click on Approve requests Step 2: Locate the request you want to approve Step 3: Select the elevation you want to approve Step 4: Click Approve
Step 5: Enter a Justification and click Confirm
Self Audit To review your own activity in PIM, select My audit history
You can then view and search activity
Privileged Access Groups Privileged Access Groups is a feature that is currently in Preview, or at least at the time of this writing. This feature allows you to assign Roles to a group. So, for example if you have a position in your organization where a user needs two Azure AD roles. You can create a Privileged access group to have those two roles. Then when you want to assign a user to those two roles for the position, you just add that user as a Member of the Privileged access group.
Assigning roles First step is when creating a group is to select Yes for Azure AD roles can be assigned to the group
One you create the Group, you can go to Azure AD Portal and select Groups
Next you click on the Group you created. In this example Branch User Administrator
Next you click on Assigned roles
Now to add your roles, click Add assignments
Select the role you want to add and click Next
Determine if you want the role to become Eligible or Active. Also determine if you want to make the role Permanently eligible or Permanently Active. And adjust the assignment dates if necessary. Finally click Assign
So, I then went and assigned a second role
Provisioning members To provision members click on Privileged access (Preview)
Choose Member as the role. Then click on No member selected. Select a Member and click on Select.
Click Next
Then choose whether you want to make the Member Eligible or Active. You make the user Eligible if you want them to activate their membership in the group. If you want to just provision the user then click Active.
Finally, click Assign
Activate your Membership in the Privilege access group If you a user was made eligible instead of active, they will need to accept the assignment.
To do this the user would start from the Privileged Identity Management view
The user would then click on My roles
Then click on Privileged access group (Preview)
Then the user would click Activate to activate their membership
The user would need to enter a Justification and optionally a Custom activation start time Then the user would click Activate
Once the user is now a member the user can choose to elevate to the roles that are assigned to that group.
Viewing Pending Requests You can view pending requests
From the Privileged Identity Management view click on Azure AD roles
AGPM Administrator: The AGPM Administrator has full control of AGPM including the AGPM archive.
Reviewer: The reviewer simply has the ability to view GPOs, they can also run comparisons on GPOs.
Editor: In addition to the reviewer permission, Editors also have the ability to Check In GPOS, Check Out GPOs, Edit GPOS, and request creation of a GPO.
Approver: In addition to Reviewer and Editor capabilities, the Approver can approve the GPO Creation, GPO Deployment. Approvers can also Create GPOs and Deploy GPOs of their own creation without approval.
There really are two options for provisioning access. The first is to create Active Directory security group and grant those groups access to a role within AGPM. For example, you could create an AGPM Admins group in AD and then provision that group Full Control within AGPM. Then to provision access to the AGPM Administrator role you would simply add users to the AGPM Admins group. The alternative approach is that you just provision access to users within AGPM. From a security perspective, I prefer the second method as it reduces the number of users or groups that will have the permissions necessary to provision access to AGPM. In the examples below I will be demonstrating the second technique for granting access, specifically using AGPM to directly provision access to user.
Temporarily add the user account that you would like to add as the first AGPM Administrator to the group that is the AGPM Archive Owner. You will need to do remove this user once provisioning of the AGPM Administrator account is complete.
To provision permissions:
Open GPMC.msc
Expand Forest, then Domain, then “Domain Name”.
Click on Change Control.
In the right-hand pane of AGPM ensure that you have navigated to the Domain Delegation tab.
Click Add…
Enter the name of the user for which you are provisioning access, then click the Check Names button.
Once the name of the user or group has been resolved, click OK.
If creating and Administrator select Full Control as the role. Otherwise, select Editor, Approver, or Reviewer as appropriate. Then click OK.
Prior to using AGPM with GPOs that already exist in your environment, you will need to give the AGPM Service Account full control of exiting GPOS. There is a script that can be used to automate much of the configuration of AGPM. It is located here: https://gallery.technet.microsoft.com/scriptcenter/AGPM-Quick-Configuration-a7f42d46. To give the AGPM Service Account permissions to existing GPOS, you can use the following portion of the aforementioned script:
Once you have given the AGPM Service Account access to the GPOs, you can put them under Control of AGPM. Once the GPOs are under the control of AGPM, all group policy management can be done via AGPM. The following steps can be followed to take control of existing GPOs:
Open GPMC.msc
Expand Forest, then Domain, then “Domain Name”.
Click on Change Control.
In the right-hand pane of AGPM ensure that you have navigated to the Contents tab.
Then within the Contents Tab, navigate to the Uncontrolled Tab.
Select or Multi-Select GPOs that you want AGPM to Control.
Right-click and then select Control… from the context menu.
You will then be prompted for a comment. Type an appropriate comment and click OK.
Then you will see the progress of taking control. When the actions have completed, click Close.
You will now see the GPOs showed up under the Controlled tab.
To ensure that the ability to modify GPOs is restricted to those that are provisioned access through AGPM, new GPOs that are created must have their permissions restricted. You will want to restrict the Production Delegation. To do this you will want to ensure that just the AGPM Service Account and System have the permissions: Edit settings, delete, modify security. All other accounts will need to either be removed or have their permissions changed to Read.
To add the AGPM Service account to the Production Delegation navigate to the Production Delegation tab. Enter the name of the Service Account. Then click Check Names to validate the account name. Then click OK.
Then when the Add Group or User dialog box opens, ensure that the Role is configured to Edit Settings, delete, modify security. Then click OK.
For Domain Admins, Enterprise Admins and any other accounts aside from System and the AGPM Service Account that have Edit settings or Edit settings, delete, modify security settings you will need to change the permission to Read.
To change permissions to read, right-click on the security principal and the select Read from the context menu.
When prompted with Do you want to change the permission on this group or user to Read?, click OK.
Below is a screenshot of the Production Delegation tab after it is locked down.
This locked down configuration will apply to existing GPOs once they are controlled by AGPM.
AGPM allows you to control how much of the GPO history is retained. If you wish to limit how much of that history is retained you can navigate to the AGPM Server tab. Next, Check the option Delete old versions of each GPO from the archive. Retain only the current version and the preceding. Then enter a number for how many of the preceding GPOs you would like to maintain in the archive and click Apply.
You can configure what AGPM Server the AGPM Client connects to when you install the AGPM Client. However, you can also control which AGP Server the client connects. Navigate to \User Configuration\Policies\Administrative Templates\Windows Components\AGPM.
Open the setting AGPM: Specify default AGPM Server (all domains). Change the configuration Enabled. For the setting Default AGPM Server for all domains, enter the DNS Alias for the AGPM Server and the port number in the format <DNS Alias>:<Port Number>.
Within AGPM it is simple to view a settings report. If you right-click on the GPO, you can select the Settings from the context menu. You then have the option to view:
HTML Report: HTML Report of all settings. This is the most user-friendly view of the settings.
XML Report: An XML output of the report which may be useful if you somehow wish to convert or manipulate the output of the report.
One of the more useful features of AGPM is the ability to compare two GPOs.
To Compare two GPOs, multi-select two GPOs. Right-click and then from context menu select Differences. Then you have the option to view an HTML Report or an XML Report.
Below is an example of an HTML Report, highlighting the differences between the two GPOs.
The walkthrough below, shows how an Editor can send a request to create a new GPO.
Editor would right-click under Controlled GPOs and select New Controlled GPO… from the context menu.
The Editor would then be prompted to Submit New Controlled GPO Request. The Editor would then fill out the form. The Editor has the option to Create in archive and production or Create in archive only. Also, the user can create the GPO from a Template. The Editor would click Submit to submit the request to the approver.
The Editor will view the progress of the submission and then click Close when complete.
Below is an example of an email that the approver will receive.
The GPO will then go into the Pending state.
The Approver would then right-click on the GPO and the select Approve… from the context menu.
The approver will then be prompted for a comment, and then choose whether or not to approve the request.
Once the approval is complete the Approver clicks Close.
An Editor can Edit and Deploy a new GPO as long as the Approver approves the Editors actions. Below are the steps required by the Editor and Approver to edit an existing GPO and deploy it to production.
The Editor would right-click on the GPO they wish to edit and select Check Out… from the context menu.
Then the Editor would add a comment and Click OK.
When the Check Out is completed the Editor would click Close.
Then the Editor would right-click on the checked out GPO and select Edit from the context menu.
The Editor can the modify the GPO. The screenshot below is just an example of an Editor modifying an existing GPO.
Once the Editor has completed the edits, they would then right-click on the GPO and select Check In… from the context menu.
The Editor would then add a comment in the Check in GPO dialog box and click OK.
Finally, when the Check In is complete the Editor would click Close.
To Deploy the GPO, the Editor would then right-click on the GPO and click Deploy…
The Editor would then complete the Submit Deploy GPO form, in part to notify the Approver. Upon completion of the form the Editor would click the Submit button.
Upon completion of the submission, the Editor would click Close.
Once the Approver receives notification the approver would navigate to the Pending Tab. The Approver would then right-click on the pending GPO and click Approve… if the approver wishes to approve the GPO.
The Approver would then add a comment to the Approve Pending Operations dialog box, and click Yes.
Upon completion of the approval the Approver would click Close.
AGPM uses a familiar concept called a Recycle Bin. If a GPO is deleted accidentely or if a deleted GPO needs to be restored it can be un-deleted from the Recycle Bin.
To Delete a GPO simply right-click on the GPO and from the context menu click on Delete…
Then decide whether you want to delete the GPO from the archive or the archive and production. Based on your decision select either Delete GPO form archive only or Delete GPO from archive and production. You would then add a comment and click OK.
You will then be asked Are you sure you want to delete the selected GPO?. Click OK to complete the deletion.