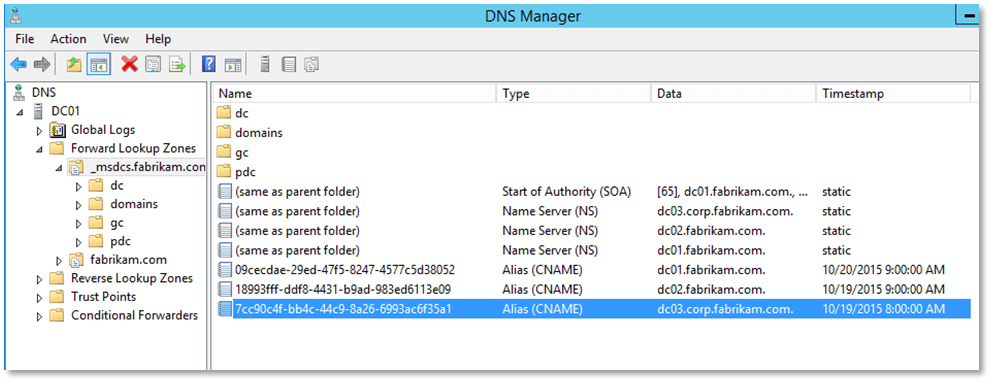
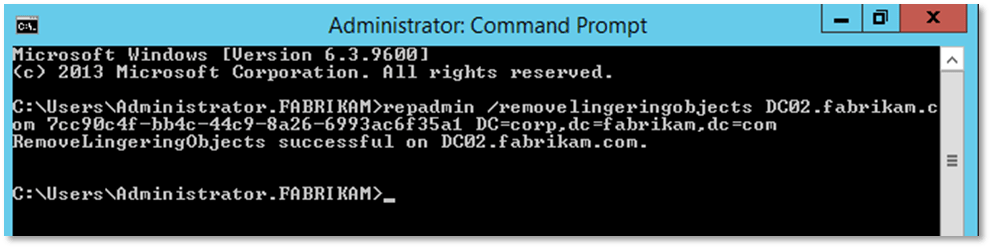
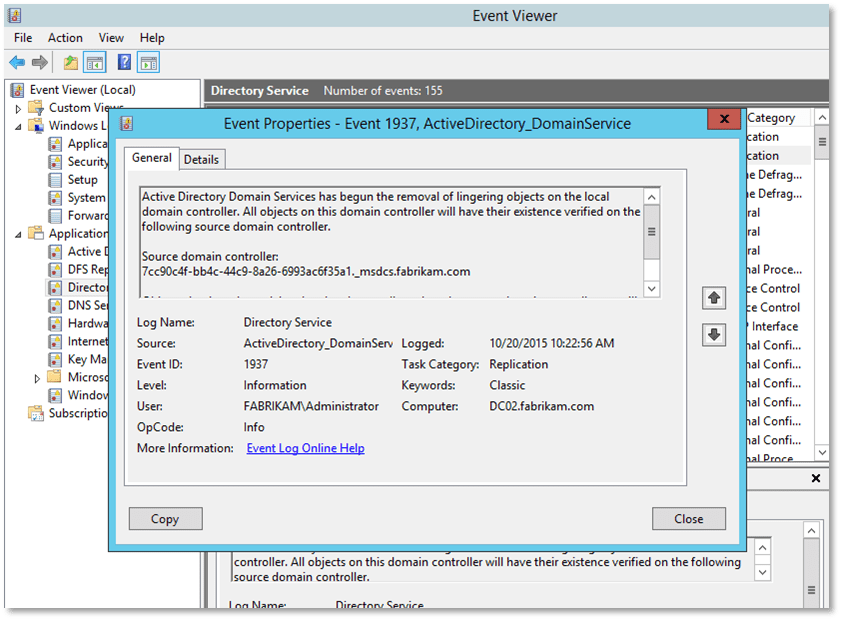
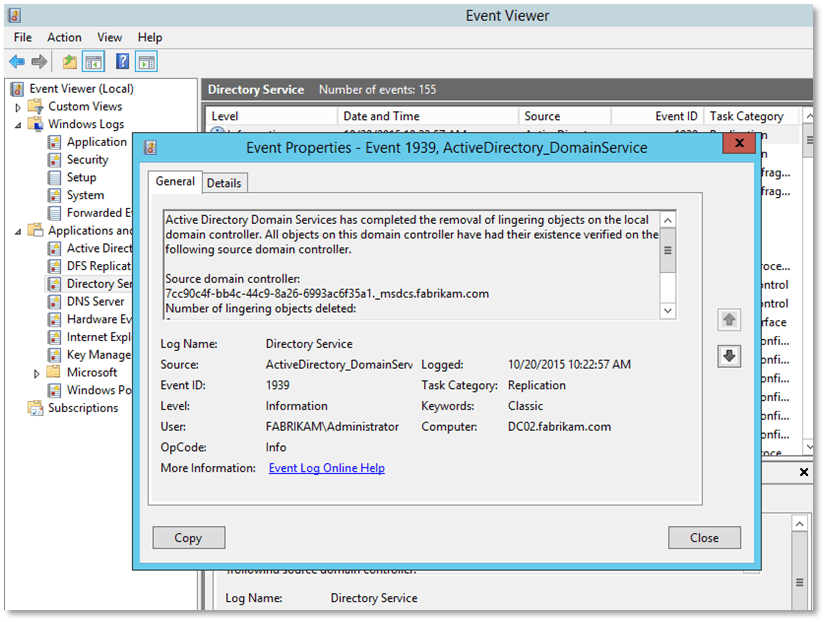
I have visited other pages on that site as Vadims has reposted many blogs that are now hard to find due to Microsoft archiving a lot of the content. Vadims has done a lot of great work here.
So, today I’m going to discuss implementing certificates for Secure LDAP on Active Directory Domain Controllers.
First of all, some helpful links. This article talks about the requirements for secure LDAP as listed below:
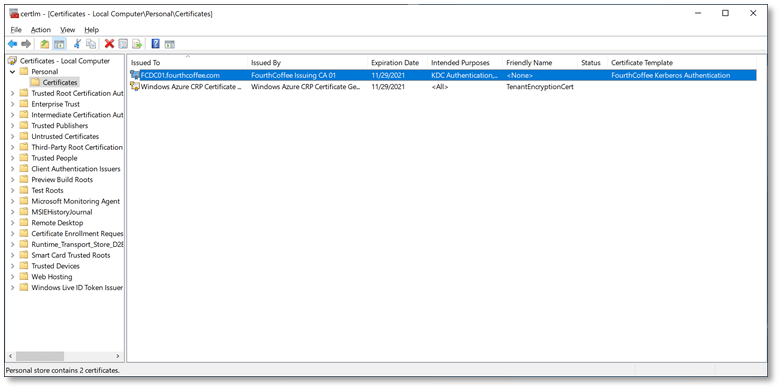
The LDAPS certificate is located in the Local Computer’s Personal certificate store (programmatically known as the computer’s MY certificate store).
A private key that matches the certificate is present in the Local Computer’s store and is correctly associated with the certificate. The private key must not have strong private key protection enabled.
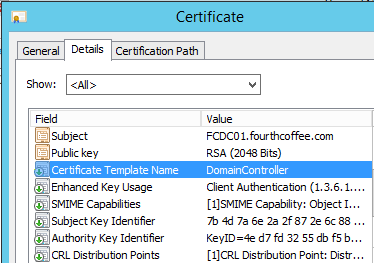
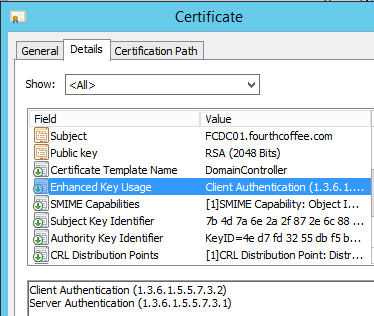
The Enhanced Key Usage extension includes the Server Authentication (1.3.6.1.5.5.7.3.1) object identifier (also known as OID).
The Active Directory fully qualified domain name of the domain controller (for example, DC01.DOMAIN.COM) must appear in one of the following places:
The Common Name (CN) in the Subject field.
DNS entry in the Subject Alternative Name extension.
The certificate was issued by a CA that the domain controller and the LDAPS clients trust. Trust is established by configuring the clients and the server to trust the root CA to which the issuing CA chains.
You must use the Schannel cryptographic service provider (CSP) to generate the key
So, as seen above the most significant requirement is that the Secure LDAP certificate have Server Authentication as it’s purpose. But, there are other reasons why you may have a certificate on a Domain Controller such as for supporting services like Smart Card Logon or Windows Hello for Business (WHfB). So, you may want some additional application policies supported in the certificate you are going to issue to Domain Controllers. There are 3 certificate templates designed for use on Domain Controllers. Keep in mind technically you could use a Web Server Certificate Template to support LDAP over TLS. But the section above will provide reasons why to use one of the three templates designed for use on a Domain Controller.
Certificate Templates
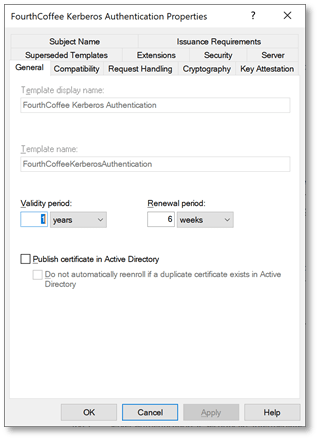
Originally, there was a Domain Controller certificate template (Windows Server 2000) that is a version 1 template, then in Windows Server 2003 the Domain Controller Authentication certificate template was released, and finally in Windows Server 2008 the Kerberos Authentication certificate template became available. The latter two are version 2 templates by default.
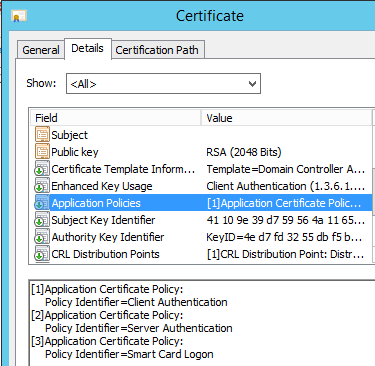
Application Policies
The table below shows the Application Policies (purposes) for the 3 templates. Of course you can always duplicate these templates and add or remove whatever Application Policies that you want to add or remove.
Certificate Template
Purpose 1
Purpose 2
Purpose 3
Purpose 4
Domain Controller
Server Authentication
Client Authentication
Domain Controller Authentication
Server Authentication
Client Authentication
Smart Card Logon
Kerberos Authentication
Server Authentication
Client Authentication
Smart Card Logon
KDC Authentication
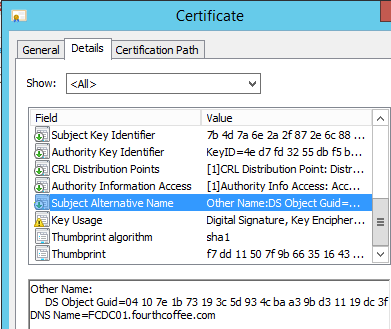
Subject Alternative Names
Additionally, the different templates come with a different Subject and SAN configuration. The table below displays the SANs available in the Certificate Templates. I am not concerned with the subjects, because applications like TLS will ignore the subject if the SAN is present and populated.
Certificate Template
SAN 1
SAN 2
SAN 3
Domain Controller
DS Object Guid
DC Name (DNS)
Domain Controller Authentication
DC Name (DNS)
Kerberos Authentication
AD Domain (DNS)
AD Domain (Shortname)
DC Name (DNS)
So, the typical SAN for a Domain Controller certificate will look like:
Other Name:
DS Object Guid=04 10 59 5a 08 29 a7 9a 00 43 a2 75 f3 62 6e aa 62 0b
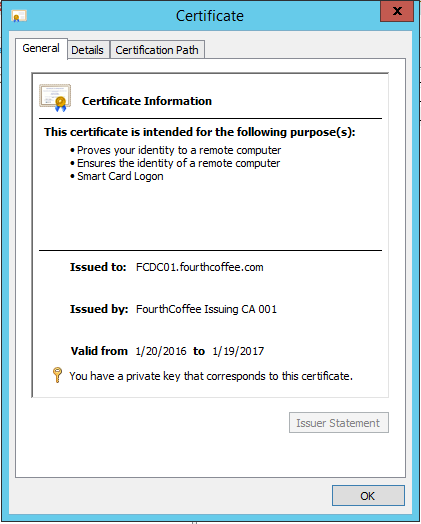
DNS Name=FCDC01.fourthcoffee.com
The typical SAN for a Domain Controller Authentication certificate will look like:
DNS Name=FCDC01.fourthcoffee.com
And finally, the SAN for a Kerberos Authentication certificate will look like the following:
DNS Name=FCDC01.fourthcoffee.com
DNS Name=fourthcoffee.com
DNS Name=FOURTHCOFFEE
As you see the Kerberos Authentication certificate has the most Application Policies and SANs, and hence it is most likely to support almost any application you need to support, both now and in the future. So, this is the template that you would use in most scenarios.
Deployment Scenarios
There really are 3 deployment scenarios. Depending on your environment it is possible that you could utilize all 3 if some of your domain controllers have other certificates installed that you need to continue to use. These include Autoenrollment using Certificate Template Supplied Names, Using Custom SANs with Automatic Renewal, Manual Deployment of Certificates to the NTDS Store.
Autoenrollment
Most of the configuration options use autoenrollment, so I am going to briefly describe autoenrollment and how to deploy autoenrollment to domain controllers, here. If you would like more information on autoenrollment, I have a video that covers this topic.
Basically, this will be an abbreviated discussion of Autoenrollment. Autoenrollment allows automatic enrollment an automatic renewal of certificates. The autoenrollment itself has some additional functionality, but I most likely won’t discuss that in this posting. To implement autoenrollment there are many requirements, from a certificate template perspective.
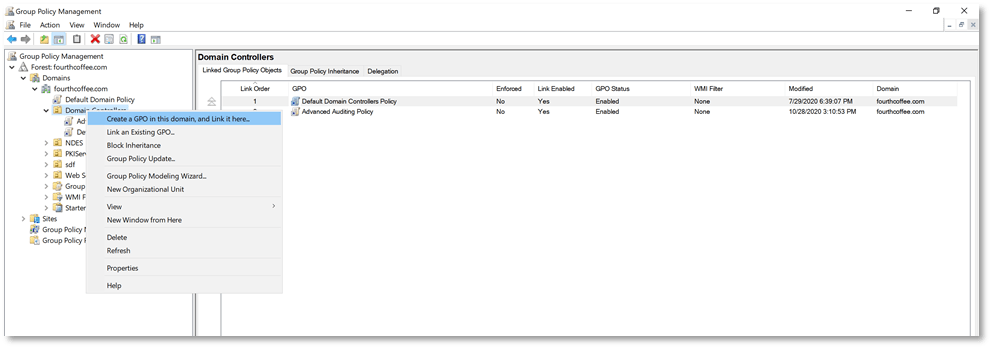
The steps below can be used to implement Autoenrollment for Domain Controllers. This walkthrough covers creating a new GPO on the Domain Controllers container.
Step 1: Open the Group Policy Management Console (GPMC.msc) as a user that can create new GPOs and link them to the Domain Controllers container.
Step 2: Right-click on the Domain Controllers OU and from the context menu select Create a GPO in this domain, and Link it here…
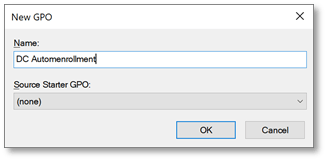
Step 3: Give the new GPO a Name and the click OK
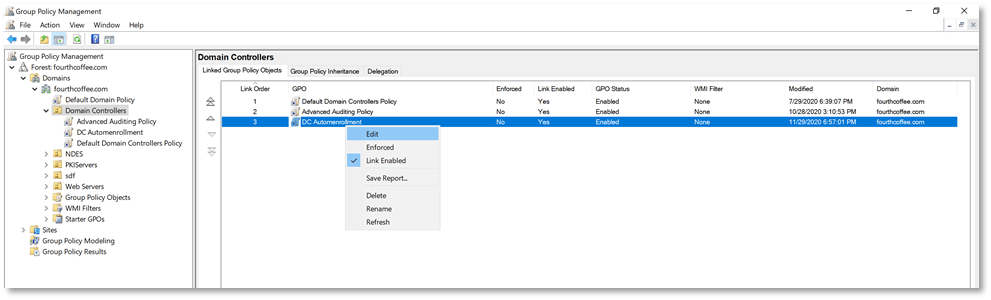
Step 4: Right-click on the new GPO and select Edit from the context menu
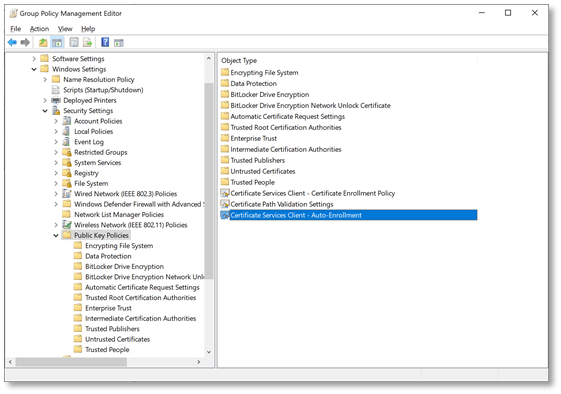
Step 5: Navigate to Computer Configuration\Windows Settings\Security Settings\Public Key Policies
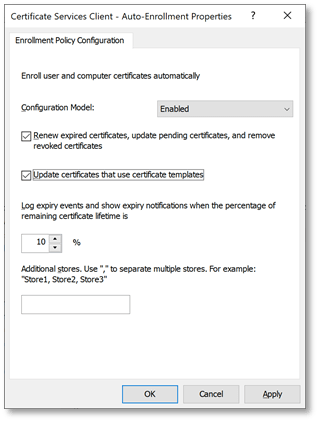
Step 6: Locate and open the following setting: Certificate Services Client – Auto-Enrollment
Step 7: Change the Configuration Model to Enabled
Step 8: Enable the settings Renew expired certificates, update pending certificates, and remove revoked certificates and Update Certificates that use certificate templates
Autoenrollment using Certificate Template Supplied Names
Configure Autoenrollment
See the Autoenrollment section above.
Configuring the Certificate Template and the CA
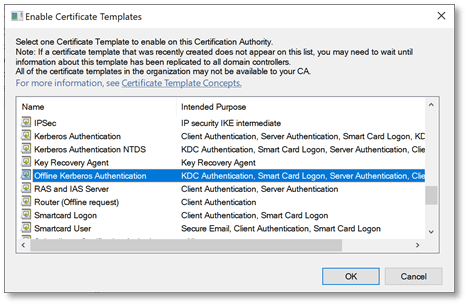
So, if you are happy with the SANs that the Kerberos Authentication template provides, and you do not have Server Authentication certificates on any of your domain controllers. Then congratulations, you get to use the easiest option. The easiest option is deploying the Kerberos Authentication certificate template with Autoenrollment.
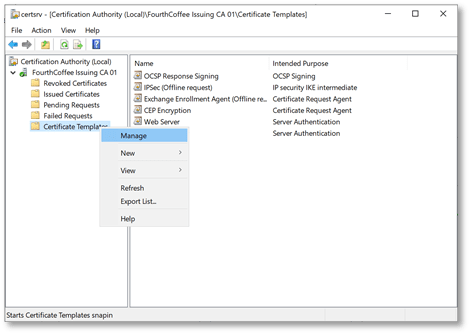
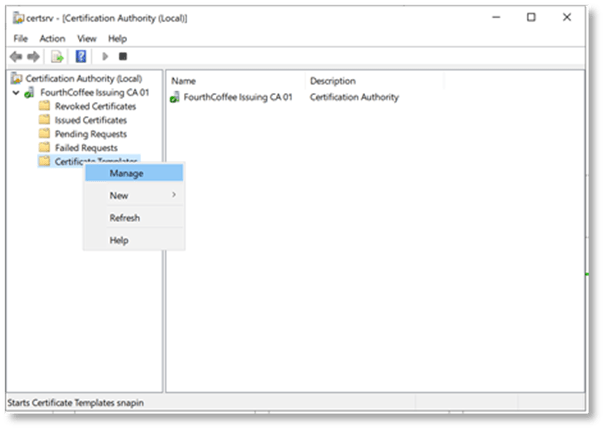
Step 1: Open the Certification Authority MMC (certsrv.msc)
Step 2: Navigate to Certificate Templates
Step 3: Right-click on Certificate Templates and select Manage from the context menu
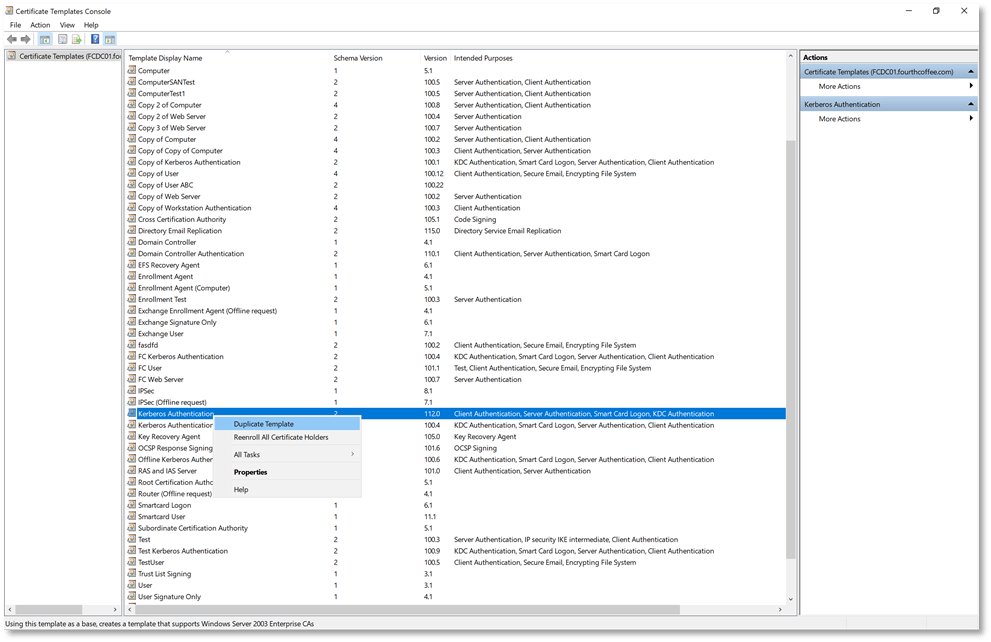
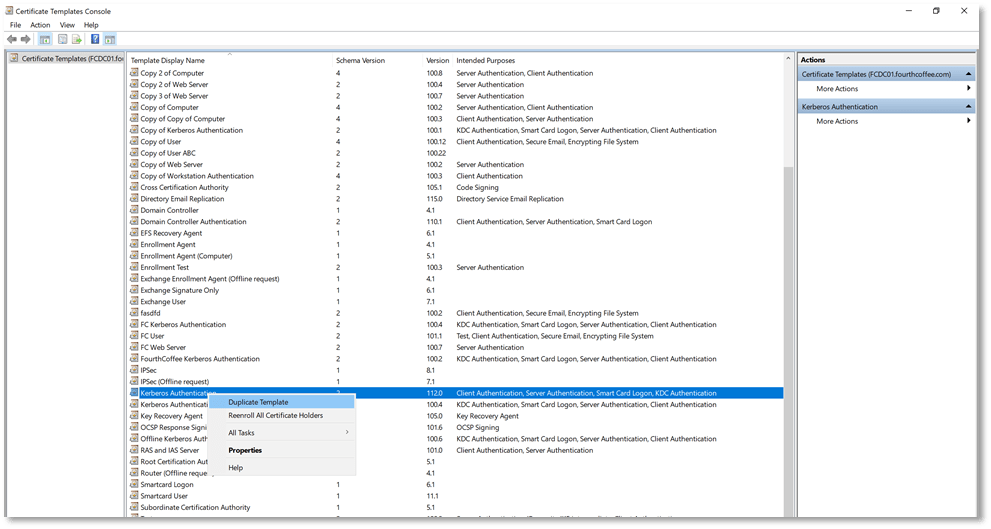
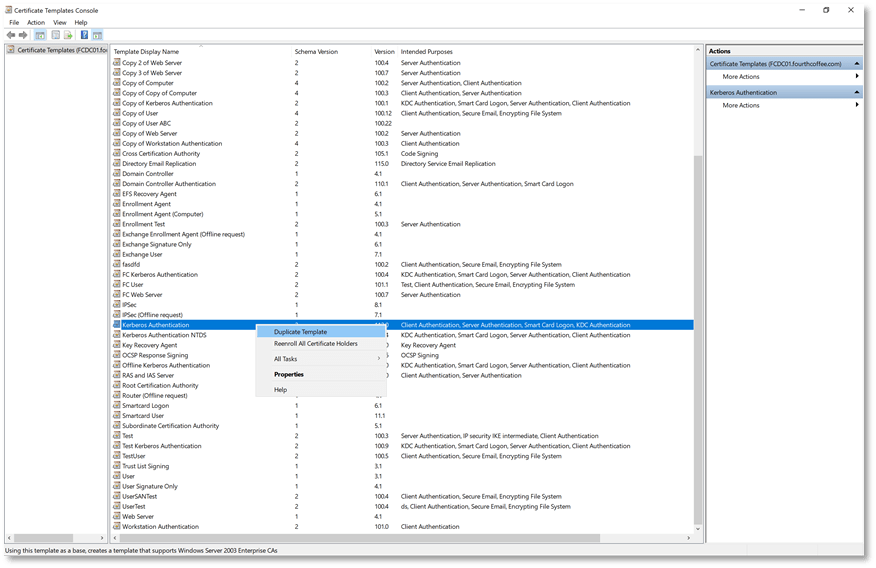
Step 4: Right-click on the Kerberos Authentication Certificate Template and select Duplicate Template
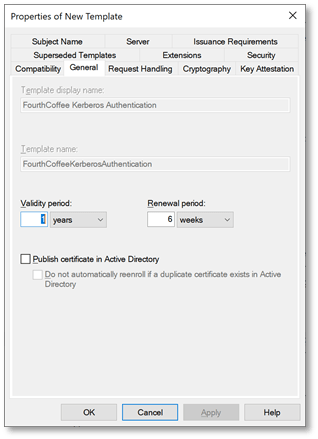
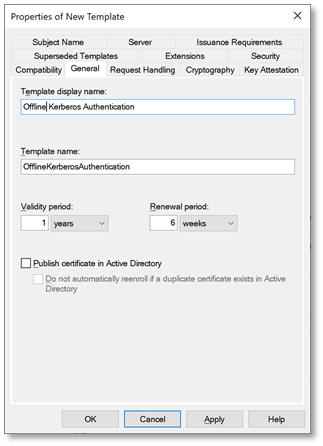
Step 5: Navigate to the General Tab and name the Certificate Template and click OK
Step 6: Return to the Certification Authority MMC
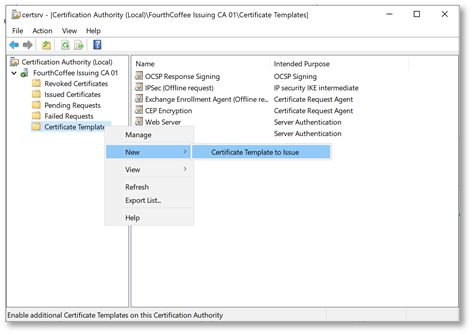
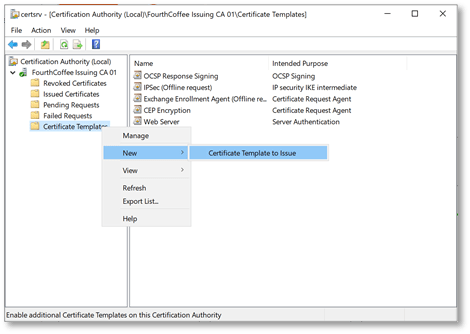
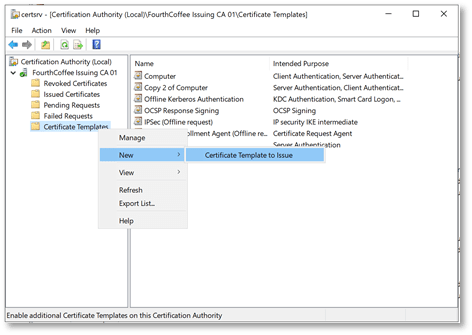
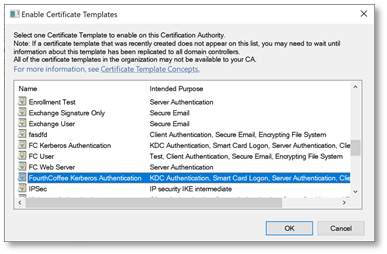
Step 7: Right-click on Certificate Templates and from the context menu select New and Certificate Template to Issue
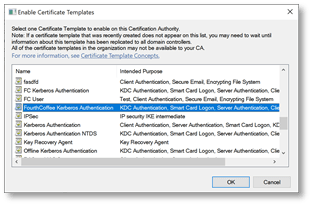
Step 8: Select the Certificate Template that was just created
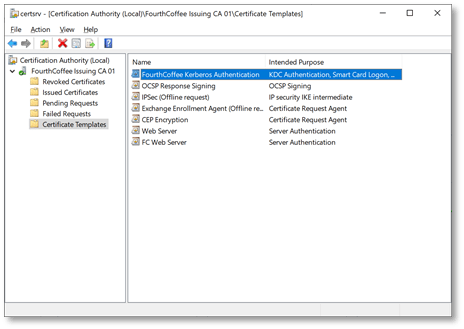
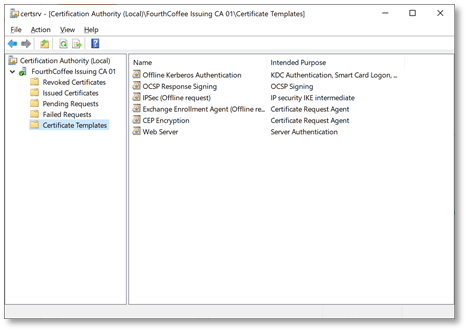
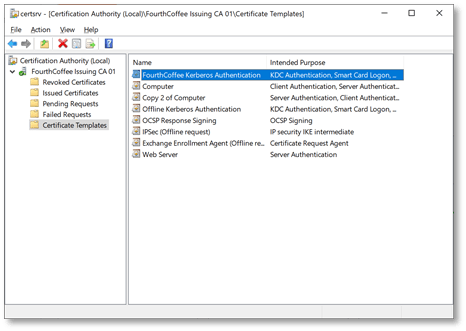
The template is now available for enrollment
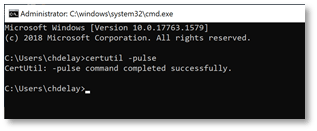
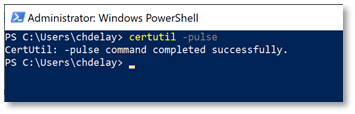
If you want to test enrollment and not wait for the autoenrollment client to run, you can login to the DC and run: certutil -pulse
The certificate should now be installed on the DC
Using Custom SANs with Automatic Renewal
So, the process for using custom SANs requires an initial manual enrollment. However, you can use a PowerShell cmdlet for the initial enrollment allowing you to potentially automate the initial enrollment. The Kerberos Authentication Certificate Template as mentioned above puts the DC FQDN and the Domain DN and NETBIOS name in the certificate. In the example below, we are going to request these and in addition to these SANs we are going to request the DNS name LDAPS.<Domain>. In my example, the domain is FourthCoffee.com, so the custom SAN will be LDAPS.fourthcoffee.com.
Configure Autoenrollment
See the Autoenrollment section above.
Configure the Certificate Template
Configuring the Certificate Template and the CA
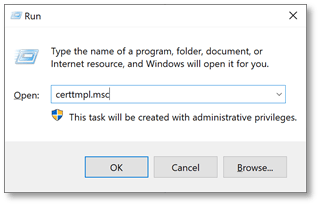
Step 1: Launch certtmpl.msc
Step 2: Right-click on the Kerberos Authentication certificate template and select Duplicate Template from the context
Step 3: Give the certificate template a unique name, then click Apply
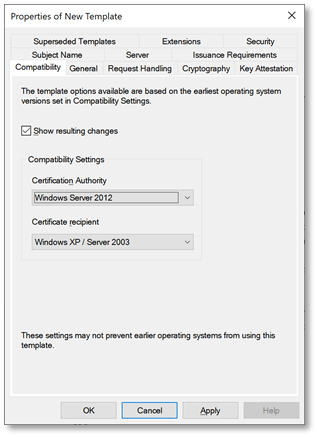
Step 4: Navigate to the Compatibility tab
Step 5: Change the Certification Authority to Windows Server 2012
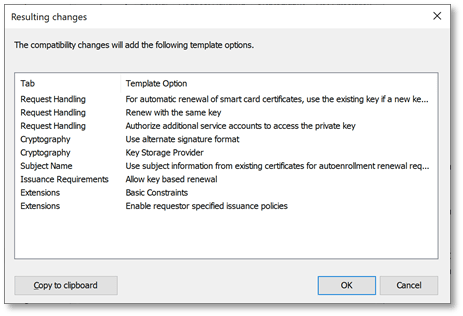
Step 6: Acknowledge the resulting changes click OK
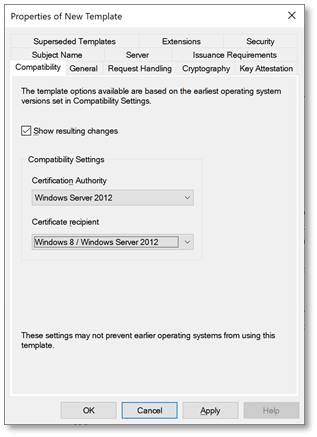
Step 7: Change Certificate recipient to: Windows 8 / Windows Server 2012
Step 8: Acknowledge the resulting changes, by clicking OK
Step 9: Click Apply
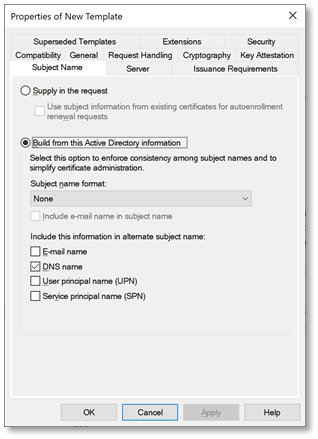
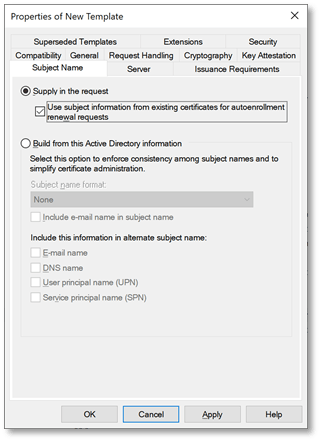
Step 10: Navigate to the Subject Name tab and change the setting to Supply in the request
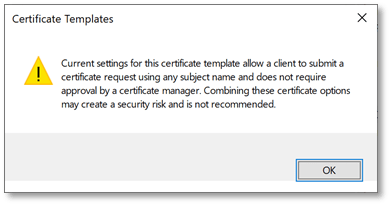
Step 11: When prompted about the security concerns, click OK. Note: From a security perspective you really should require Certificate Manager approval when allowing the requester to supply the subject name. The limitation is if we did that in this situation we would be unable to automatically renew the certificates. A mitigation could be to continually review issued certificates and make sure the identities requested make sense and do not violate any security policy.
Step 12: Click OK
Step 13: Go to the Certification Authority MMC, and on the Certificate Templates container right-click and select New and then Certificate Template to Issue
Step 14: Select the certificate template you just created and click OK
The template should now be available on the CA
Manually Requesting the Initial Certificate
So, there are some options here. Of course manually requesting the certificate on each DC is not a scalable solution. However, since this request can be done via PowerShell this enrollment can be initiated by a Script that is initialized by whatever configuration management software you use for Domain Controllers.
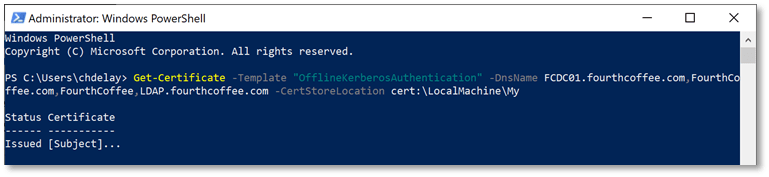
Run the following command: Get-Certificate -Template <Certificate Template you created> -DnsName <list of DNS names, separated by a comma> -CertStoreLocation cert:\LocalMachine\My
AN example would be: Get-Certificate -Template “OfflineKerberosAuhentication” -DnsName FCDC01.fourthcoffee.com,FourthCoffee.com,FourthCoffee,LDAP.fourthcoffee.com -CertStoreLocation cert:\LocalMachine\My
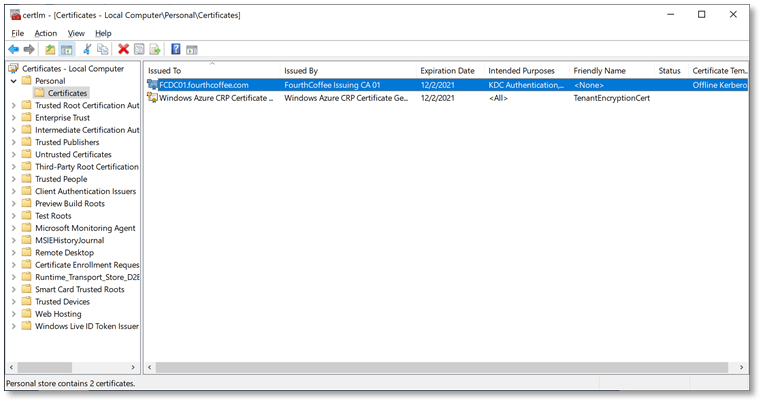
You will now see the certificate in the Computer Certificate Store
Optional Testing Steps for Test Environment
If you are setting this up in a pre-production environment and want to verify the autoenrollment works, follow these steps.
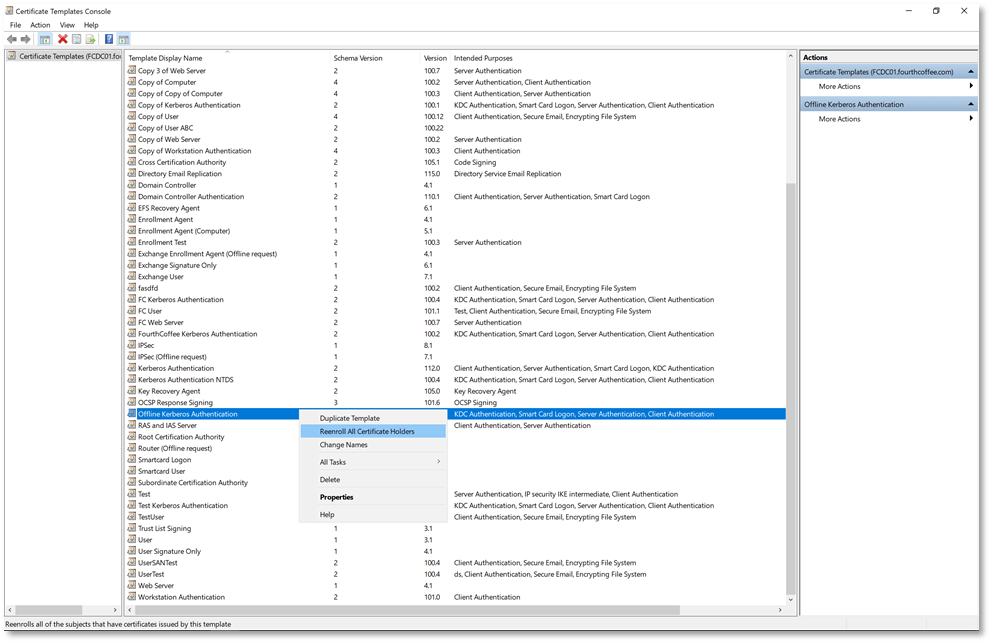
Step 1: Just open up the Certificate Template MMC and then right-click on the template and select Reenroll All Certificate Holders and this will cause DCs that have received a certificate to renew the certificate.
Step 2: Run certutil -pulse
Step 3: Log on to one of the Domain Controllers and verify the certificate has been renewed
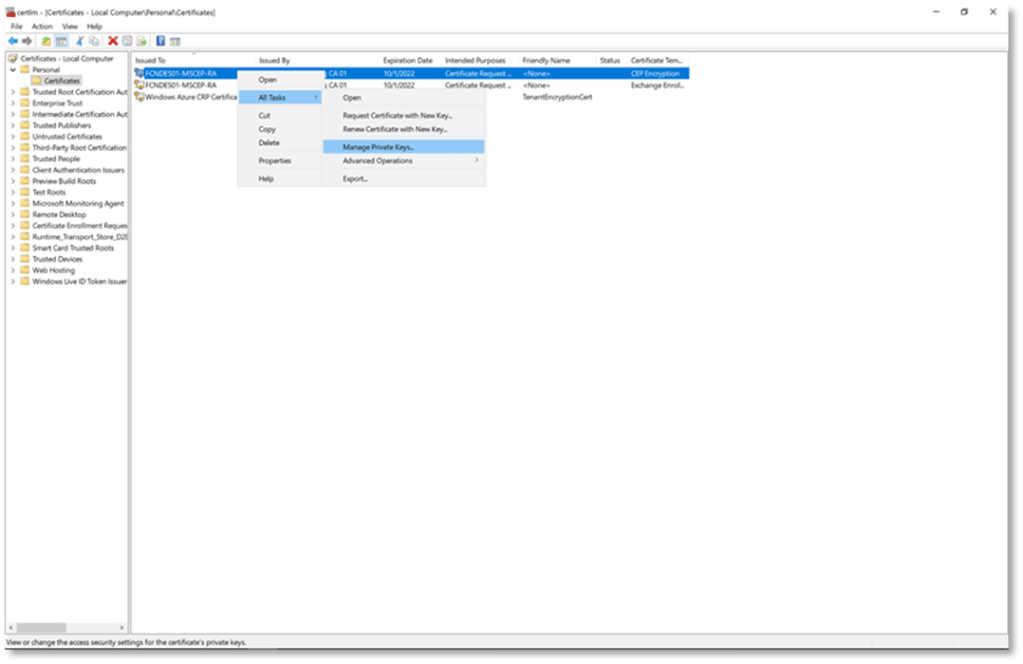
Manual Deployment of Certificates to the NTDS Store
One issue that can arise is when Domain Controllers have more then one certificate with the Application Policy of Server Authentication. In this case the first certificate that has Server Authentication will be used. This can lead to undesired certificate selection. If there are multiple Server Authentication certificates you can force the selection of the desired certificate by putting the certificate in the NTDS store. The steps below will cover how to deploy certificates to the NTDS store. The disadvantage to putting certificates in this store is that it is a very manual process.
Configuring the Certificate Template and the CA
Step 1: Open the Certificate Template MMC
Step 2: Right-click o the Kerberos Authentication certificate template
Step 3: Select Duplicate Template from the context menu
Step 4: Name the certificate template and the click Apply
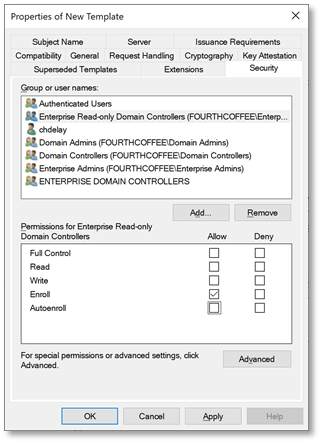
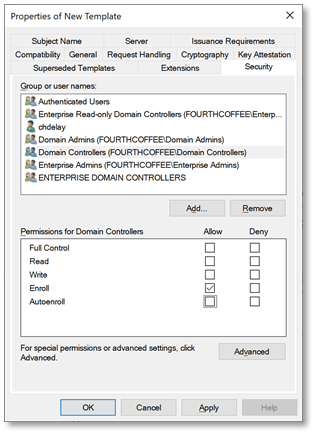
Step 5: Remove Autoenroll permissions from Enterprise Read-only Domain Controllers
Step 6: Remove Autoenroll permissions from Domain Controllers
Step 7: Remove Autoenroll permissions from ENTERPRISE DOMAIN CONTROLLERS
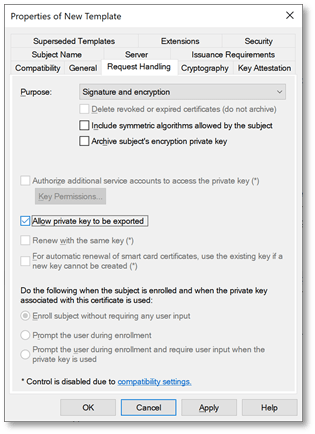
Step 8: Navigate to the Request Handling tab and select Allow private key to be exported
Step 9: Open the Certification Authority MMC
Step 10: Navigate to Certificate Templates
Step 11: Right-click on Certificate Templates and from the context menu select New and then Certificate Template to Issue
Step 12: Select the certificate template that you created and click OK
The Certificate Template is now on the CA
Requesting the Certificate
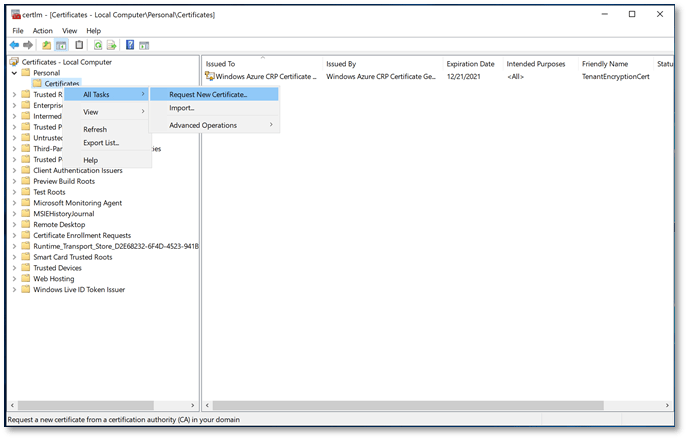
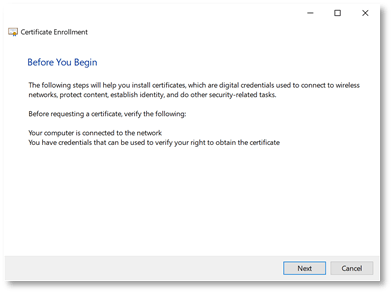
Step 1: Open certlm.msc on the Domain Controller
Step 2: Right-click on Personal or if it exists the Certificate folder underneath Personal
Step 3: From the context menu select All Tasks and the Request New Certificate…
Step 4: This will open the Certificate Enrollment wizard
Step 5: Click Next
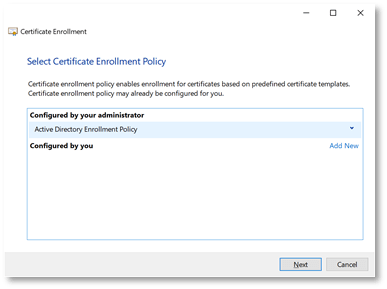
Step 6: On the Select Certificate Enrollment Policy page, click Next
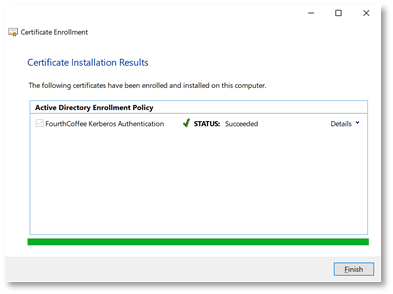
Step 7: On the Request Certificates page of the wizard, select the certificate template you created
Step 8: On the Certificate Installation Results page, click Finish
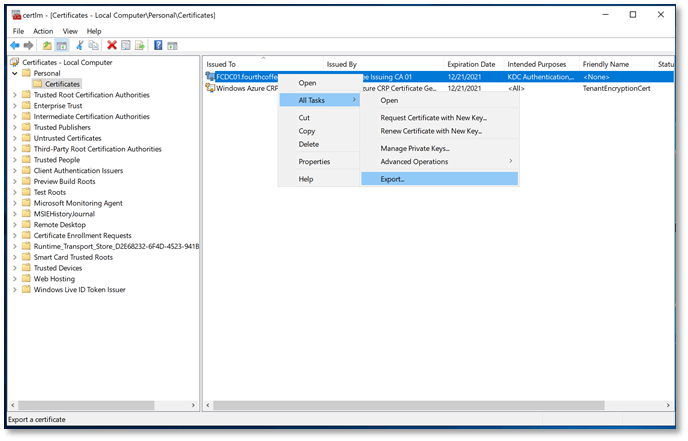
Exporing the Certificate
Step 1: Locate the certificate
Step 2: Right-click on the certificate and from the context menu select All Tasks and then Export…
Step 3: When the Certificate Export Wizard opens click Next
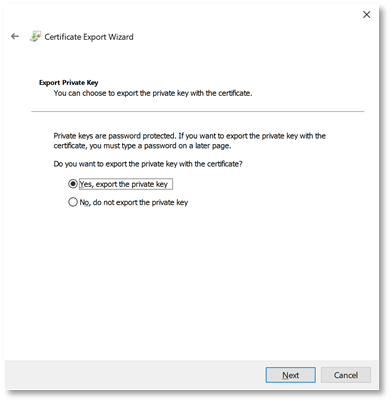
Step 4: On the Export Private Key page of the wizard, select Yes, export the private key
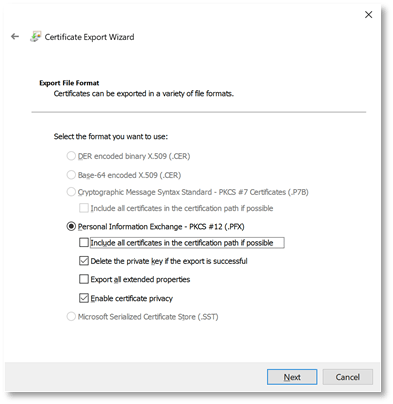
Step 5: Deselect Include all certificates in the certification path if possible and select Delete the private key if the export is successful
Step 6: Click Next
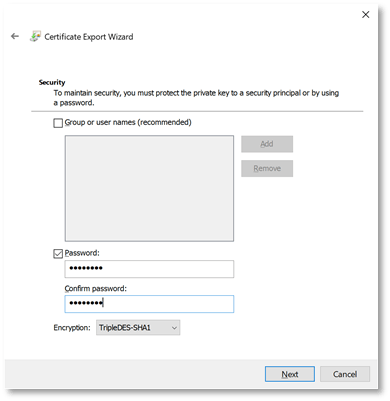
Step 7: Select Password and enter a password
Step 8: Click Next
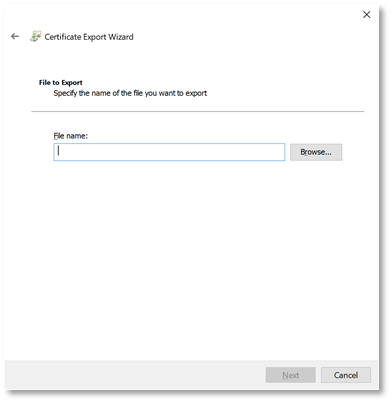
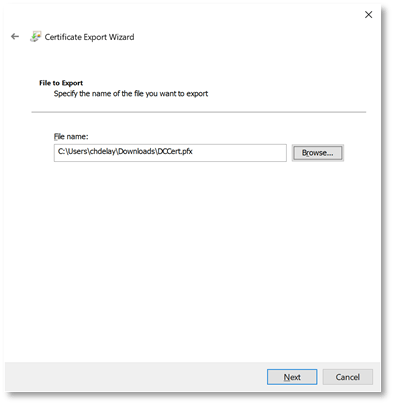
Step 9: On the File to Export page of the wizard, click Browse…
Step 10: Enter a name for the file and click Save
Step 11: Click Next
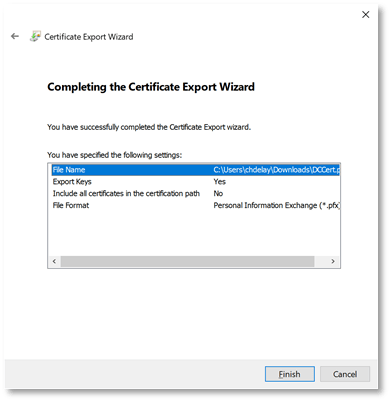
Step 12: On the final page of the wizard, click Finish
Step 13: Click OK
Importing the Certificate Into the DS Store
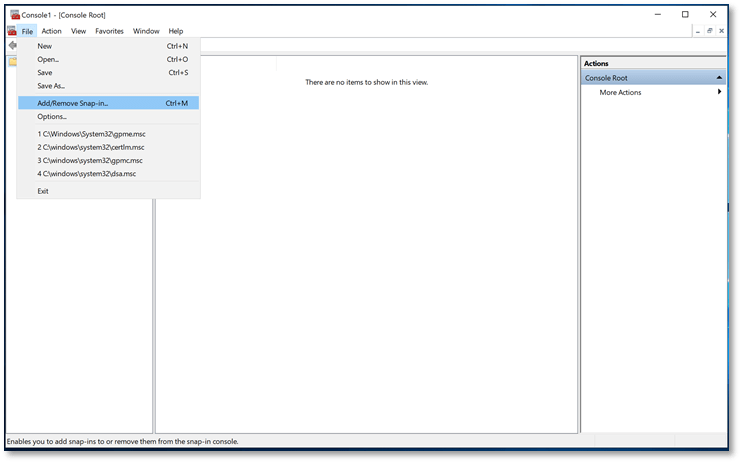
Step 1: Open mmc.exe
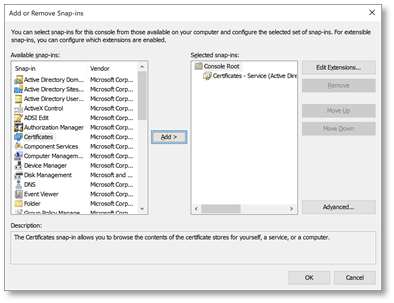
Step 2: Click on File and then Add/Remove Snap-in…
Step 3: Select Certificates and then click Add
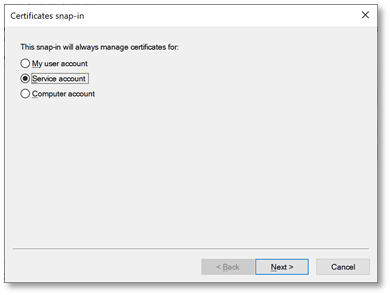
Step 4: Select Service Account and then click Next
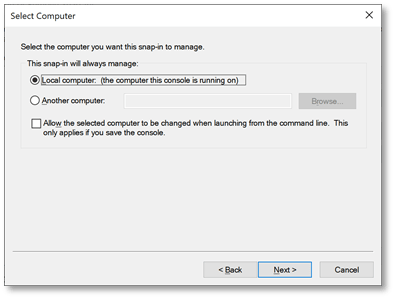
Step 5: Keep Local Computer selected and then click Next
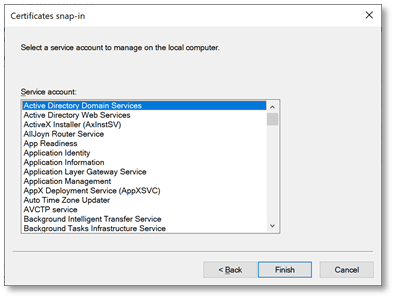
Step 6: Select Active Directory Domain Services, and click Finish
Step 7: Click OK
Importing the Certificate
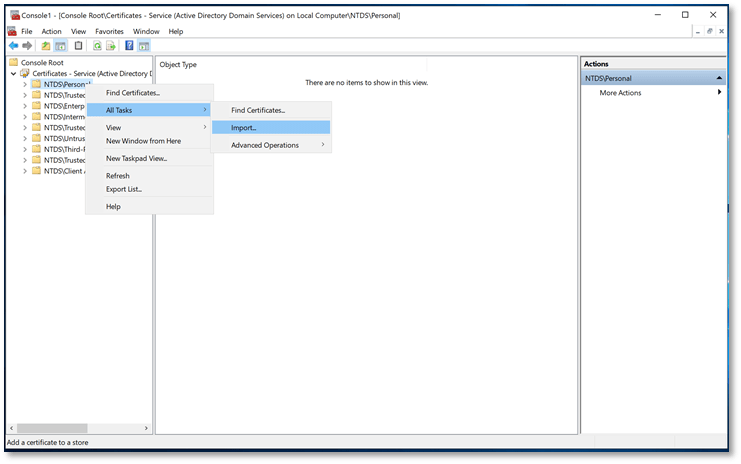
Step 1: Right-click on NTDS\Personal
Step 2: Select All Tasks and then Import…
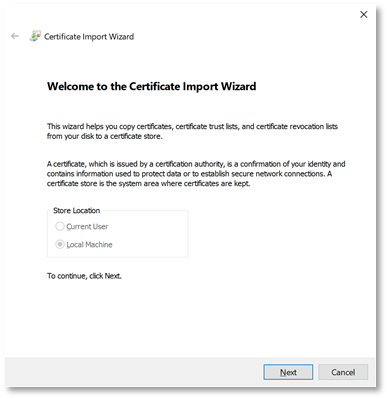
Step 3: When the Certificate Import Wizard opens, click Next
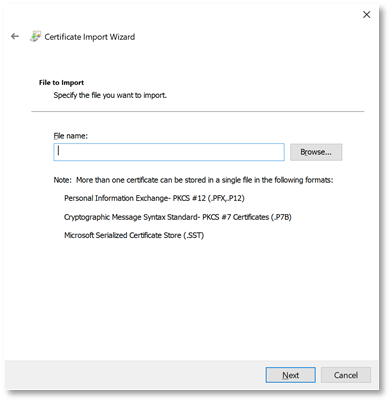
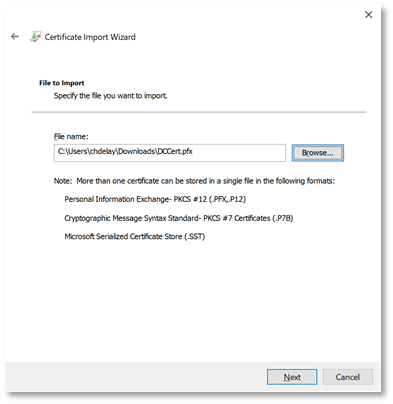
Step 4: On the File to import page of the wizard, click Browse…
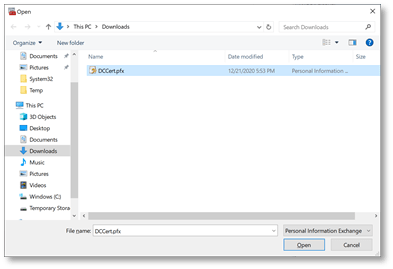
Step 5: Browse to the PFX file you previously created and click Open
Step 6: Click Next
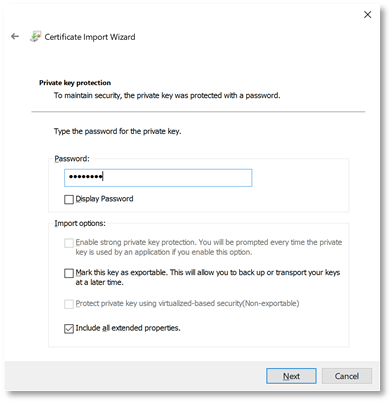
Step 7: Enter the password and click Next
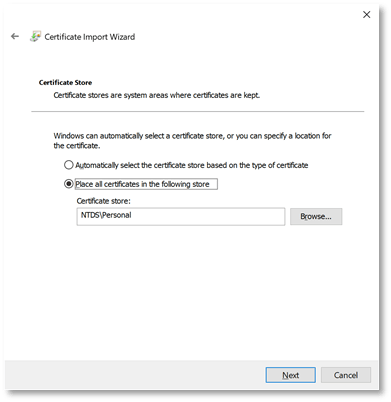
Step 8: On the Certificate Store accept the default and click Next
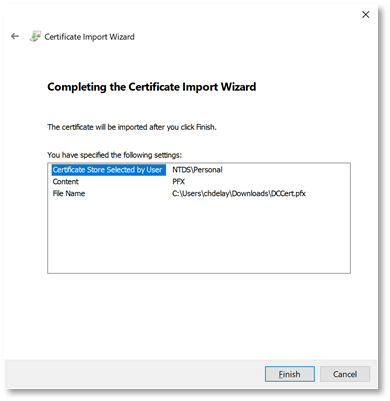
Step 9: Click Finish to complete the wizard
Step 10: Click OK
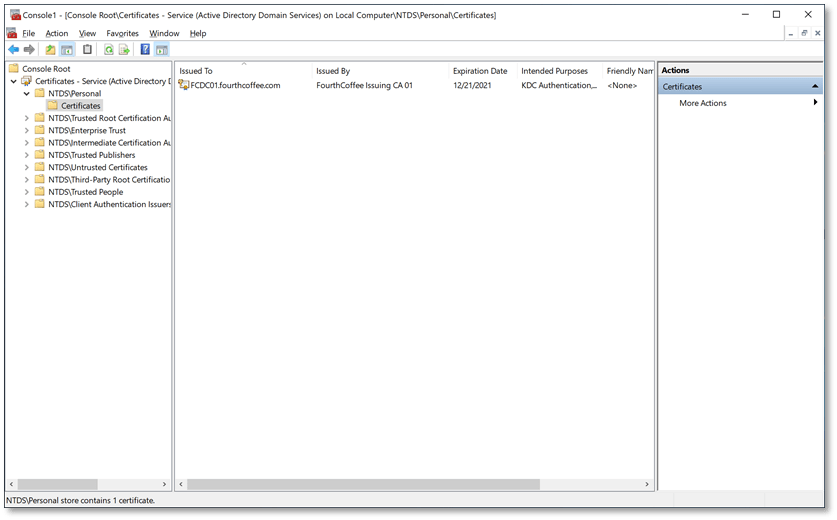
The certificate with now be in the DS Store
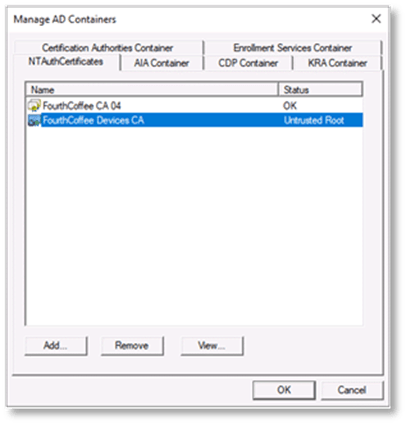
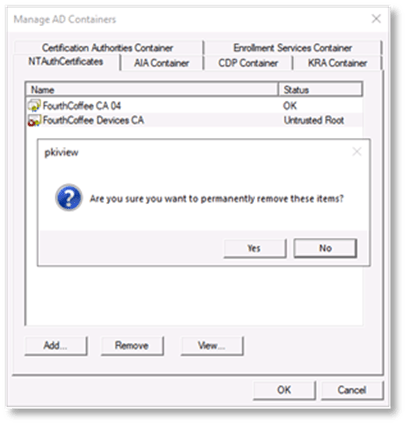
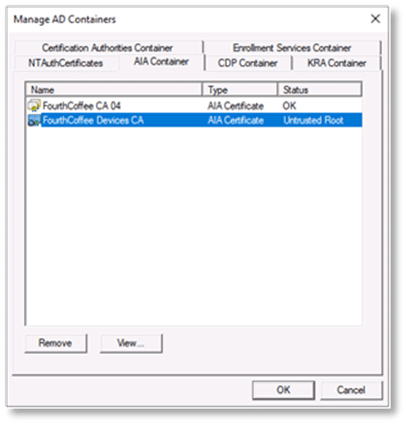
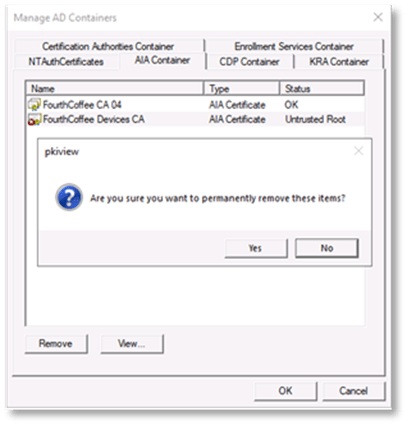
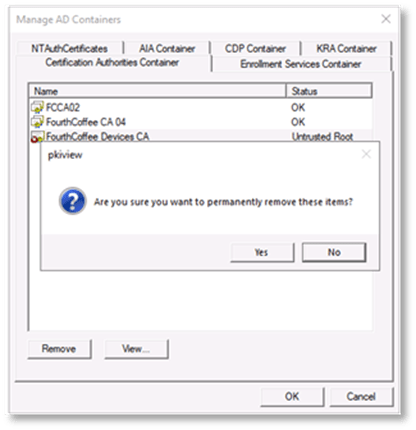
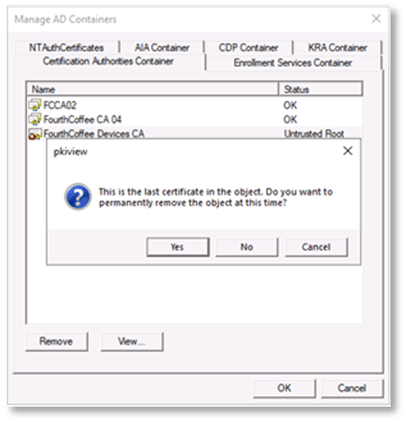
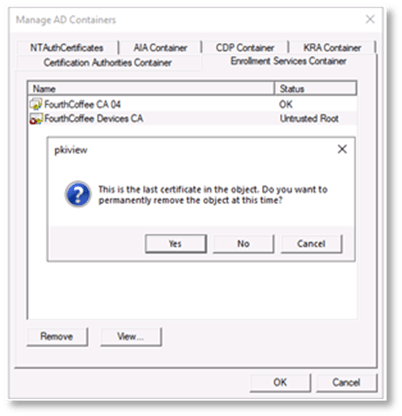
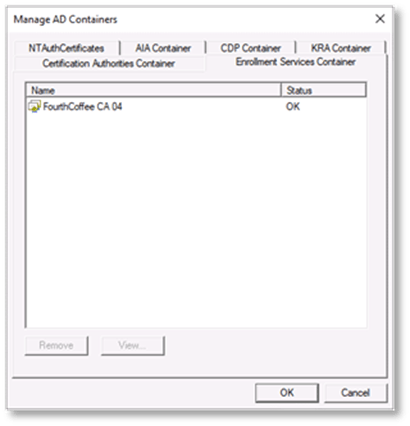
Superseding Certificate Templates
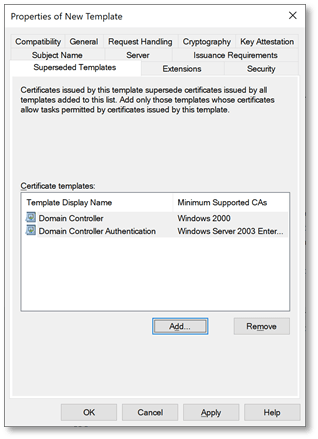
One thing I intentionally left out is superseding Certificate Templates, because it may not apply in situations where you have not issues certain types of certificates. But if you have previously issued Domain Controller or Domain Controller Authentication certificates you will want to supersede them. When you do this the previously issued Domain Controller and Domain Controller Authentication certificates will be archived on the Domain Controllers.
To supersede the Domain Controller and Domain Controller Authentication certificates, follow these steps while creating your certificate templates in the previous sections:
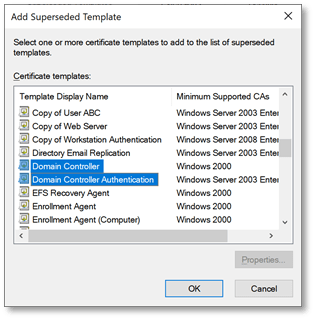
Step 1: Navigate to the Superseded Templates tab
Step 2: Select Domain Controller and Domain Controller Authentication certificate templates and click OK
I have come across many questions in regard to whether when deploying a PKI if a two tier PKI hierarchy and whether an offline root should be used.
The answer is yes an offline Root should be used in pretty much all environments. So, why? Some might ask, I have a super small environment, do I really need to this. The answer is, yes. So, again why?
First what is the reason for having an offline Root which pretty much guarantees that you would have to then setup a two or three tier hierarchy?
Root CA
The Root CAs main role is to be the trust anchor for the PKI hierarchy. In other words, the self-signed certificate that the Root CA generates is distributed to all devices that will need to trust the PKI. So, when you have a Root CA and Issuing CAs are subordinate to that CA, you only have one certificate to distribute. So, no matter how many issuing CAs you decide to deploy, you only have one Root certificate to distribute. Some applications may require you to install the subordinate CAs, but many applications can fetch the subordinate CAs from the AIA repository.
Two Tier Hierarchy?
So, let’s say you have a small environment, and you are only planning to install one Issuing CA. Do you still need an offline root and two-tier hierarchy? Yes. The reason you still want to have this, is because it allows you to later expand your PKI if necessary. You can later add additional issuing CAs that terminate in the same trusted root. And while you may only need one CA at this time, it is impossible to anticipate the future needs of your organization, so by deploying a two tier PKI you enable your PKI to be scalable. If you do not install a two tier hierarchy you are limited. Because if you later decide to expand your PKI, you either need to rebuild with an offline Root or manage multiple Issuing CAs that are also Root CAs. So, to avoid these future limitations you still would want to deploy a two tier PKI, or in some edge case scenarios a three tier PKI.
Offline Root
What is an offline root? An offline Root is a Root CA that is disconnected from the network for it’s entire “lifetime”. The OS should be installed without network connectivity, and the machine should never be connected to a network, not even for a minute.
What are the inconveniences of having an offline Root?
The main problem is that you periodically must update the CRL, then copy the CRL to the CRL Distribution Points (CDP) repositories. And if this CRL expires, it can cause outages in your environment.
So, do you need to make your Root CA and offline CA?
Yes. As mentioned earlier the Root CA is the trust anchor of the PKI. Also, you want to put as much security around CAs as possible since if they are compromised certificates that are trusted in your environment can be issued. And if a malicious actor compromises your CA, they can impersonate identities in your environment. So, the security guidance is to have CAs offline if they infrequently issue certificates. Issuing CAs are online because they issue certificates very frequently. Root CAs and Policy CAs are kept offline because they issue certificates very infrequently.
To explain this further, let’s us a fictional scenario. Let’s say you have an Offline Root CA, and you have an Issuing CA that only issues Code Signing certificates for your organization. And let’s say due to the sensitivity of these types of certificates you want to provide maximum security for the Code Signing CA. And your development group typically only requests Code Signing certificates 5 time a year. In this scenario you would keep the CA offline and only bring it online 5 times a year. And if possible, like the Root CA you would set it up as a standalone CA and keep it disconnected from the network (offline). Sure, this makes administration a bit harder since you have to sneaker-net the requests to the CA and the certificates off the CA. But it dramatically increases the security of the CA, so it is worth the trade off.
So, to answer the question “Why have an offline root?”
Because the CA infrequently issues certificates and CRLs
Because compromise of the CA can result in a compromise, or assist in the compromise of your environment (Possibly including Active Directory)
If it is not connected to the network, it cannot be attacked from the network
It is best practice and if your PKI gets audited you will be flagged for not having it offline
If you later have to convert the CA to an offline CA, you will have to potentially revoke previously issued certificates and renew the Root CA certificate, if not have to redeploy the Root CA altogether
Why should I not deploy a single tier PKI?
Having the Root CA online violates best practice, due to the reasons above
The PKI is not scalable (We want to future proof deployments, so we can avoid having to redeploy the PKI in the future)
If your PKI is audited, you will be flagged during the audit, since your Root CA is online
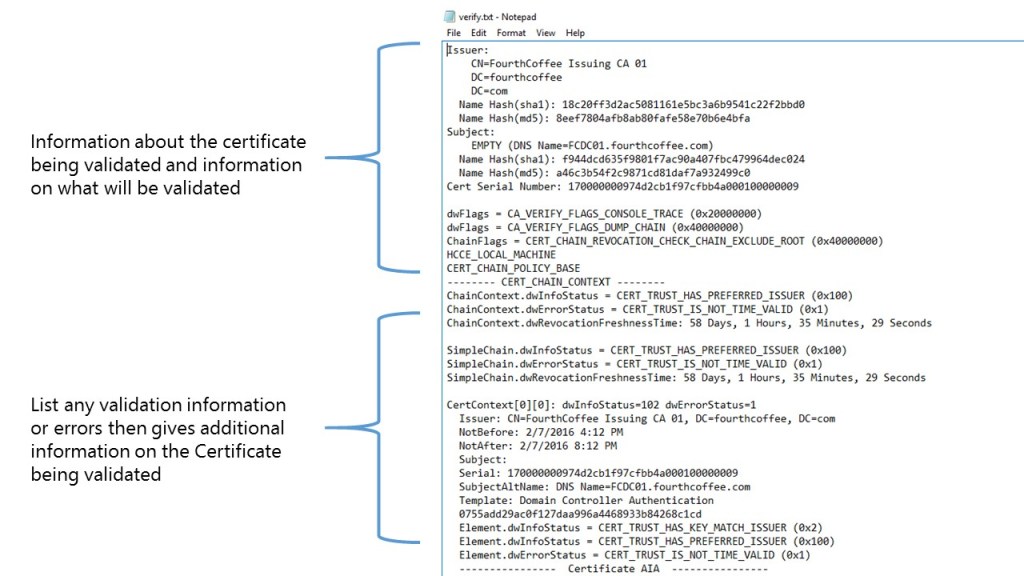
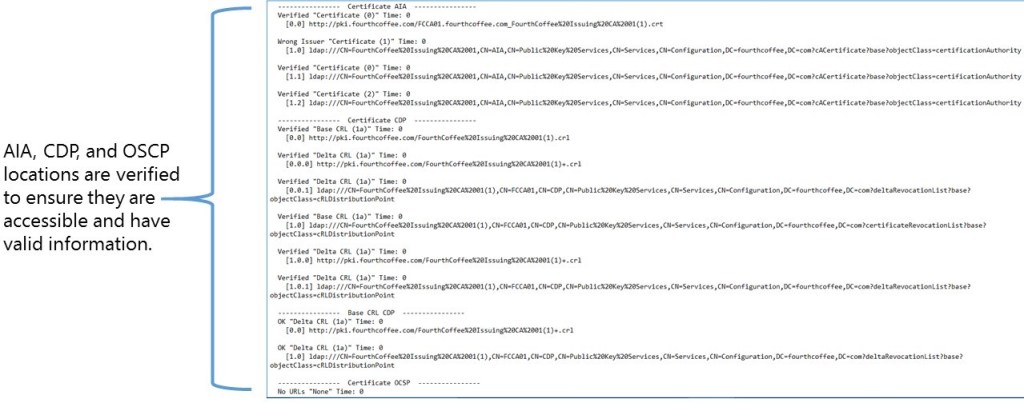
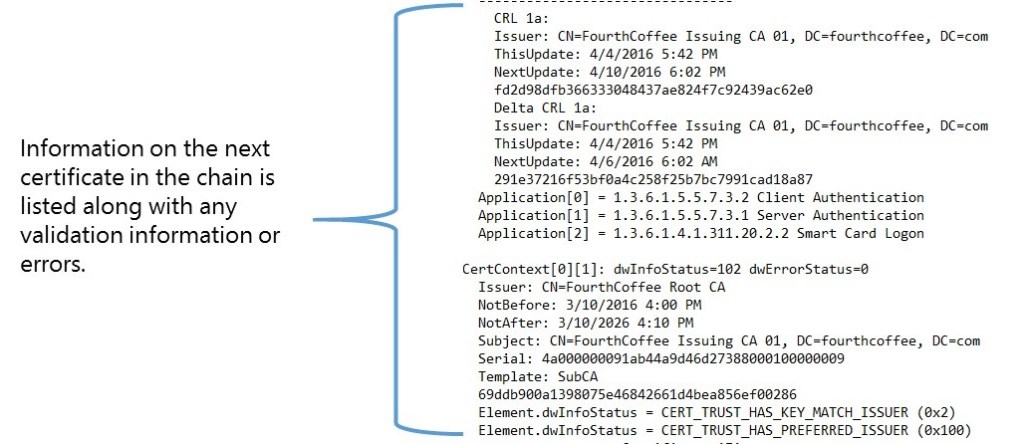
There are several tools you can use to troubleshoot certificate validation. The best tool is certutil -verify -urlfetch. That tool is the best because it checks all certificates in the chain and gives us a lot of validation information. You can find information on how to use that tool, at the end of the following blog: Certificate Validation – xdot509.blog.
However, there is a GUI tool that can be used: certutil -url. The disadvantage to this tool is that it just checks one certificate at a time and mostly provides information on the accessibility of CDP, AIA, and OCSP. So, if you just want to check that your repositories are accessible this is a good way to perform that check. It is also easier to understand the output form this tool, which can make it easier for you to communicate your issue to your colleagues when you are troubleshooting.
To run the command, you first need a certificate file. So, you can export the certificate and save it to a file location. If it is a website you are having trouble with you can export the cert from the lock icon in the browser.
The syntax of the command is: certutil -url <Certificate File Name>, where <Certificate File Name> is the certificate file you previously exported. This will launch the GUI.
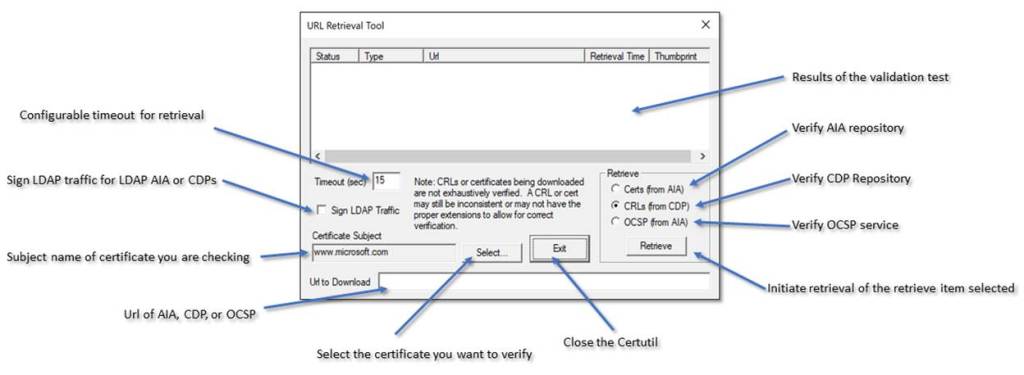
The tool is pretty self-explanatory, but the graphic below provides some additional information.
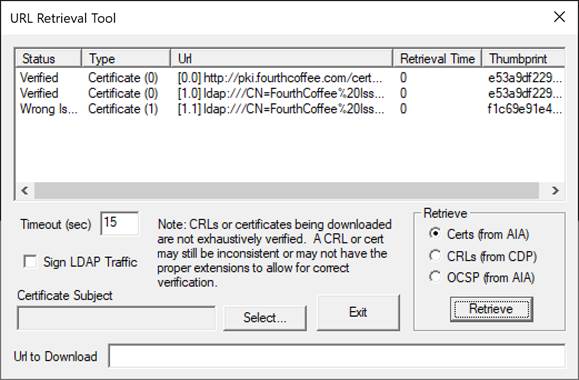
If you click Certs (from AIA) and click Retrieve it will verify that it can retrieve the certificates from the AIA repository and that they are the correct certificates.
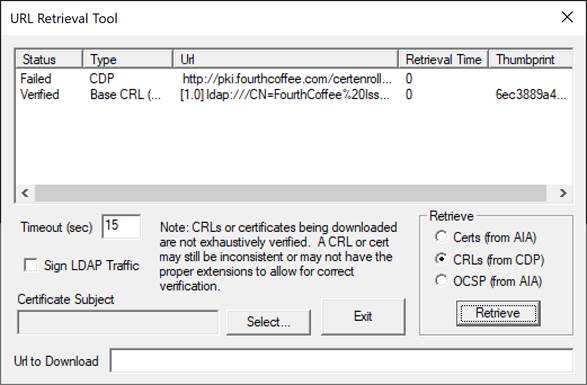
If you select CRLs (from CDP) and click Retrieve it will verify that it can retrieve the certificates from the AIA repository and that they are the correct certificates.
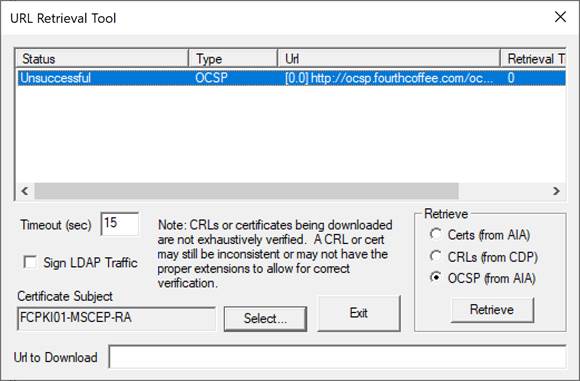
And finally, you can select OCSP (from AIA) and click Retrieve it will verify that OCSP is working
This blog posting covers certificates. The purpose of this post is for those who would like to better understand certificates, their structure, and their contents. This blog post also covers basic management of certificates.
1.2 What is a certificate?
A certificate is a digital document that binds an identity to a public key. The identity contained in a certificate can be associated with any number of things including computers, users, and services such as a web site. Certificates also contain additional information that makes the certificate more useful in many respects.
Public Key cryptography makes use of two related keys. There is a public key and a private key. Any data that is encrypted with the public key can be decrypted the private key. Also, any data that encrypted with the private key can be decrypted with the public key. The public key is distributed via certificates and the private key is protected on a computer or on a cryptographic device such as a smart card.
Certificates also have a period of time for which they are valid. In other words, a certificate is valid for a certain period of time. This built in expiration mechanism helps increase the security of certificates. This is due to the fact that if a certificate is compromised and that compromise is not detected it will eventually expire and become invalid.
There is some basic information you can get from a certificate by viewing it in the Windows UI. However, for most troubleshooting you will want to look at the certificate fields which will be discussed in the next section.
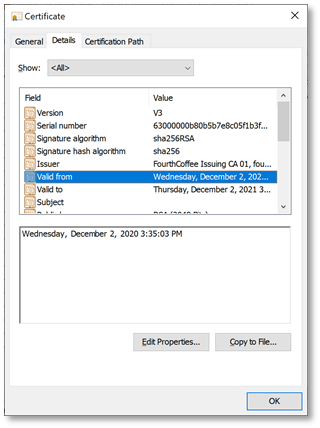
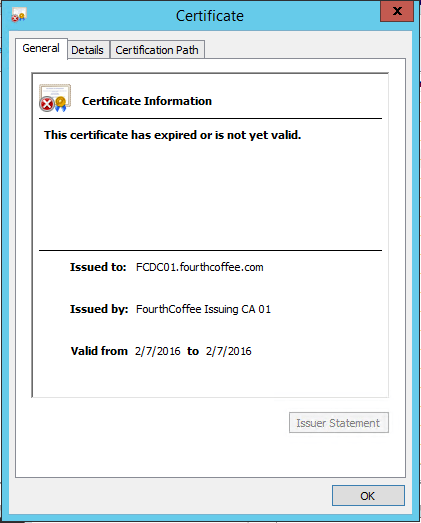
In the General Tab you can look at a description of the purposes of the certificate. You can also get the identity of the subject and the issuer. You can view the validity period of the certificate. If there is a private key associated with the certificate available in the certificate store you will see that as well.
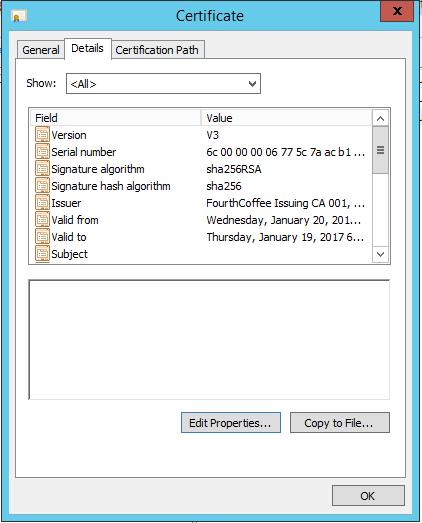
In the Details Tab you will see all of the fields listed in the certificate as well as some additional information supplied by the Operating System. We will discuss these fields in the next section. You can also use the Copy to File… button to export a certificate.
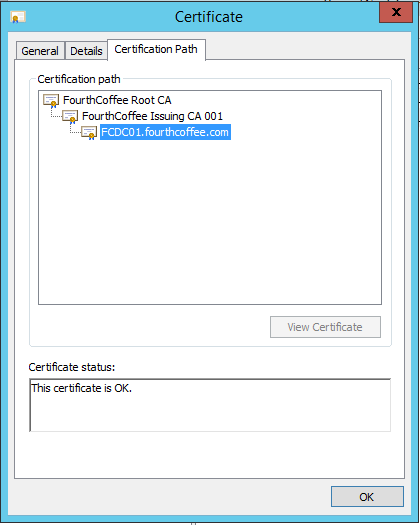
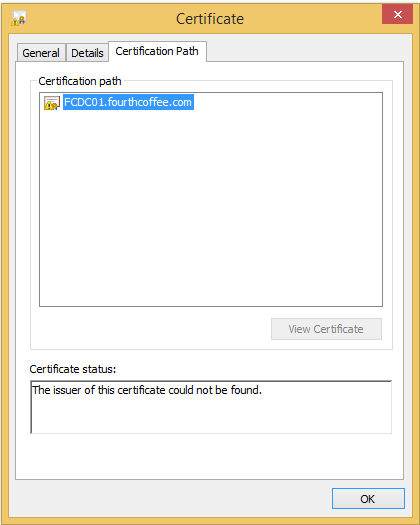
The Certification Path Tab shows the chain of the certificate, starting at the current certificate and going up as far as the Root CA. There is also a Certificate status section that can be used for identifying issues with the certificate in terms of trust or validation.
To better understand certificates including how they are used and validated we need to understand the various fields that are contained in a certificate.
Certificates contain two types of fields Version 1 Fields and Extensions.
Version 1 fields are those that were specified in the original specification for X.509 certificates defined in RFC 1422.
1.7.1.1 Version
This field indicates the X.509 version that is being used. The current version of the X.509 standard is Version 3.
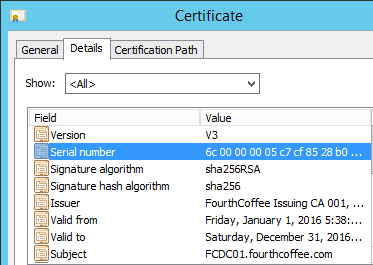
1.7.1.2 Serial Number
Serial Number is a unique identifier for each certificate. The Serial Number should be unique at least on a per CA basis. In other words, a Certification Authority should not issue more than one certificate with the same Serial Number.
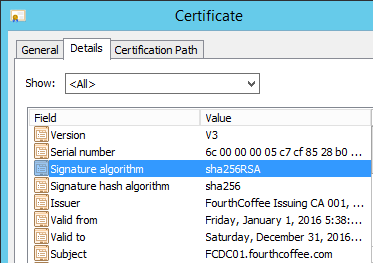
1.7.1.3 Signature Algorithm
This field contains the name of the Public Key Algorithm and Hashing Algorithm that were used to sign the certificate.
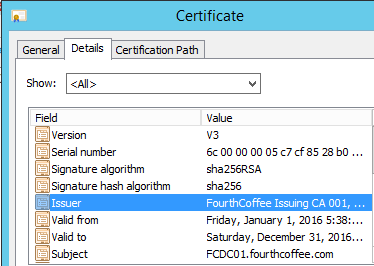
1.7.1.4 Issuer
This field indicates the name of the CA that issued the certificate
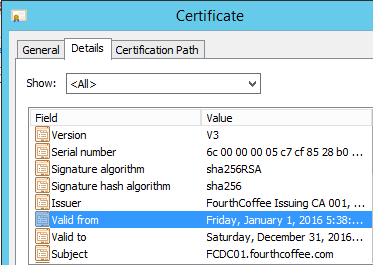
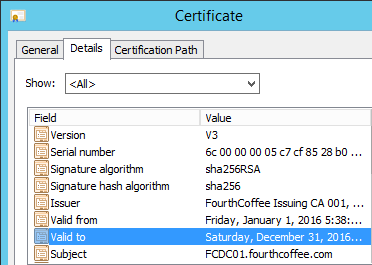
1.7.1.5 Valid From (Validity Period)
This field indicates at what date and time the certificate becomes valid.
1.7.1.6 Valid To (Validity Period)
This field indicates at what date and time the certificate expires
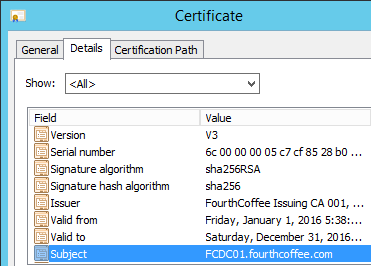
1.7.1.7 Subject
This field contains the identity that is bound to the public key of the certificate. The identity is bound to that public key duet to the fact that the certificate contains both the public key as well as the identity are contained within a certificate that is signed by a trusted certification authority.
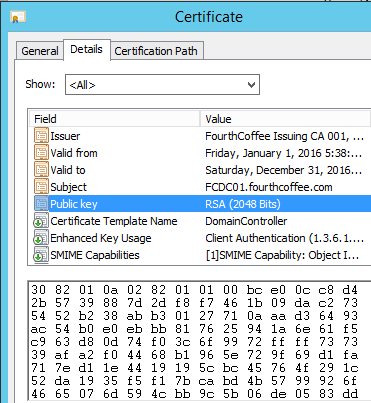
1.7.1.8 Public key
This field contains the public key that is bound to the certificate.
After the publication of RFC 1422 the idea of extensions in certificates were introduced in a later RFC. Extensions are optional fields that can be included in a certificate. However, generally the extensions included in RFC 5280 should be understood by PKI enabled applications.
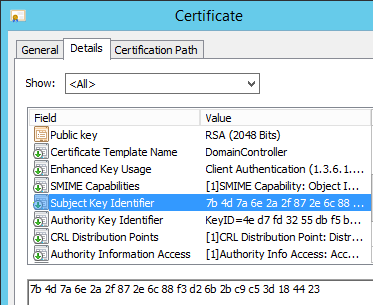
1.7.2.1 Subject Key Identifier
This field contains a hash of the public key in the certificate, this information is one way to identify the certificate.
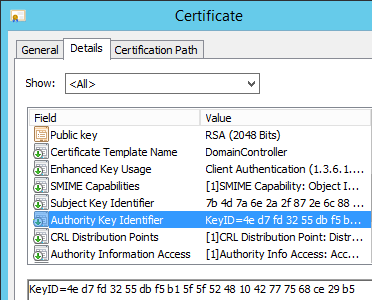
1.7.2.2 Authority Key Identifier
This field contains a hash of the public key that is contained in the CA certificate, this is one way to identify the certificate of the CA that issued the current certificate.
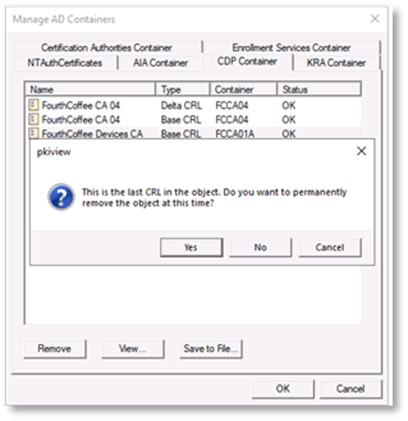
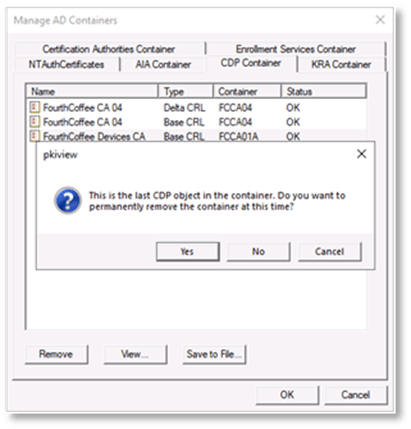
1.7.2.3 CRL Distribution Points
This field indicates where Certificate Revocation Lists can be downloaded from to determine if the certificate has been revoked.
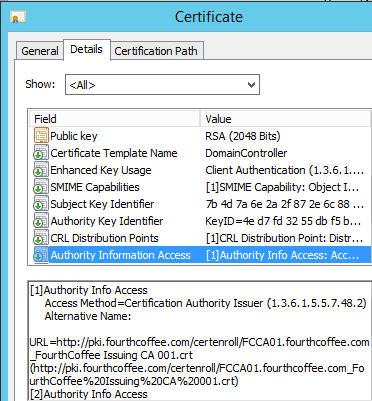
1.7.2.4 Authority Information Access
This field indicates where the certificate of the CA that issued the certificate can be downloaded. This field will also indicate where the OSCP service can be accessed, if one is available in the environment.
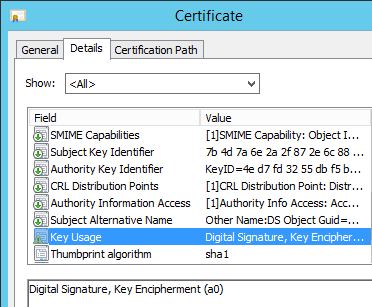
1.7.2.5 Key Usage
This field indicates what purposes the keys in the certificate can be used for and these purposes include Digital Signature, Key Encryption, Key Agreement, Certificate Signing, CRL Signing, Key Agreement Enciphering, Key Agreement Deciphering.
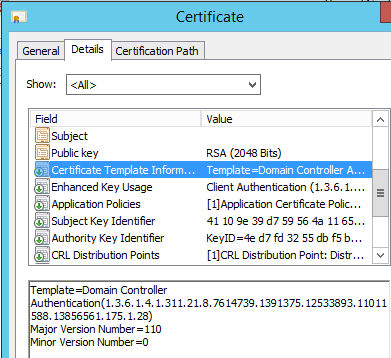
1.7.2.6 Certificate Template Information
This is a Microsoft specific extension which means it is note one included in the RFC 5280, as such it would only be expected to be understood by Microsoft applications. This field contains the name and OID of the Certificate Template.
1.7.2.7 Certificate Template Name
This is a Microsoft specific extension which means it is note one included in the RFC 5280, as such it would only be expected to be understood by Microsoft applications. This field contains the name of the Certificate Template.
1.7.2.8 Enhanced Key Usage
This extension specifies for what purposes the public key may be used.
1.7.2.9 Application Policies
This extension specifies for what applications the certificate can be used.
1.7.2.10 Subject Alternative Name
The Subject Alternative Name or SAN is an optional field that contains the identity or identities that are bound to the certificate. The SAN extension is typically used when the certificate will contain more than one identity. To elaborate further identity information can be stored in either the subject field, the Subject Alternative Name extension or both. Some services such as SSL with ignore the subject field if the Subject Alternative Name extension is populated.
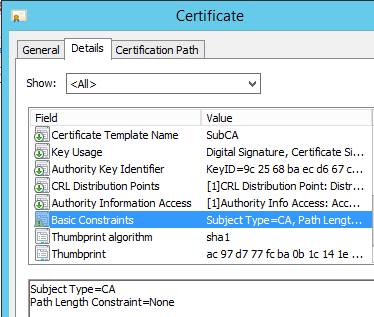
1.7.2.11 Basic Constraints
Typically, this extension is only included in CA certificate and identifies the certificate as a CA certificate.
In Windows certificates can be stored in a number of places, so let’s discuss the various locations where certificates are stored and the benefits of storing certificates in these locations.
Certification Authorities by default store a copy of every issued certificate in its database. Storing certificates in the CA Database enables the following capabilities:
Retrieval- Having a copy of each certificate provides a central repository from where certificates can be retrieved by enrollees or a certificate manager.
Recovery- Certificates can be recovered for a user or computer since a copy of the certificate is stored in the CA Database. Additionally, if Key Archival is enabled the private key can be recovered for encryption certificates.
Forensics and Analysis: The database can be searched to determine what certificates have been issued and provide useful information such as when a certificate expires.
Revocation: If a certificate has been compromised or is no longer trusted that certificate can easily be located in the CA database and revoked.
Certificates can be stored on the userCertificate attribute of a user or computer that enrolls for a certificate. Publishing certificates to a computer or user object is typically not necessary for most applications. However, some applications such as EFS or Email Encryption can query Active Directory for the certificate of the user that the document or email for which it is being encrypted.
As previously mentioned the certificate is published to the userCertificate during enrollment. The certificate is published by the Certification Authority. The Cert Publishers security group is the group that has permission to write to the userCertificate attribute. In order for the CA to be able to publish a certificate to the userCertificate attribute it must be a member of the Cert Publishers group in the corresponding Active Directory domain.
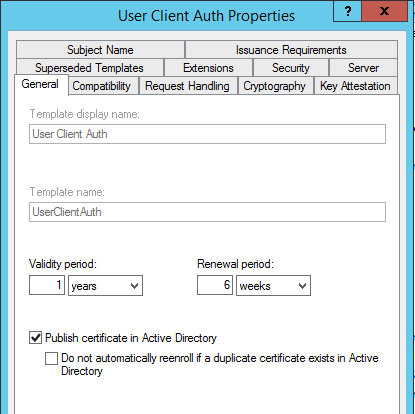
Additionally, the certificate template must be configured to Publish certificate in Active Directory as seen in the screenshot below:
1.9.2.1 Viewing the userCertificate Attribute
There are several ways to view certificates that are stored in the userCertificate attribute.
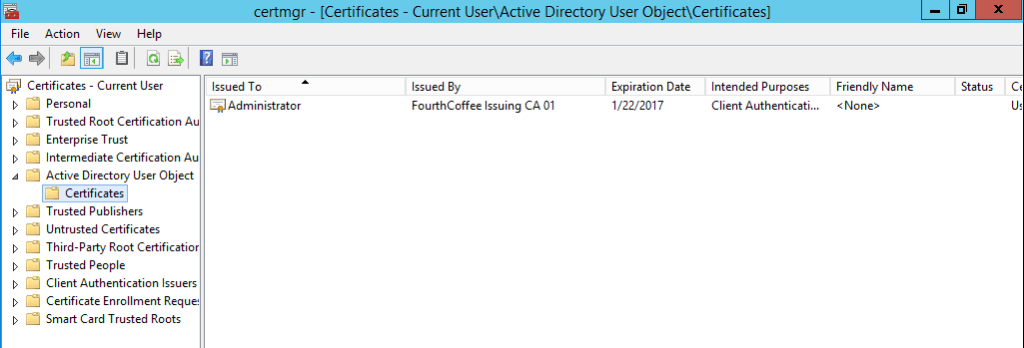
1.9.2.1.1 Certmgr.msc
If a user opens Certmgr.msc they can view what certificates are stored on their user object by navigating to the Active Directory User Object node.
1.9.2.1.2 Active Directory Users and Computers
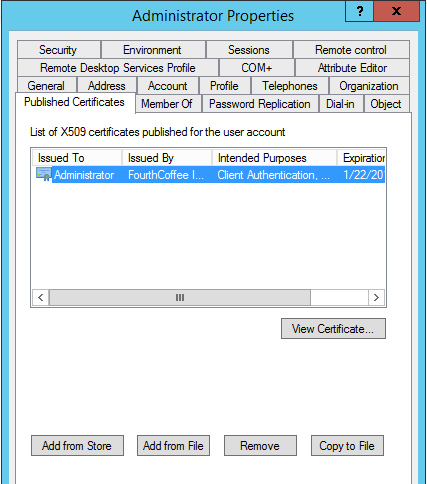
To view the userCertificate attribute in Active Directory Users and Computers navigate to the user or computer whose userCertificate attribute you wish to view. Open the properties for the user or computer account and navigate to the Published Certificates tab. If the Published Certificates tab is not available, you need to enable Advanced Features in the Active Directory Users and Computers View menu.
1.9.2.1.3 ADSIEDIT
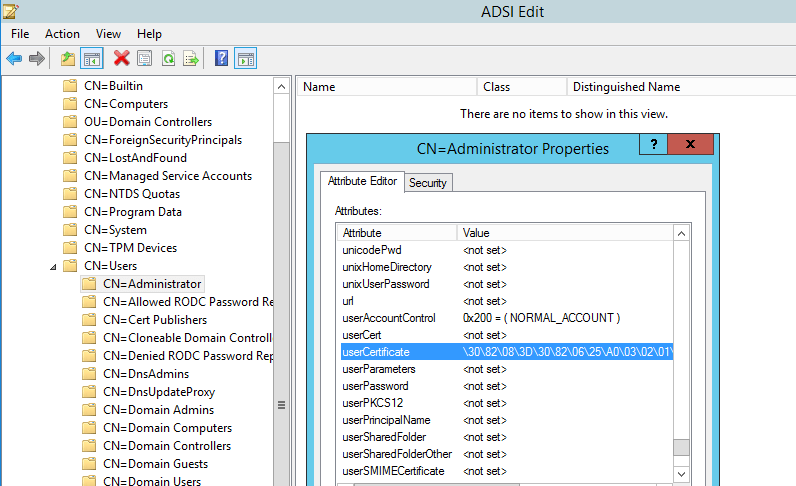
To view the userCertificate attribute connect to the Domain Partition (Default Naming Context). Go to properties on the corresponding object and navigate to the userCertificate attribute.
For certificates that are stored on the local machine for the computer or user these certificates are stored on the local file system or registry. The only exception to this is if you are storing certificates and/or keys on a cryptographic device such as a TPM or Smart Card.
The following tables illustrate where certificates are stored on the local computer.
The following table shows where Computer certificates are stored on the computer.
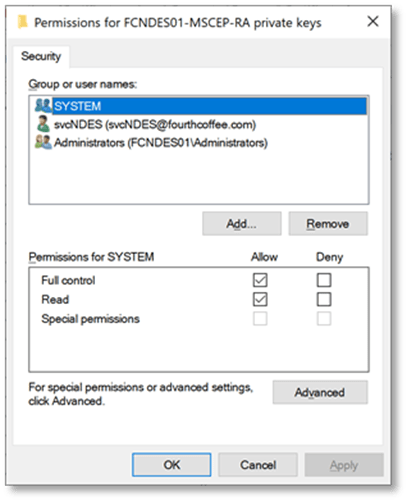
1.9.3.1 Protection of Private Keys that are stored locally
Private keys are protected by the Data Protection Application Programming Interface (DPAPI). DPAPI protects the private keys with encryption and that encryption is accessed with a key that is a derivation of the user or computer’s password.
Certificates can also be stored on a cryptographic device called a Smart Card. Smart cards are typically credit card size and require a smart card reader. However, there are also USB smart cards that have an integrated smart card reader. Regardless, these devices have an integrated circuit and cryptographic functions are performed on that hardware. Certificates and private keys are stored on the smart card. To use the keys on that smart card a user must have knowledge of the PIN associated with that smart card and must enter the PIN when using the smart card. The key advantage is that the private keys are protected by hardware. A secondary advantage is the smart card provides a mechanism to roam the user’s certificates and keys. This is due to the fact that the certificates and keys can be used on any system where the user inserts their smart card.
Starting in Windows 8.0 the capability to store certificates on the Trusted Platform Module chip was introduced. A Virtual Smart Card is created on the TPM and the certificate is stored on the Virtual Smart Card which is protected by the TPM. The Virtual Smart Card offers some of the advantages of physical smart card in the sense that the private keys are protected by hardware and cryptographic functions that require use of the private key occur on the TPM. However, since the TPM is physically part of the computer certificates do not roam with the user as they do in the case of physical smart cards. However, in some cases that is a practical advantage since physical smart cards can be lost or forgotten by the user.
A Hardware Security Module (HSM) is a dedicated cryptographic security device for protecting keys. In PKI we use an HSM to protect the private keys that are linked to a certificate and that are part of a public/private key pair. HSMs are commonly used to protect the Private Keys of Private Keys are isolated to prevent tampering or exportation of the Private Keys. Cryptographic functions that require use of the private key occur in the HSM. HSMs typically use K of N security to prevent a single individual from having control of the HSM. K of N security means that a certain number of credentials have to presented in order to make changes to the HSM. For example, if 5 credentials are provisioned for administrative actions on HSM, you can configure the HSM so that at least 3 of those 5 credentials must be presented to the HSM for administrative actions to be performed. There are several types of HSMs currently used. There are USB HSMs that are typically used for an Offline CA or for Code Signing. There are PCI Express HSMs that can be used with a Physical CA. However, the most commonly type used of HSM that I have seen in use are Network HSMs. Network HSMs are connected to via Ethernet.
There are a number of tools that are used for certificate administration. The most common tool that you may end up using for certificate administration is the Certificates MMC. The Certificates MMC itself can be targeted at the certificate store of a user, a computer, or a service account. However, you will most commonly use the Certificates MMC for administration of user or computer certificates, and hence we will focus on administration of user and computer certificates.
Certmgr.msc is the certificates MMC for managing user certificates. Using this MMC you can perform the following actions for the user:
View Certificates
Import Certificates
Export Certificates
Enroll for Certificates
View Requests
Generate Certificate Request
Process Approved Certificate Requests
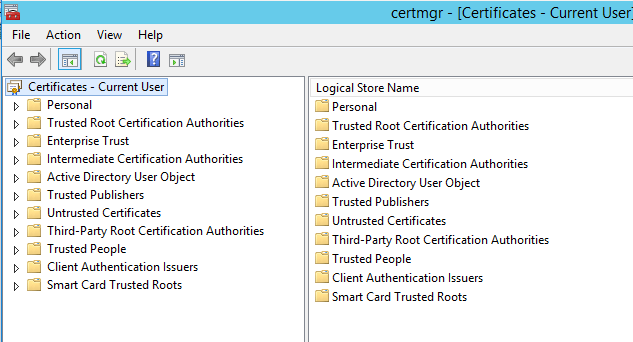
Below is a screenshot of the Certmgr.msc:
The table below describes the purpose of each container in Certmgr.msc.
Folder Name
Contents
Personal
Certificates associated with private keys to which you have access. These are the certificates that have been issued to you, or to the computer or service for which you are managing certificates.
Trusted Root Certification Authorities
Implicitly trusted certification authorities. Includes all of the certificates in the Third-Party Root Certification Authorities store plus root certificates from your organization and Microsoft.
Enterprise Trust
A container for certificate trust lists. A certificate trust list provides a mechanism for trusting self-signed root certificates from other organizations and limiting the purposes for which these certificates are trusted.
Intermediate Certification Authorities
Certificates issued to subordinate certification authorities.
Active Directory User Object
Certificates associated with your user object and published in Active Directory.
Trusted Publishers
Certificates from certification authorities that are trusted by Software Restriction policies.
Untrusted Certificates
An untrusted certificate is a certificate that a certification authority has revoked, or a certificate that for other reasons has been placed in the Untrusted Certificates folder on your computer.
Third-Party Root Certification Authorities
Trusted root certificates from certification authorities other than Microsoft and your organization.
Trusted People
Certificates issued to people or end entities that are explicitly trusted. Most often these are self-signed certificates or certificates explicitly trusted in an application such as Microsoft Outlook.
Client Authentication Issuers
A list of issuers whose certificates are trusted for TLS/SSL Client Authentication.
Certificate Enrollment Requests
Pending or rejected certificate requests.
Smart Card Trusted Roots
On smart card insertion, the Certificate Propagation service propagates any root certificates on the card to the Smart Card Trusted Roots certificate stores on the local computer. This process establishes a trust relationship with the organization.
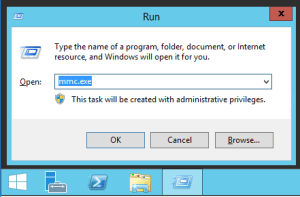
Certlm.msc is the Certificate MMC for managing certificates for the local computer. Prior to Windows 8.1 the shortcut (certlm.msc) was not available for launching the Certificate MMC targeted to the local computer. So, for pre-Win8 or pre-Windows Server 2012 machines the following steps can be used to launch the Certificates MMC targeted for the local computer.
Steps for Opening Certificates MMC Targeted for Local Computer
Step 1: Click the Start key and then the R key
Step 2: Type mmc.exe and click OK
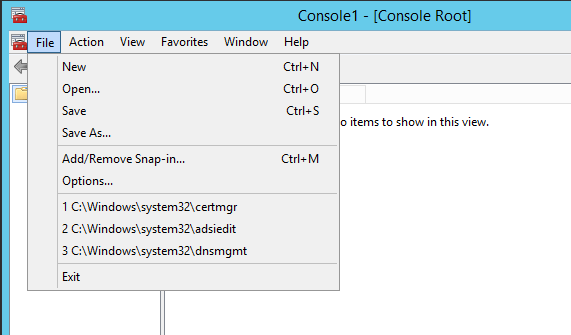
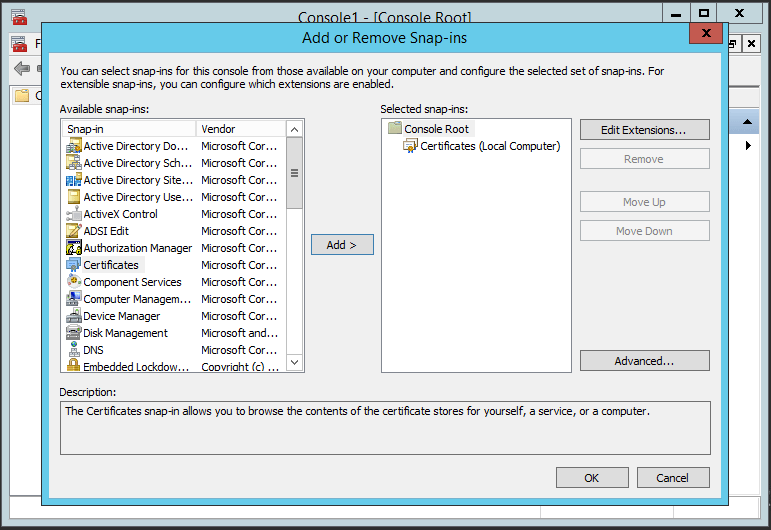
Step 3: In the new console select the File menu and from the File menu select Add/Remove Snap-in…
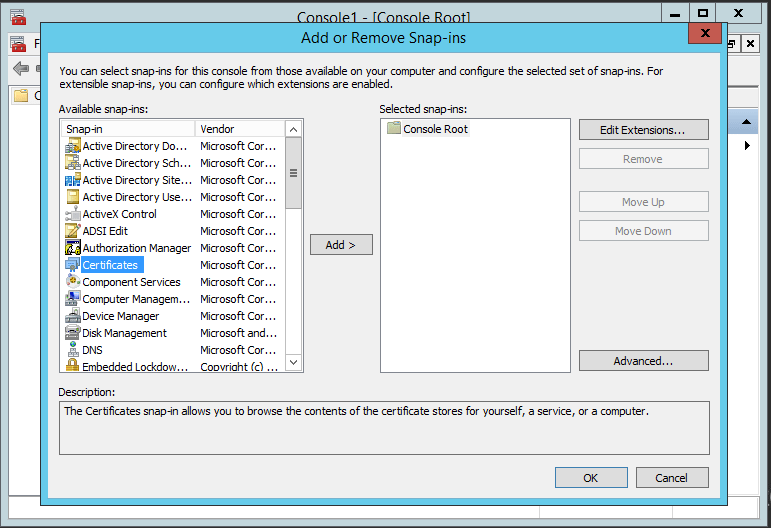
Step 4: Select Certificates and then click the Add button
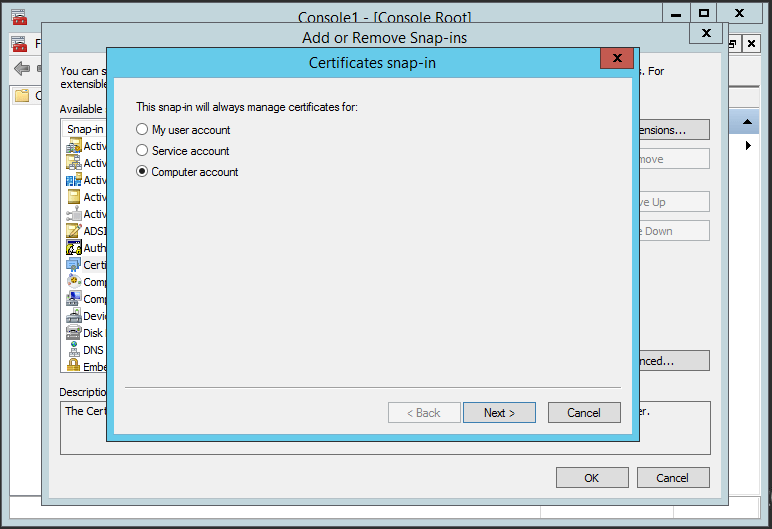
Step 5: Select Computer account and then click Next
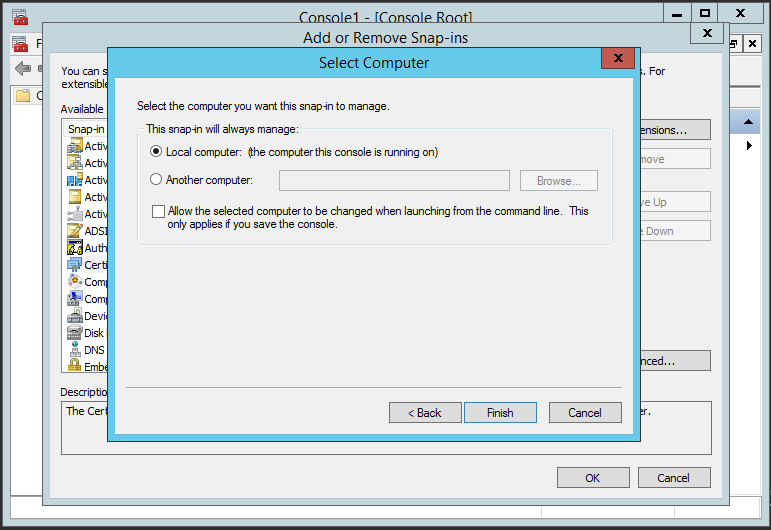
Step 6: Select Local computer: (the computer this console is running on), and the click Finish
Step 7: Click OK
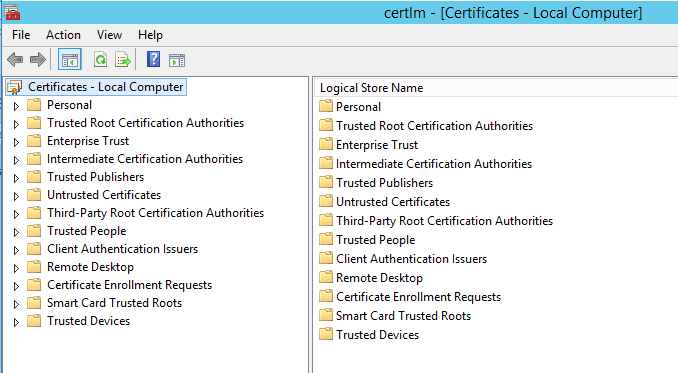
The Certificates MMC targeted for the Local Computer will now be Open
1.10.2.1 Certlm.msc Uses
The following tasks for the local computer can be performed using certlm.msc:
View Certificates
Import Certificates
Export Certificates
Enroll for Certificates
Generate Certificate Request
Below is a screenshot of the Certmgr.msc:
The table below describes the purpose of each container in Certlm.msc.
Folder Name
Contents
Personal
Certificates associated with private keys to which you have access. These are the certificates that have been issued to you, or to the computer or service for which you are managing certificates.
Trusted Root Certification Authorities
Implicitly trusted certification authorities. Includes all of the certificates in the Third-Party Root Certification Authorities store plus root certificates from your organization and Microsoft.
Enterprise Trust
A container for certificate trust lists. A certificate trust list provides a mechanism for trusting self-signed root certificates from other organizations and limiting the purposes for which these certificates are trusted.
Intermediate Certification Authorities
Certificates issued to subordinate certification authorities.
Trusted Publishers
Certificates from certification authorities that are trusted by Software Restriction policies.
Untrusted Certificates
An untrusted certificate is a certificate that a certification authority has revoked, or a certificate that for other reasons has been placed in the Untrusted Certificates folder on your computer.
Third-Party Root Certification Authorities
Trusted root certificates from certification authorities other than Microsoft and your organization.
Trusted People
Certificates issued to people or end entities that are explicitly trusted. Most often these are self-signed certificates or certificates explicitly trusted in an application such as Microsoft Outlook.
Client Authentication Issuers
A list of issuers whose certificates are trusted for TLS/SSL Client Authentication.
Remote Desktop
Certificates that are used to provide SSL security for RDP connections.
Smart Card Trusted Roots
On smart card insertion, the Certificate Propagation service propagates any root certificates on the card to the Smart Card Trusted Roots certificate stores on the local computer. This process establishes a trust relationship with the organization.
Web Hosting
Highly scalable certificate store for SSL certificates that can support thousands of certificates to support increased secure site density.
The following video provides additional information on certificates:
One important concept to understand when troubleshooting certificates. This blog covers the basics of understanding certificate validation. Then towards the end, I cover troubleshooting steps.
1.2 Identity Validation
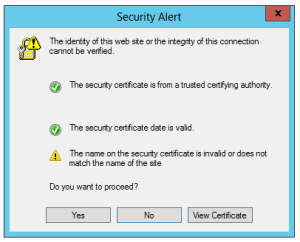
Certificates bind an identity to a public key. And one of the reasons that we use certificates is to ensure that we are accessing the resource that we intend to access. Therefore, we expect the identity in the certificate to match the identity we are trying to access. For example, if you enter the following URL in your web browser: https://www.microsoft.com, you would expect that the identity www.microsoft.com would be included in the certificate. There are two possible fields in the certificate where this identity information can be located: Subject and Subject Alternative Name. The Subject is a Version 1 field that will typically only contain one identity. The Subject Alternative Name field is an extension and is typically used when there is more than one identity in the certificate. For some applications such as SSL, the subject will be ignored if the SAN is populated. Below is an example of an error a user might receive if there is a mismatch between the identity that they are trying to contact and the identity in the certificate.
In order to determine if a certificate is trusted, you need to build a chain to the root certificate. Once the chain is built to the root certificate you can determine whether or not the root certificate is trusted. To validate the chain, you must have possession all of the certificates in the chain and then you can build the chain from the end-entity certificate all the way up to the root certificate, which is a self-signed certificate where the chain terminates. I will discuss more about Chain Validation later on in this document.
Certificates also have a period of time for which they are valid. In other words, a certificate is valid for a certain period of time. This built in expiration mechanism helps increase the security of certificates. This is due to the fact that if a certificate is compromised and that compromise is not detected it will eventually expire and become invalid.
The Valid From field is when the certificate begins its validity period and the Valid To field indicates when a certificate ends its validity period. In order for a certificate to be valid from a time perspective, the current date should fall in between the Valid From and Valid To dates specified in the certificate.
When a Windows client checks the revocation status of a certificate it checks revocation for that certificate and every certificate in the chain excluding the Root CA certificate.
The client will first check to see if it has any time valid OCSP Responses or CRLs cached locally.
If an OSCP URI has been deployed via Group Policy the client will send and OCSP response to the OCSP Responder. The OCSP responder then should send a response back to the client informing the client whether or not the certificate has been revoked.
If an OCSP URI is included in the AIA extension of the certificate the client will send and OCSP response to the OCSP Responder. The OCSP responder then should send a response back to the client informing the client whether or not the certificate has been revoked.
If there is no OCSP URI Specified the client will download the Base CRL. If the Base CRL has a Freshest CRL extension the client will then download the Delta CRL. The client will then parse the CRL(s) to determine if the certificate has been revoked.
As mentioned earlier a certificate needs to be chained to a root certificate in order to determine if the certificate chains to a trusted root. There is information included in certificates to assist in this chain building process. The most common type of information I see used to help the system identify the chain or the Subject Key Identifier (SKI) field and the Authority Key Identifier (AKI) field. The Authority Key Identifier is a hash of the certificate issuers public key. The Subject Key Identifier is a hash of the public key in the current certificate. The Operating System can chain a certificate by matching the Authority Key Identifier field in a certificate to the Subject Key Identifier in the issuer’s certificate. Matching the Authority Key Identifier field in the certificate to the Subject Key Identifier of the issuer is commonly called a key match.
Keep in mind not only do the fields have to match but the signature needs to verify as well. A certificate is digitally signed by the issuer. This means the certificate data was passed through a hashing algorithm and then the resulting hash is encrypted with the private key of the issuer. The signature can be verified by hashing the same certificate data, decrypting the digital signature with the public key of the issuer, and comparing the hashes. If the resulting hashes match and the digital signature can be decrypted with the issuer’s public key then the signature is verified.
Remember that the verifier of the certificate must have all certificates in the chain. The verifier will have access to the certificate it is verifying usually during a handshake during a protocol setup. Intermediate certificates may also be distributed the same way. However, if the intermediate certificates are not distributed during the protocol handshake they can be downloaded from the AIA repository. There is an extension named Authority Information Access that is commonly included with certificates. The AIA extension usually has a url which indicates from where the issuer’s certificate can be retrieved from. Windows supports two protocols for retrieval of CA certificates via the AIA Repository: LDAP and HTTP. Also, keep in mind that you have multiple AIA locations specified in the AIA extension of the certificate. Those AIA locations are processed in the order in which they are present the AIA extension.
Below is an example of the AIA extension in a certificate:
1.6.1.1 LDAP Repository
When we talk about using an LDAP repository to host CA certificates we typically mean using the LDAP functionality of Active Directory. Although, other ldap providers can be used for hosting CA certificates it is less common and does not provide the same level of integration as Active Directory.
There are some significant advantages and disadvantages to using LDAP as an AIA repository:
1.6.1.1.1 Advantages
High Availability: When using Active Directory as the LDAP provider, there is built-in fault tolerance. This is due to the fact that the AIA location is stored in the Configuration container that is replicated to all Doman Controllers in the forest.
Site Awareness: Active Directory has built-in site awareness. Clients use DCLocator to find the nearest DC, so clients will be able to pull certificates from a local Domain Controller.
1.6.1.1.2 Disadvantages
3rd Party Support: PKI can be leveraged by 3rd party Operating Systems and applications. Many of these are not integrated into Active Directory and hence cannot access the Active Directory LDAP provider.
Insecure Networks: Providing access to Active Directory LDAP over insecure networks such as a DMZ or Public Network would be a security nightmare so it would not be a good practice to use LDAP if clients on an insecure network need to retrieve the CA Certificates from AIA.
1.6.1.2 HTTP Repository
Using an HTTP or Web Repository is a more common practice. This is especially true for Public or 3rd Party CAs. If using an HTTP repository, it is important that the repository can be located by a DNS name and that the DNS name is not tied to a specific machine. In other words, you would likely use a CNAME or an A record that is not the computer name of the Web Server.
1.6.1.2.1 Advantages
Insecure Networks: Just about every organization is familiar on how to make the http protocol accessible in DMZ’s or over the Internet.
3rd Party Support: The virtual directory where the CA certificates are made accessible is normally configured to allow anyone to read and hence download the CA certificates.
1.6.1.2.2 Disadvantages
High Availability: A web server by itself is not highly available. Additional work and resources must be brought to bear to make a website highly available including having multiple web servers typically behind a load balancer.
Site Awareness: If you wish to make the HTTP AIA repository available locally to every site it requires additional web servers and a load balancer that will re-direct clients to the closest web server.
1.6.1.3 AIA Design Considerations
When you are in the process of building a PKI you have to decide where the AIA locations are going to be located and how the names used to access those locations are going to be formed. A common practice for 3rd Party Certification Authorities is just to use a single http URL inside of the AIA extension. Then that web location is made available from a highly available provider such as a Content Delivery Network (CDN). For your own internal PKI you have a number of possible ways to make the HTTP AIA location highly available. You could use for instance Azure CDN to provide a highly available solution. Alternatively, you could stand up several web servers behind a load balancer to provide this functionality. Regardless, when you design the name for the AIA location you will want to choose a name that is not tied to a specific machine name. Even if you do decide to go against best practices and host the HTTP AIA location on the CA itself, you would still want to use some sort of alias instead of the machine name. This configuration would allow you flexibility in the future if you ever decide to move that location to another machine. This is due to the fact that aside from reconfiguring where the certificate was published you would simply just need to update where that DNS alias is pointed instead of having to re-configure the AIA location which would require renewing the CA certificate to update the extension in that certificate. Additionally, if you plan on using the PKI to secure internet facing resources you would want to ensure that the DNS name used for the AIA location is not just resolvable internally, but also externally. Aside from the HTTP location some organizations decide to leverage LDAP as a secondary AIA location that would be available if the HTTP location is inaccessible.
The Root CA’s primary function is to be the trust anchor for the PKI. When a system trusts a Root CA, then that trust extends to subordinate CAs that chain to that same root and the certificates that they issue.
In order for a Root CA to be trusted on a Windows system the Root CA certificate must be present in the Trusted Root Certification Authorities store. Keep in mind there Trusted Certification Authorities container in both the Computer certificate store and the User certificate store. Trusted Root CA Certificates present in the Computer store are inherited by the user. There are a number of ways that a Root CA certificate can be populated in that store.
Microsoft has a program where 3rd Party CAs can submit their certificate to be installed in the Trusted Root Certification Authorities store. These are the Root CA certificates that ship with Windows. The advantage to this approach is that a user or organization does not need to go out download and install the Trusted Roots for popular 3rd Party CAs.
Root CA Certificates can be deployed via Group Policy. This is a common way organizations deploy Root CA Certificates for the PKI of a trusted organization. Root CA certificates may also be deployed this way during a Merger or Acquisition.
Autoenrollment performs a variety of functions. One of those functions is to download Enterprise Certificates from Active Directory. Enterprise Certificates includes the Root CA certificates that are published to the Certification Authorities container as well as downloading Subordinate CA certificates from the Authority Information Access container in Active Directory. All of these containers are located in the Configuration Partition of Active Directory.
Unless otherwise prevented by Group Policy users can add Root CA certificates in the Trusted Root Certification Authority container in the user store. A user that has administrator privileges can also add Root CA certificates to the Trusted Root Certification Authorities container in the Computer certificate store.
In order to determine whether or not a certificate should be trusted, the certificate chain must be built. Starting with the certificate that is being validated, the validator locates the next certificate in the chain. If that certificate is an intermediate CA that cert can be retrieved locally from the Intermediate Certification Authorities container, passed to the validator during the protocol handshake for whatever protocol is using the certificate, or retrieved from the AIA extension in the certificate. This process continues until it reaches a self-signed certificate or in other words a Root CA certificate. If that Root CA certificate exists in the Trusted Root Certification Authority store that the certificate being validated is considered trusted.
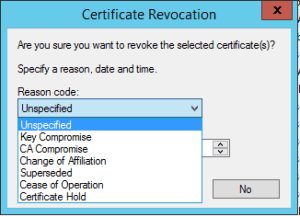
Certificates do have a limited time for which they are valid. This built-in expiration mechanism enhances the security of certificates. However, there are times where you may no longer trust a certificate before it expires. There are several possible reasons why you may no longer trust a certificate. Some of those reasons include: the certificate was compromised, the computer was compromised, or the user left the company. When you no longer trust a certificate you can revoke. Once the certificate is revoked, applications that perform revocation checking will no longer trust the certificate. More specifically the CA Manager and Certificate Manager can revoke the certificate. When an administrator revokes a certificate they must specify a reason for the revocation. These reason include: Unspecified, Key Compromise, CA Compromise, Change of Affiliation, Superseded, Cease of Operation, and Certificate Hold. If the Certificate Hold reason is selected, the certificate can later be unrevoked.
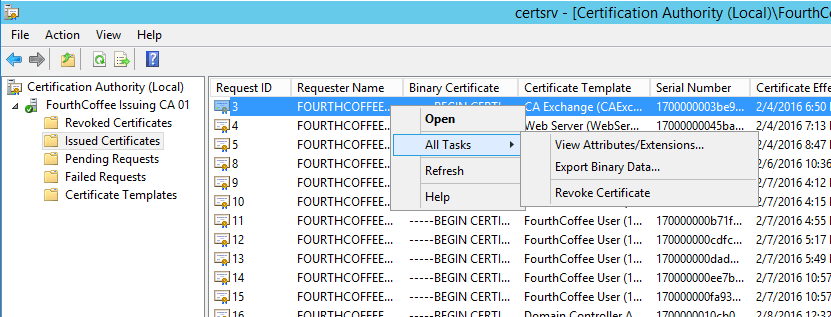
The following steps can be taken to revoke a certificate
Step 1: To revoke a certificate the Certificate Manager open the Certification Authority MMC (certsrv.msc)
Step 2: Click on Issued Certificates
Step 3: Right-click on the certificate that needs to be revoked
Step 4: From the context menu click All Tasks and the Revoke Certificate
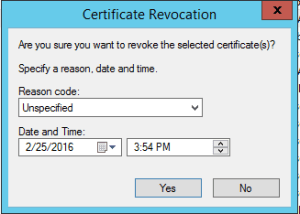
Step 5: Select a reason for the revocation
Step 6: Click OK
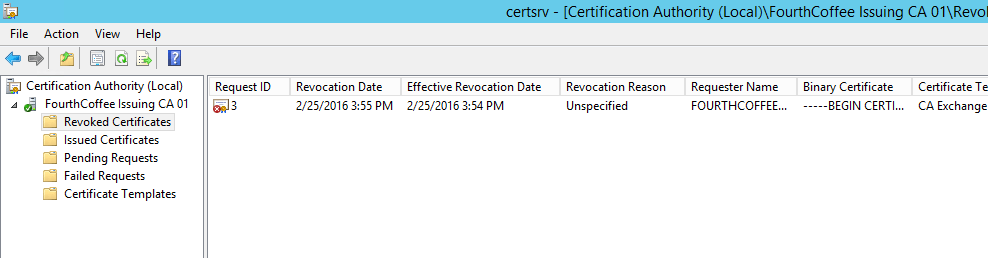
The Revoked Certificate will show up under Revoked Certificates. The certificate will not be known to be revoked until the CRL is published to the CDP and subsequently downloaded and parsed by clients checking revocation.
A Certificate Revocation List contains a list of certificates that have been revoked. Specifically, CRLs contain the Serial Number of each certificate that has been revoked, along with the reason for revocation, and the date and time that the certificate was revoked. There are two types of CRLs: Base CRLs and Delta CRLs. Base CRLs contain a list of all non-expired certificates that have been revoked. Delta CRLs contain a list of non-expired certificates that have been revoked since the last Base CRL was published. The lists from the latest Base CRL and Delta CRL can be combined to get a list of all non-expired certificates that have been revoked. Delta CRLs were implemented so that clients would not have repeatedly download a base CRL which would be larger in size. So, instead of publishing a Base CRL more frequently, delta CRL can be published instead. Delta CRLs are optional you can just use a Base CRL if that better fits the requirements for your organization.
In this section I will discuss the various fields that are included in a CRL.
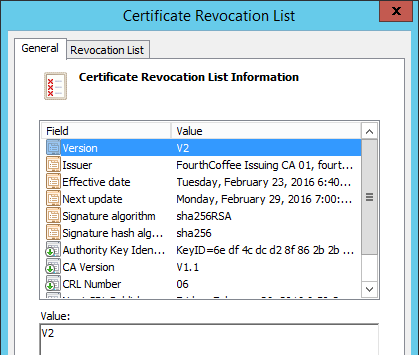
1.9.3.1 Version
This is the Version of the CRL Profile that is being used. The current version of the CRL Profiles is Version2.
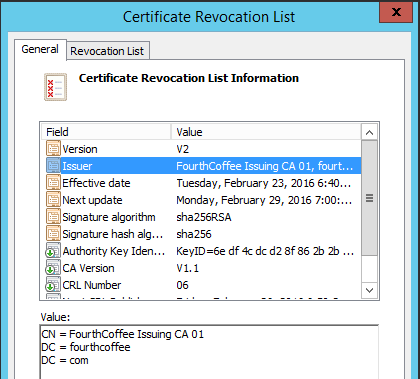
1.9.3.2 Issuer
The Issuer field indicates which CA issued the CRL.
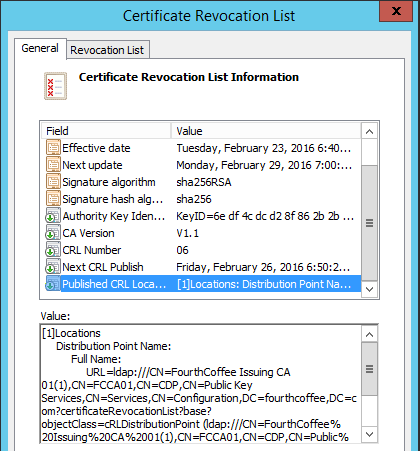
1.9.3.3 Effective date
This is the date and time at which a CRL becomes effective.
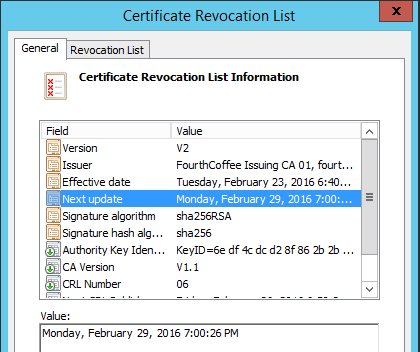
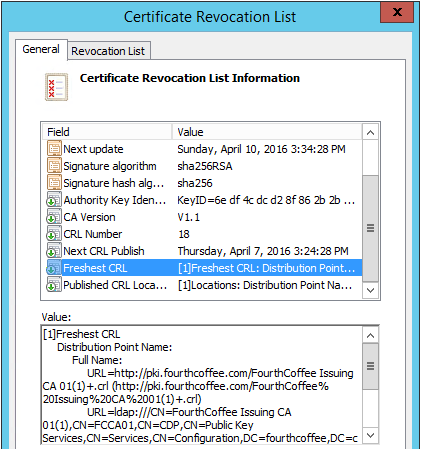
1.9.3.4 Next update
Next update indicates the date and time at which the CRL will be expired.
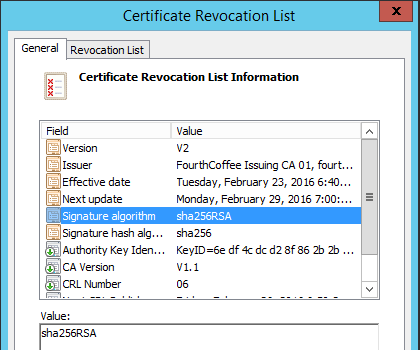
1.9.3.5 Signature Algorithm
The Signature Algorithm field indicates what Asymmetric Cryptographic Algorithm and Hashing Algorithm were used to sign the CRL.
1.9.3.6 Signature Hash Algorithm
The Signature Hash Algorithm field indicates the Hashing Algorithm used when signing the CRL
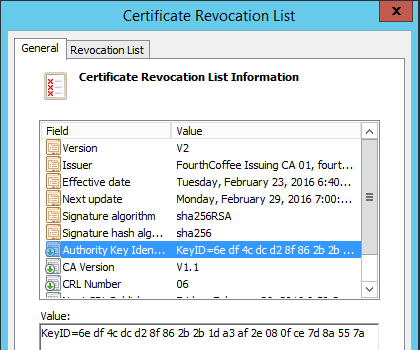
1.9.3.7 Authority Key Identifier
The Authority Key Identifier is another way of identifying the issuer of the CRL. Specifically, the Authority Key Identifier field contains a hash of the issuer’s public key
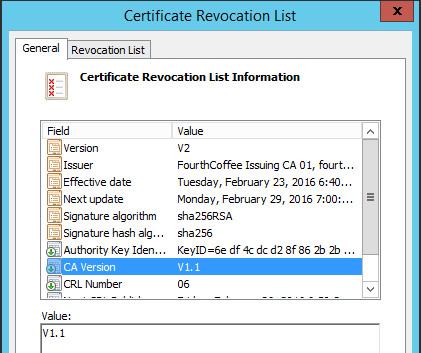
1.9.3.8 CA Version
The CA Version Field list the version number for the CA Certificate that was used to sign the CRL.
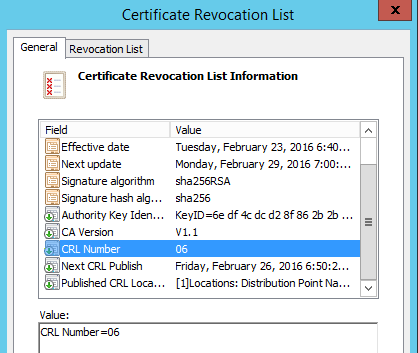
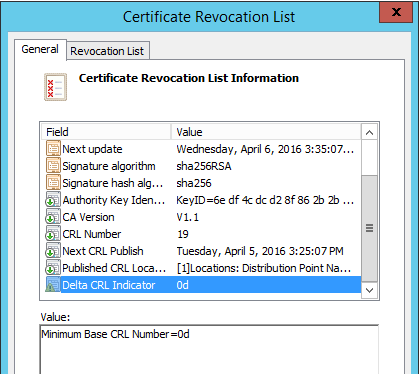
1.9.3.9 CRL Number
The CRL Number indicates the version of the CRL. The CRL Number increments each time a new CRL is published.
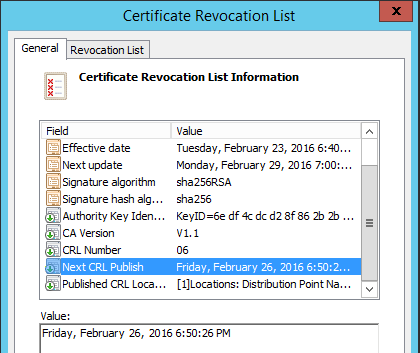
1.9.3.10 Next CRL Publish
The Next CRL Publish field indicates the date and time at which the next CRL will be published.
1.9.3.11 Published CRL Location
Published CRL Location is the location at which the CRL will be published in Active Directory. This is typically
1.9.3.12 Freshest CRL
If a CA publishes Delta CRLs then the Freshest CRL extension will show the location(s) where Delta CRLs can be retrieved.
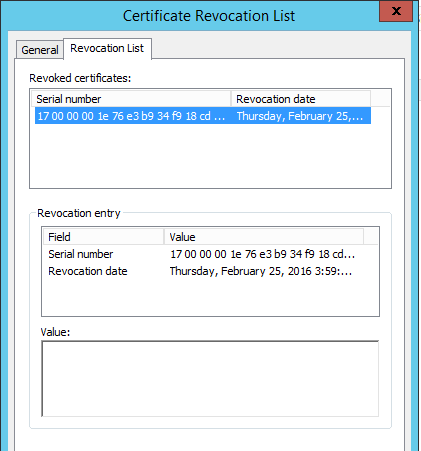
1.9.3.13 Revocation List
The Revocation List will list every non-expired certificate that has been revoked. This list will include the Serial Number and revocation date. Depending on the reason code selected it may also list the reason for the revocation.
A Delta CRL contains a list of all non-expired certificates that have been revoked after the publication of the Base CRL. To determine the location of the Delta CRL the Freshest CRL extension of the Base CRL must be read or known. To determine revocation, the current Base CRL and latest Delta CRL must be available.
1.9.4.1 Delta CRL Indicator
A Delta CRL has the same extension and formatting as a base CRL. A Delta CRL also has a field called Delta CRL Indicator. This field indicates which base CRL the client must have to have complete knowledge of revocations.
The CRL Distribution Points extension is an extension in a certificate that indicates where the CRL can be retrieved from for the purposes of checking revocation. That location where the CRLs can be retrieved is often referred to as a CDP repository. Some of the same concepts that apply to the Authority Information Access extension apply here, but I have listed them below for completeness.
1.9.5.1 LDAP Repository
When we talk about using an LDAP repository to host CA certificates we typically mean using the LDAP functionality of Active Directory. Although, other ldap providers can be used for hosting CA certificates it is less common and does not provide the same level of integration as Active Directory.
There are some significant advantages and disadvantages to using LDAP as an AIA repository:
1.9.5.1.1 Advantages
High Availability: When using Active Directory as the LDAP provider, there is built-in fault tolerance. This is due to the fact that the AIA location is stored in the Configuration container that is replicated to all Doman Controllers in the forest.
Site Awareness: Active Directory has built-in site awareness. Clients use DCLocator to find the nearest DC, so clients will be able to pull certificates from a local Domain Controller.
1.9.5.1.2 Disadvantages
3rd Party Support: PKI can be leveraged by 3rd party Operating Systems and applications. Many of these are not integrated into Active Directory and hence cannot access the Active Directory LDAP provider.
Insecure Networks: Providing access to Active Directory LDAP over insecure networks such as a DMZ or Public Network would be a security nightmare so it would not be a good practice to use LDAP if clients on an insecure network need to retrieve the CA Certificates from AIA.
1.9.5.2 HTTP Repository
Using an HTTP or Web Repository is a more common practice. This is especially true for Public or 3rd Party CAs. If using an HTTP repository, it is important that the repository can be located by a DNS name and that the DNS name is not tied to a specific machine. In other words, you would likely use a CNAME or an A record that is not the computer name of the Web Server.
1.9.5.2.1 Advantages
Insecure Networks: Just about every organization is familiar on how to make the http protocol accessible in DMZ’s or over the Internet.
3rd Party Support: The virtual directory where the CA certificates are made accessible is normally configured to allow anyone to read and hence download the CA certificates.
1.9.5.2.2 Disadvantages
High Availability: A web server by itself is not highly available. Additional work and resources must be brought to bear to make a website highly available including having multiple web servers typically behind a load balancer.
Site Awareness: If you wish to make the HTTP AIA repository available locally to every site it requires additional web servers and a load balancer that will re-direct clients to the closest web server.
1.9.5.3 CDP Design Considerations
When you are in the process of building a PKI you have to decide where the CDP locations are going to be located and how the names used to access those locations are going to be formed. A common practice for 3rd Party Certification Authorities is just to use a single http URL inside of the CDP extension. Then that web location is made available from a highly available provider such as a Content Delivery Network (CDN). For your own internal PKI you have a number of possible ways to make the HTTP CDP location highly available. You could use for instance Azure CDN to provide a highly available solution. Alternatively, you could stand up several web servers behind a load balancer to provide this functionality. Regardless, when you design the name for the CDP location you will want to choose a name that is not tied to a specific machine name. Even if you do decide to go against best practices and host the CDP AIA location on the CA itself, you would still want to use some sort of alias instead of the machine name. This configuration would allow you flexibility in the future if you ever decide to move that location to another machine. This is due to the fact that aside from reconfiguring where the CRL was published you would simply just need to update where that DNS alias is pointed instead of having to re-configure the CDP location which would require renewing the CA certificate to update the extension in that certificate. Additionally, if you plan on using the PKI to secure internet facing resources you would want to ensure that the DNS name used for the CDP location is not just resolvable internally, but also externally. Aside from the HTTP location some organizations decide to leverage LDAP as a secondary CDP location that would be available if the HTTP location is inaccessible.
1.9.5.4 CRL Publishing
So, how do we maximize the amount of time we have for recovery, and at the same time increase the “freshness” of the CRL? We can do this with the use of Overlap Periods.
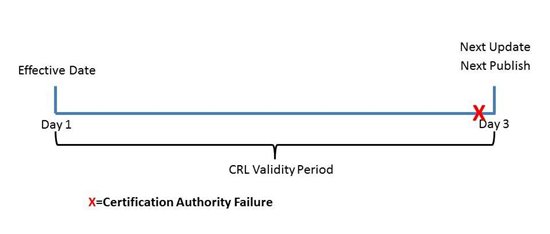
So, let’s say we want to implement this solution that maximizes recovery time and increases CRL freshness. The first consideration is Delta CRLs. Since Delta CRLs in my view are not necessary in most instances, we will first get rid of Delta CRLs. So, now that gives us just Base CRLs to work with. Let us take our Base CRL and make it valid for a period of 3 days. So, at first you would think great, now I have 3 days to recover the CA if the CA fails since the CRL is valid for 3 days. Well this is not true. If the validity period of the CRL and the publishing interval coincide, then you could have as little time as 1 second depending on when the CA failed. The illustration below exemplifies this scenario. The problem is without changing the default configuration the Next Update and Next Publish fields will be very close together, providing very little time for recovery.
1.9.5.5 Introducing CRL Overlap Period
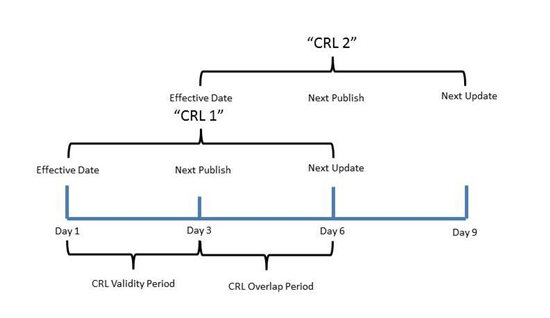
As mentioned there is some additional configuration that can be performed that can optimize your CRL publishing intervals so that you have adequate time to perform Emergency CRL Signing or to recover your CA. What will need to be configured is the CRL Overlap Period. In order to configure the CRL Overlap Period both the CRLOverlapUnits and CRLOverlapPeriod registry settings need to be configured. So, in my previous example my CRL had a validity period of 3 days. What I can do now is add a CRL Overlap Period of 3 days. With this configuration, my CRL will be valid for a period of 6 Days. However, at 3 days a new CRL will be published as well. This is illustrated in the graphic below:
In the example illustrated in the graphic above, CRL 1 will be valid for a period of 6 days. CRL 2 will be published at Day 3. So, if my CA fails between Day 1 and Day 3, I would still have 3 Days (Day 3 through Day 6) to perform Emergency CRL signing or to recover my CA in event of failure. If my CA fails between Day 3 and Day 6, there is a new CRL (CRL 2) that is valid through Day 9. So, in short if my CA fails between Day 3 and Day 6, I still have at least 3 days to perform Emergency CRL Signing or to recovery my CA, before revocation checking starts to fail. And the reason that I have the 3 days is the CRL Overlap Period extended out my CRL for 3 days and staggered the Next Publish and Next Update times by 3 days.
You can use the errors visible in the Windows UI to troubleshoot Certificate Validation. Below are a sample of some errors you may encounter in the Windows UI.
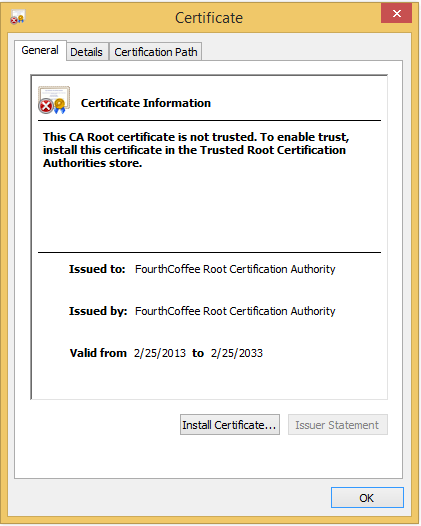
This CA Root certificate is not trusted. To enable trust, install this certificate in the Trusted Root Certification Authorities store.
This error simply indicates that the Root CA Certificate is not trusted.
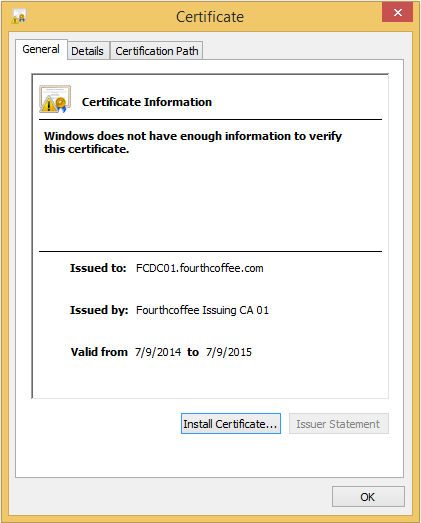
Windows does not have enough information to verify this certificate.
This error indicates that the client verify the certificate does not have access to all of the certificates in the chain.
The issuer of this certificate could not be found.
This error indicates that the client verify the certificate does not have access to all of the certificates in the chain.
This certificate has expired or is not yet valid.
This error typically indicates that the certificate is expired.
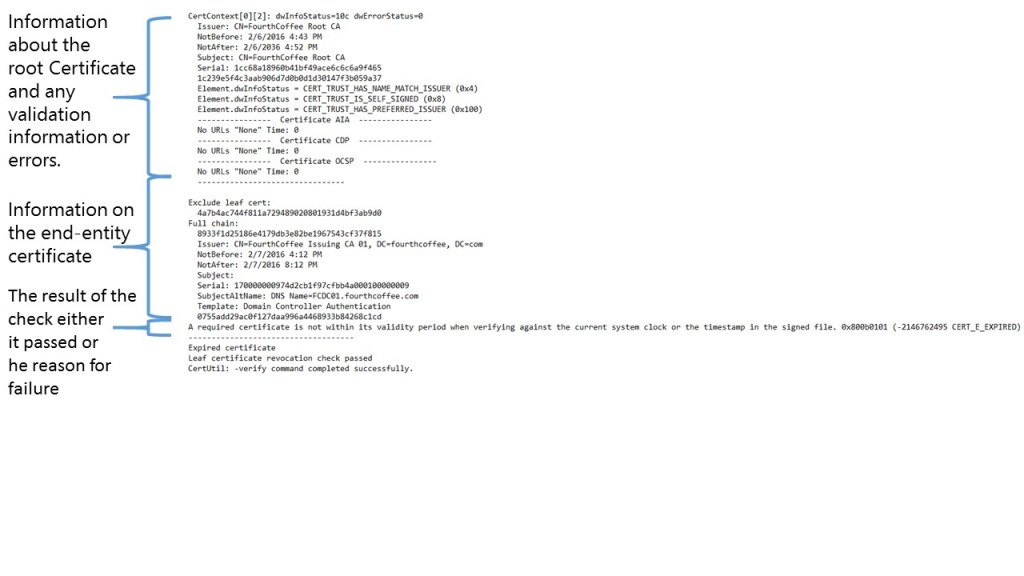
Certutil -verify -urlfetch is perhaps the best tool to check the validation of a certificate. You will want to run this tool on a machine which appears to have validation issues. For example, if a client is visiting a website that is secured with TLS you would want to copy the certificate to the client and run this tool from the client. This command does all of the validation checks including checking of the AIA, CDP, and OCSP locations are accessible and contain valid configuration. The normal syntax for running the command is: certutil -verify -urlfetch [File Name of Certificate] > [Name of Output Text File].
Below are screenshots or a sample output of certutil – verify -urlfetch to help you better understand how to read this file.
Here are some of the information or error messages you can receive at the end of the output from the command:
Leaf certificate revocation check passed
Indicates that the certificate passed the verification check.
A required certificate is not within its validity period when verifying against the current system clock or the timestamp in the signed file. 0x800b0101 (-2146762495 CERT_E_EXPIRED)
Typically means the certificate is expired.
ERROR: Verifying leaf certificate revocation status returned The revocation function was unable to check revocation because the revocation server was offline. 0x80092013 (-2146885613 CRYPT_E_REVOCATION_OFFLINE)
CertUtil: The revocation function was unable to check revocation because the revocation server was offline.
This means that the verifier was unable download a CRL.
The certificate is revoked. 0x80092010 (-2146885616 CRYPT_E_REVOKED)
Indicates that the certificate has been revoked.
Conclusion
That covers certificate validation. For additional information see the following video.
I am writing this blog and others to explain how things work and some ways deployment and operational tasks can be handled. In other words, these postings are for demonstration purposes only. Since I am not familiar with your organization or environment I do not know if these steps are applicable to your environment or are even safe to perform in your environment. It is recommended that you contact Microsoft Support prior to making changes in your environment to ensure that these steps are applicable to your environment, and are safe to perform in your environment. By writing this blog I am in no way recommending that you perform these steps in your own environment. If you choose to follow the steps outlined in this or other blog postings on this site, you are assuming the risk for your actions.
Background
So, a little bit of background. You may or may not have noticed that certificate templates have this Publish certificate to Active Directory option. So, what does this do? Well the answer is that it publishes the resulting certificate to the userCertificate attribute to the user or computer depending on whether the template is a user or computer template. An example of this settings is in the screenshot below.
So, why would you want to do this? Honestly, there is not really many good reasons for doing this. Theoretically, this would be useful when using Email Encryption or Email Signing. So, for email encryption if I wanted to encrypt an email to a user a could pull their certificate from AD and the ecrypt the email with the public key from the certificate. And for email signing if a user is trying to validate a signature they can retrieve the signers certificate from AD and use the public key to decrypt the signature so the hashes can be compared. Theoretically, the access to the users public key could potententially allow a user to give access to another user to an EFS encrypted file. However, this last option I do not have any experience with.
That being said, most organizations do not use email encryption and signing or EFS. Email encryption and signing are a problematic because getting the required certificates to all devices on which a user can check email is extremely difficult if not impossible. Think of all the devices you check email on and imagine trying to get the same exact certificate installed on all of those devices. EFS is problematic for file encryption because the process is very manual and honestly not very enterprise friendly.
So, in short although you can publish certificates to Active Directory there is most likely no need for you to do so.
The problem
So, what is the problem with this setting. For a user certificate the user will in a typical configuration enroll for a new certificate each time they log onto a new machine. If the template is configured to publish a certificate to the userCertificate attribute on the user. So, for a user that such as an IT administrator who logs onto many systems they will publish a large number of certificates to their userCertificate attribute. Another situation where this occurs when there is an MDM solution in place and the MDM uses a service account that requests certificates on behalf of it’s clients. If the certificate template that it leverages is configured to pubish the certificate to Active Direcotry it can bloat the userCertificate attribute for that service account.
So, the main problems are if many users are publishing their certificates to Active Directory it can lead to bloating of the AD database. If it is a single user publishing many certificates to it’s userCertificate attribute it can bloat that attribute in Active Directory.
Once the attribute becomes too large, certificates will no longer be able to publish certificates to the attribute and eventually it can interfere with AD replication because the attribute may be too large to replicate.
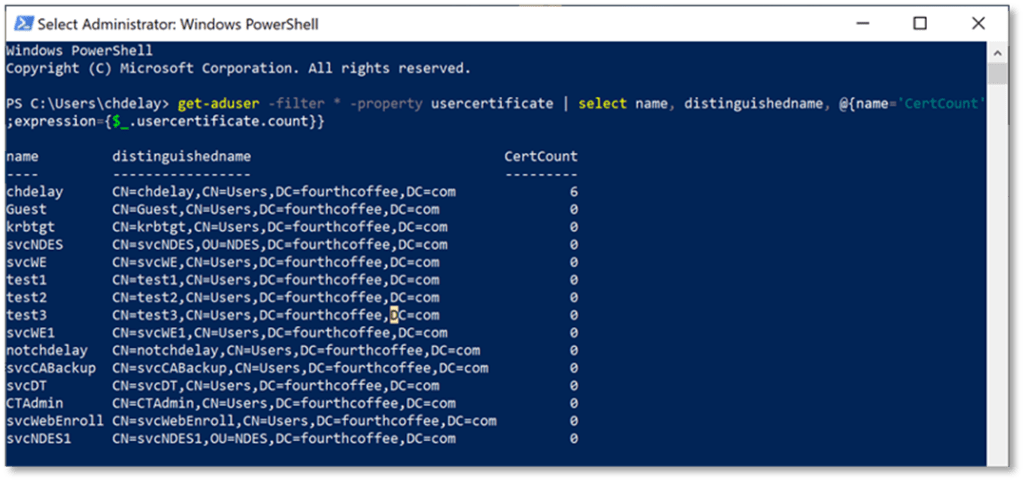
Investigating the problem
It is pretty straight forward to determine the severity of the problem using PowerShell. The following script will search AD and display the results:
The following command will clear the userCertiifcate attribute for all users. Before running this command make sure that you do not need the userCertificate attribute populated.
I am writing this blog and others to explain how things work and some ways deployment and operational tasks can be handled. In other words, these postings are for demonstration purposes only. Since I am not familiar with your organization or environment I do not know if these steps are applicable to your environment or are even safe to perform in your environment. It is recommended that you contact Microsoft Support prior to making changes in your environment to ensure that these steps are applicable to your environment, and are safe to perform in your environment. By writing this blog I am in no way recommending that you perform these steps in your own environment. If you choose to follow the steps outlined in this or other blog postings on this site, you are assuming the risk for your actions.
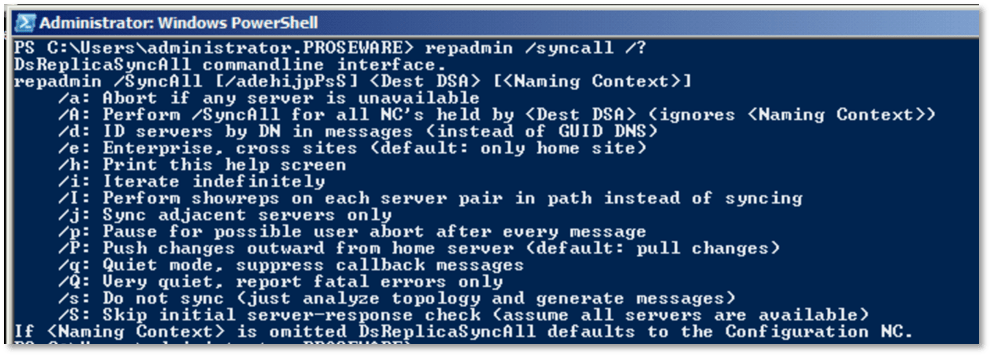
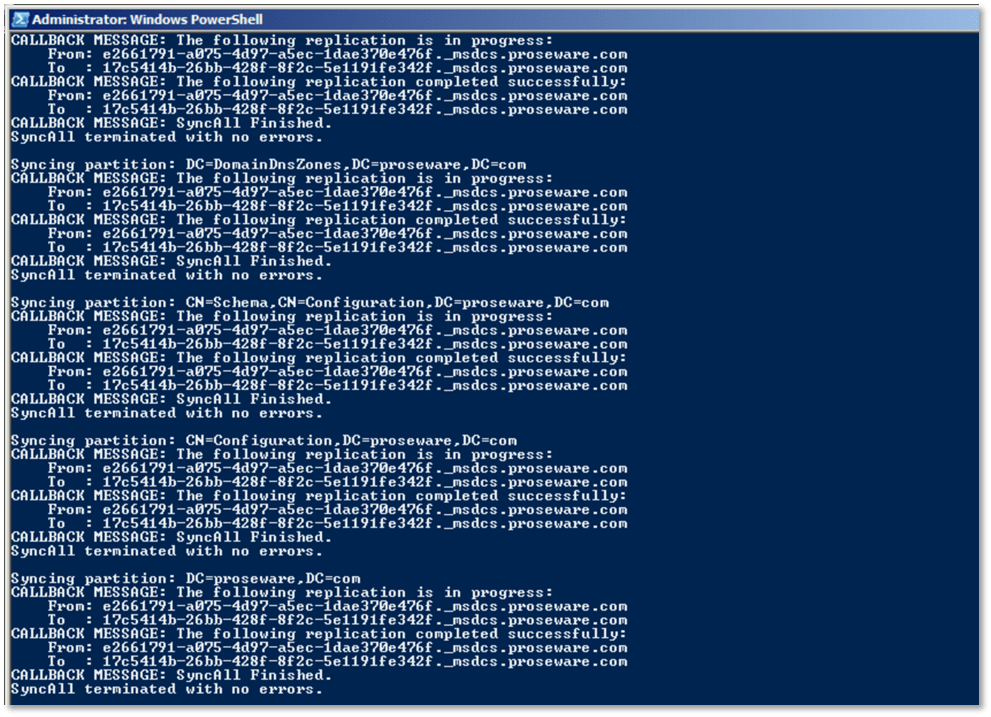
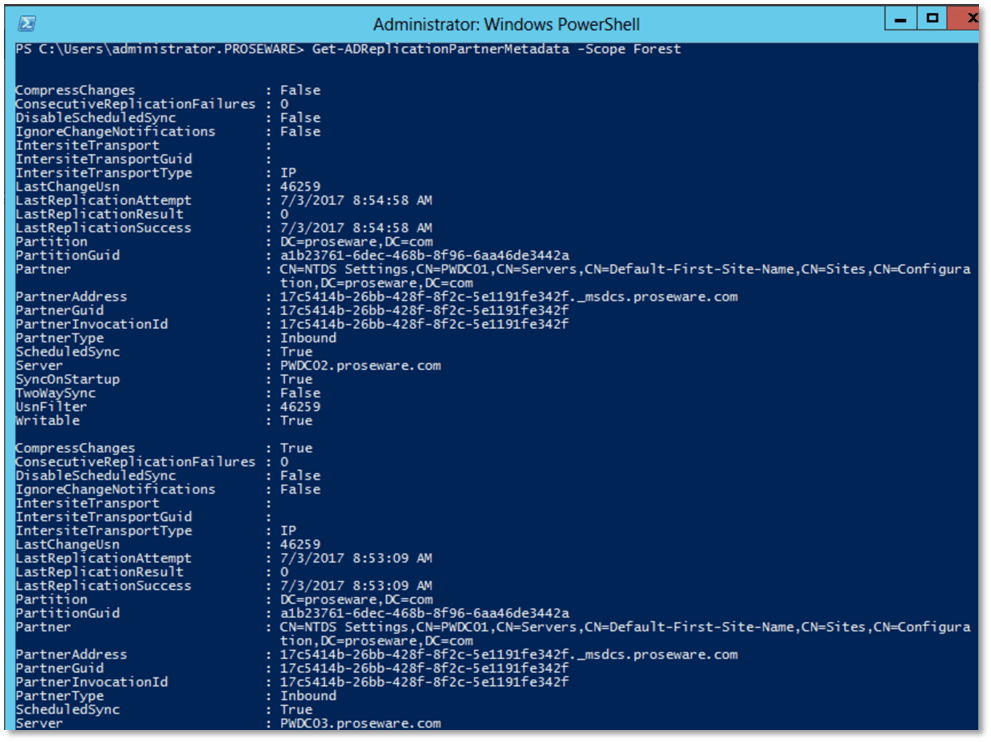
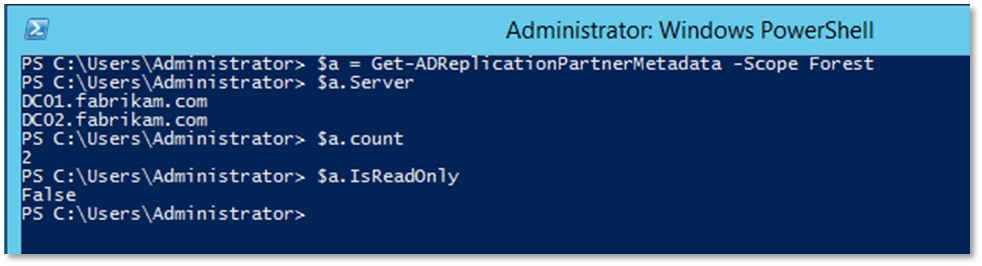
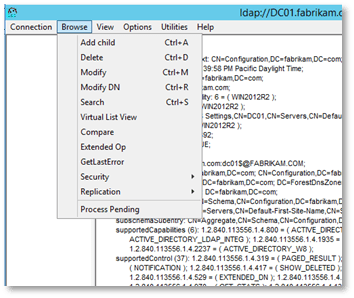
Repadmin is a tool for checking replication status and troubleshooting replication issue. Below is a table highlighting commonly used syntax of the repadmin tool.
Syntax
Usage
Repadmin /replsummary
The replsummary operation quickly and concisely summarizes the replication state and relative health of a forest.
Repadmin /replsummary /bysrc /bydest /sort: delta
The replsummary operation quickly and concisely summarizes the replication state and relative health of a forest.
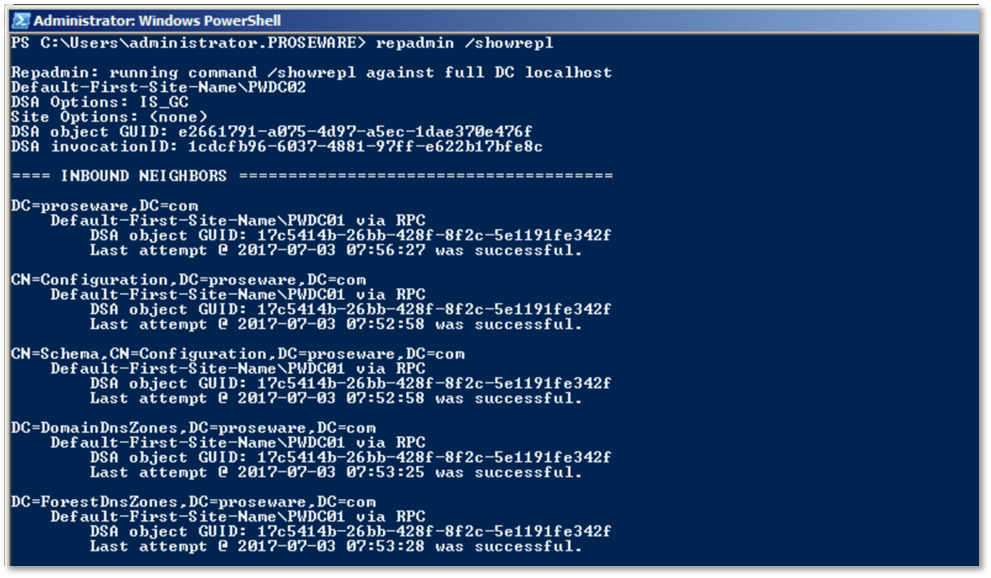
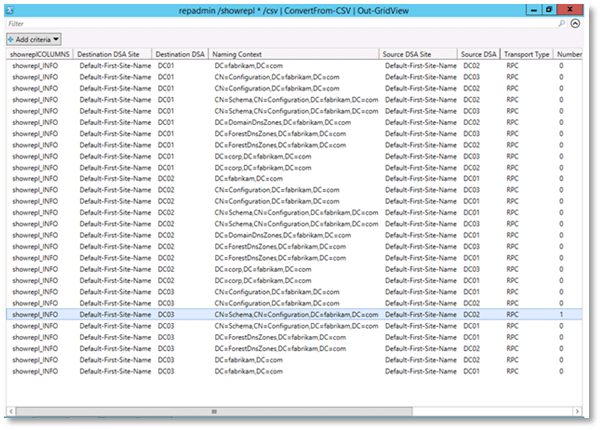
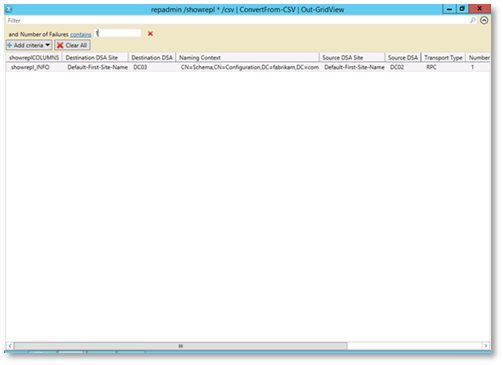
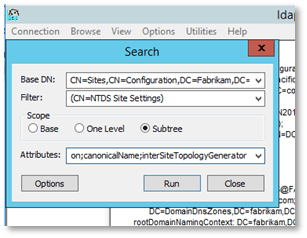
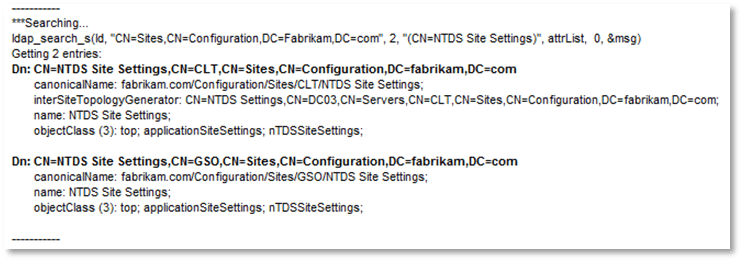
Repadmin /showrepl <DC Name>
Displays the replication partners for each directory partition on the specified domain controller. Helps the administrator build a visual representation of the replication topology and see the role of each domain controller in the replication process.
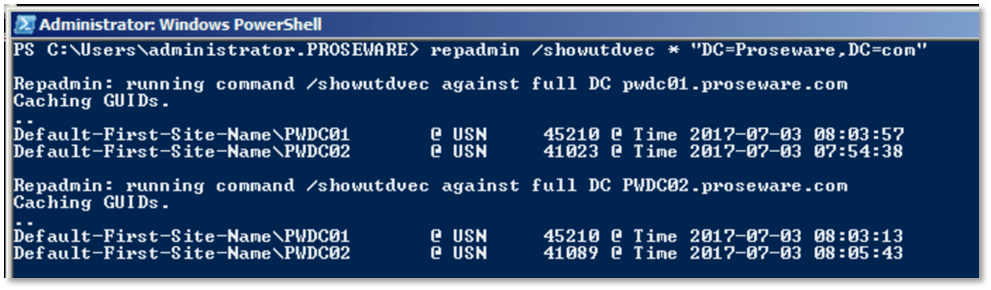
Repadmin /showutdvec
Displays the highest Update Sequence Number (USN) for the specified domain controller. This information shows how up-to-date a replica is with its replication partners.
Repadmin /showobjmeta <DC> <DN of object>
Displays the replication metadata for a specified object stored in Active Directory, such as attribute ID, version number, originating and local Update Sequence Number (USN), and originating server’s GUID and Date and Time stamp. By comparing the replication metadata for the same object on different domain controllers, an administrator can determine whether replication has taken place.
Repadmin /showconn
Displays the connection objects for a specified domain controller. Default is local site.
Replicates a single object between any two domain controllers that have partitions in common. The two domain controllers do not have a replication agreement. Replication agreements can be shown by using the Repadmin /showrepl command.
Starts a replication event for the specified directory partition between the source and destination domain controllers. The source UUID can be determined when viewing the replication partners by using the Repadmin showrepl operation.
Repadmin /syncall <DC>
Synchronizes a specified domain controller with all replication partners.
Repadmin /queue
Displays tasks waiting in the replication queue.
Repadmin /showmsg <Error>
Displays the error message for a given error number.
Repadmin /viewlist <DC_List>
Displays a list of domain controllers.
Repadmin /showctx <DC_List>
Displays a list of computers that have opened sessions with a specified domain controller.
Repadmin /showcert
Displays the server certificates loaded on a specified domain controller.
Repadmin /removelingeringobjects <Dest_DC_List> <Source DC GUID> <NC> [/ADVISORY_MODE]
Uses an authoritative domain controller to compare the directory of a domain controller (destination) that is suspected of having lingering objects against the directory of a domain controller (source) that is designated as a reference source for up-to-date values for the domain of the destination. When the advisory mode parameter is used, this command provides a list of found lingering objects. When the advisory mode parameter is not used, this command removes lingering objects from the destination domain controller.
As seen in the screenshot below repadmin /replsummary will give statistics for replication with replication partners. The output also lists any errors that were encountered with replication. This is useful for getting an overview of any replication issues the DC is having.
You can also sort the output. In the example below, the output is sorted by the largest delta since last replication.
As seen below repadmin /showrepl shows the replication status with all of the DCs replication partners and is sorted by the Naming Context that is being replicated.
One trick that can be used to get a more manageable output is to use repadmin to send its output to a CSV and the use PowerShell to convert the CSV to a GridView. The command to do this is repadmin /showrepl * /csv | ConvertFrom-CSV | Out-GridView
The resulting output is in a manageable GUI.
In GridView you can sort and filter. Below is an example of filtering on Number of Failures, so that I can easily see what failed.
Replications changes are tracked through incrementing numbers called USNs. There are times where you will want to know what knowledge each DC has about other DCs current state. The up-to-dateness vector is the knowledge that a DC as about the current state of other DCs. This information can be useful when trying to troubleshoot replication issues such as USN Rollback. USN Rollback is when a DC is restored from an unsupported method such as a snapshot. In that case the up-to-dateness vector would be much larger than the actual USN of the DC. Since, there is going to be some delay in replication you will notice some differences but the numbers should be relatively close. For example, if you compare the up-to-dateness vector for DC01 across DCs you will notice the following: for itself DC01 has USN of 17347, DC02 has a USN of 17346 for DC01, and DC03 has a USN of 17346 for DC01. So, we can see the numbers are relatively close and that DC01 potentially has one change that it needs to replicate to DC02 and DC03.
The /showobjmeta switch shows detailed information for attributes of an object. It is most commonly used when comparing the output of the command from 2 DCs to see if they are in sync and the current status of the attributes. Differences can be used to identify replication problems.
Repadmin /syncall is used to force replication between domain controllers. You can easily view options for the /syncall switch with the following command: repadmin /syncall /?
A normal use of repadmin /syncall is with the /AeP switch
PowerShell is an object oriented scripting language that allows enterprises to automate IT tasks.
Below is a conversion table that shows the PowerShell command that can be used in place of the Repadmin command. So, why would you choose to use PowerShell? The output of PowerShell commands are objects those objects can be filtered with properties, piped through other PowerShell commands and manipulated to many useful things including great control in how the data is presented to the user.
Command
PowerShell Cmdlet
Repadmin /FailCache
Get-ADReplicationFailure
Repadmin /Queue
Get-ADReplicationQueueOperation
Repadmin /ReplSingleObj
Sync-ADObject
Repadmin /ShowConn
Get-ADReplicationConnection
Repadmin /ShowObjMeta
Get-ADReplicationAttributeMetadata
Repadmin /ReplSummary
Get-ADReplicationPartnerMetadata
Repadmin /Showutdvec
Get-ADReplicationUpToDatenessVectorTable
Repadmin /SiteOptions
Set-ADReplicationSite
Repadmin /ShowAttr
Get-ADObject
Repadmin /Set Attr
Set-ADObject
Get-ADReplicationParnerMetadata is very similar to running repadmin /showrepl. Without passing the output through another cmdlet the formatting is a bit different then to what you get with repadmin.
However, the advantage is that the output of the command are objects. You can constrain your views to certain properties.
The other advantage is that you can pass objects through other cmdlets. As seen here I am passing the output of Get-ADReplicationPartnerMetadata through Output-GridView.
Once in GridView you have the ability to sort and filter the data.
Here is another example of the usefulness of using PowerShell over repadmin. In this example I take the output of Get-ADReplicationPartnerMetadata then passing it through Select-Object so that we can then limit what objects are presented in GridView.
These issues are caused by lingering objects. Lingering objects can be caused when a domain controller is taken offline for an extended period of time, does not replicate for longer than the tombstone lifetime, or is restored from a backup that is older than the tombstone lifetime.
When an object is deleted it is put in a tombstone state. After the tombstone lifetime passes (typically 180 days), DC run garbage collection and those tombstone objects are deleted. If a DC was offline for the entire TSL and then were brought back online they may have objects that have since been deleted, tombstoned, and garbage collected. Any objects that were deleted will still exist on that DC. These objects go unnoticed until a change is made to that object then the DC attempts to replicate that object, and at that point that is where it is either re-introduced into the environment or if strict replication consistency is enabled, blocked.
One way to remove lingering objects is to user repadmin with the /removelingeringobjects switch. First you must identify a clean source of the partition. The syntax of the command is repadmin /removelingeringobjects <Dest DC Name> <Source DC Guid> <Naming Context>. So, in other words you need to identify the source DCs guid and the Naming Context you want to clean. The naming context will be available in the Event 1388 or 1988 you receive in the event long. Once you find a clean source you can obtain the guid by opening DNS Manager and opening up the _msdcs Zone and obtaining the CName record for the DC in question.
Below is an example of running the repadmin /removelingeringobjects command
You will receive an Event 1937 when the removal of lingering objects begins.
You will then receive an Event 1939 when removal completes.
2.2.2.2 Repadmin /rehost
An alternative to using repadmin /removelingeringobjects command is to unhost the partition so that the domain controller no longer has that partition and then rehosting the entire partition with a good source.
The repadmin syntax for unhosting the partition is repadmin /unhost <DC Name> <Partition Name>
You will receive an event an event 1658 when the removal begins.
You will receive an event 1660 when the removal completes
The syntax for rehosting the partition is: repadmin /rehost <Dest DC Name> <Partition> <Source DC Name>
Review event log for any 1988 or 1388 errors. If found use the previous section to remove the lingering objects from the domain controller.
Option 1: Re-hosting the partition that has not replicated
If the partition is a GC partition consider unhosting and rehosting the partition. Instructions for unhosting and rehosting are in the previous section called Repadmin /rehost
Option 2: Removing and then re-adding the domain controller to Active Directory
Another option is removing the DC from Active Directory and Re-promoting the Domain Controller
Step 4: Next you will need to run the Install –ADDSDomainController cmdlet. Below is a sample that you can use. You will need to modify the template to meet the requirements of your environment.
Option 3: Enabling Replication with Divergent and Corrupt Partner
Due to the risk of adding lingering objects to Active Directory the final consideration should be enabling the following setting: Allow Replication With Divergent and Corrupt Partner.
Step 1: To enable this setting run the following command on the domain controller:
repadmin /regkey <hostname> +allowDivergent
Step 2: Let replication complete
Step 3: Disable the setting with the following command: repadmin /regkey <hostname> -allowDivergent
Event 1311 is caused when there is not complete connectivity between domain controllers. There are a number of reasons there may not be complete connectivity.
The Inter-Site Topology Generator (ITSG) is responsible for building the replication topology. So to determine what the scope of the connectivity issues it is important to identify the ISTGs that are logging 1311.
To find the ISTGs in your environment you need to use ldp.exe
Below are the steps for locating the ISTGs:
Step 1: Launch ldp.exe
Step 2: When LDP opens, select Connection and then Connect…
Step 3: In the Connect dialog box, enter the name of a Domain Controller for the Server you want to connect to and then click OK
Step 4: Click on Connection and then click Bind…
Step 5: In the Bind dialog box, click OK
Step 6: Select the Browse menu and then select Search
Step 7: In the search enter the following:
Base DN: CN=Sites,CN=Configuration,<DN of Forest Root> (example: CN=Sites,CN=Configuration,DC=fabrikam,DC=com)
Filter: (CN=NTDS Site Settings)
Scope: Subtree
Attributes: Append the following to the attributes that are already listed: ;interSiteTopologyGenerator
Step 8: Click Run
Step 9: For each site you will then need to look for interSiteTopologyGenerator to determine the ITSG for each site.
By default, Bridge All Site Links (BASL) is enabled in Active Directory. If your environment is not fully routed, then you will want to disable BASL. By fully routed we mean each site can contact every other site. If BASL is configured on a network which is not fully routed, the KCC will generate site bridges that cannot actually be reached. To determine if BASL is enabled launch Active Directory Sites and Services (dssite.msc).
Expand Sites, then Inter-site Transports.
Right-click on IP and select Properties from the context menu
If Bridge all site links is enabled, there will be a check box next to it. To disable BASL, uncheck the checkbox and click OK.
If you disable BASL you can still bridge site links. You would do that if you wanted two spoke sites to communicate directly if they could not communicate with the hub site. In a hub and spoke configuration the cost of crossing to site links (bridging a site link) will typically be a higher then just connecting directly to the hub site. So, ordinarily you would not have to worry about the Site Link Bridge being used instead of a direct site link. That being said, there are not a whole lot of scenarios where you would need to create Site Link bridges.
The following steps will allow you to bridge two site links.
Step 1: Open the Active Directory Sites and Services MMC.
Step 2: Expand Sites and then expand Inter-site Transports
Step 3: Select New Site Link Bridge… from the context menu
Add at least two sites to the Site Link Bridge, give it a Name, and click OK
Step 1: Run the following command in a PowerShell Console: Get-ADObject –LDAPFilter ‘(objectClass=site)’ –SearchBase (Get-ADRootDSE).ConfigurationNamingContext –Property Name | Format-Table Name
Step 3: Verify that each site that was listed in Step 1 exists in one of the site lists returned in Step 2
If not all sites are contained in a site link that you need to determine what site link that site needs to be added to or if a new site link needs to be created.
And that is all I have for replication troubleshooting for today.
There may be times when you need to replace the service account for the NDES service. One scenario is if your organizations gets compromised. After a compromise it is common to change the passwords for service accounts and in some cases to replace the service accounts entirely. Of course, there may be other reasons to replace service accounts as well. Today we will review the steps needed to replace the NDES service account and walkthrough the process.
Steps to Replace NDES service account
Stop the SCEP Application Pool
Create new service account
Remove any custom SPNs from the existing service account
Add any custom SPNs to the new service account
Add the account to the IIS_IUSRS group on the NDES server(s)
Add the account to the certificate template that is being provisioned
Give the new service account read permissions to the private key of the service certificates
Replace the service account in the SCEP Application Pool
Start the SCEP Application Pool
Remove previous service account from the IIS_IUSRS group
Remove previous service account from private key permissions
Remove previous service account from certificate template(s)
Service Account Replacement Walkthrough
Stopping the Application Pool
Step 1: On the NDES Server, in Server Manager select Tools, then Internet Information Services (IIS) Manager
Step 2: Navigate to and select Application Pools
Step 3: Right-click on the SCEP Application Pool and then select Stop from the context menu
Creating the Service Account
Step 1: On your Adminstration Workstation open Active Directory Users and Computers
Step 2: Right-click on the OU that contains your service accounts
Step 3: From the context menu select New then User
Step 4: Fill out the Full name and User logon name the click Next
Step 5: Enter and confirm the password and select Password never expires if appropriate, then click Next
Step 6: Click Finish
Managing the SPNs (if applicable)
Step 1: Open an elevated command prompt on your Administration Workstation (as a Domain or Enterprise Admin)
Step 2: Run the following command: setspn -l <NDES Service Account Name>
Step 3: Not any custom SPNs (in my example it is http/ndes.fourthcoffee.com)
Step 4: To remove the SPN run the following command: setspn -D <SPN> <NDES Service Account Name>
Step 5: Add the SPN to the new service account by running the following command: setspn -S <SPN> <New NDES Service Account Name>
Adding the Service Account to the IIS_IUSRS group
Step 1: In Server Manager select Tools then Computer Management
Step 2: Navigate to Local Users and Groups, then Groups
Step 3: Open the IIS_IUSRS group
Step 4: Click Add…
Step 5: Enter the new service account and click OK
Step 6: Click OK
Managing Service Certificates Private Keys
Step 1: As a user that is local administrator on the NDES server open certlm.msc
Step 2: Navigate to Personal and then Certificates
Step 3: Locate the CEP Encryption certificate
Step 4: Right-click on the certificate and click All Tasks then Manage Private Keys…
Step 5: Click Add…
Step 6: Enter the service account and click OK
Step 7: Provision the new service account with just Read permissions
Step 8: Click OK
Step 9: Locate the Exhange Enrollment (Offline Request) certificate
Step 10: Right-click on the certificate and click All Tasks then Manage Private Keys…
Step 11: Click Add…
Step 12: Enter the service account and click OK
Step 13: Provision the new service account with just Read permissions
Step 14: Click OK
Give the New Service Account Enroll Permissions on the Certificate Template
Determine the certificate template(s) you are distributing with NDES
Step 1: On the CA logon as an Enterprise Admin
Step 2: Open the Certification Authority MMC
Step 3: Right-click on Certificate Templates and then select Manage from the context menu
Step 4: Navigate to the certificate template you are distributing with NDES
Step 5: Right-click on the certificate template and select Properties from the context menu
Step 6: On the certificate template click Add…
Step 7: Enter the new service account name and click OK
Step 8: Give the account Enroll permissions
Changing the Service Accounts in the SCEP Application Pool
Step 1: Open Internet Information Services (IIS) Manager on the NDES server as a member of the local administrators group
Step 2: Navigate to Application Pools
Step 3: Right-click on the SCEP application pool and select Advanced Settings…
Step 4: In Advanced Settings click on the … after the current service account (Identity)
Step 5: Click Set…
Step 6: Enter the service account in domain\user format and then enter and confirm the account password
Step 7: Click OK
Step 8: Click OK
Step 9: Click OK
Step 10: Return to the SCEP application pool
Step 11: Right-click on the SCEP application pool and select Start from the context menu
De-provisioning steps
The following steps need to be completed to deprovision the previous service account. However, these steps will not be covered by this walkthrough as those steps should be obvious after completing the above walkthrough.
Remove previous service account from the IIS_IUSRS group
Remove previous service account from private key permissions
Remove previous service account from certificate template(s)
I am writing this blog and others to explain how things work and some ways deployment and operational tasks can be handled. In other words, these postings are for demonstration purposes only. Since I am not familiar with your organization or environment I do not know if these steps are applicable to your environment or are even safe to perform in your environment. It is recommended that you contact Microsoft Support prior to making changes in your environment to ensure that these steps are applicable to your environment, and are safe to perform in your environment. By writing this blog I am in no way recommending that you perform these steps in your own environment. If you choose to follow the steps outlined in this or other blog postings on this site, you are assuming the risk for your actions.
Background
Sometimes if you are new to an environment or exploting PKI for the first time you may realize that you have Certification Authorities that are populated in Active Directory. Sometimes some of those CAs may no longer exist in the environment or you had some problems removing the CA from Active Directory. In those cases you can manually remove the PKI objects from Active Directory. This posting will cover how you can remove the CA and PKI objects from Active Directory
It is extremely important to note that you should not do this unless you are 100% certain that you are no longer going to use the Certification Authority or any certificates that have been issued from that Certification Authority.
The PKI objects exist in the Configuration partition of Active Directory. Hence, these objects are replicated to every Domain Controller in the forest. This means that it will require that the user that will be removing the PKI objects from Active Directory must be a member of the Enterprise Admins group. Also, keep in mind that since this is an Active Directory change so it will need to replicate to every DC in the forest which depending on your replication convergence time may take a while.
Pre-requisites
Access to a machine that has the Active Directory Certificate Services (ADCS) Remote Server Administration Tools (RSAT)
The machine must be a member of the Active Directory forest that hosts the CA
The user removing the PKI objects must be a member of the Enterprise Admins group
You have backed up Active Directory using a System State backup or other approved backup method
Removing the Deprecated CA and related PKI objects from Active Directory
Step 1: Logon to a machine with an account that is a member of the Enterprise Admins group
Step 2: Launch Enterprise PKI (PKIView.msc)
Step 3: Identify the CA you want to remove from Active Directory
Step 3: Right-click on Enterprise PKI and from the context menu select Manage AD Containers…
Step 4: On the NTAuthCertificates tab, select the certificate associated with the deprecated CA and click the Remove button
Step 5: When prompted to confirm the removal, click Yes
Step 6: Select the AIA Container tab
Step 7: Select the certificate associated with the deprecated CA and click the Remove button
Step 8: When prompted to confirm the removal click Yes
Step 9: If you are prompted that this is the last certificate in the object, click Yes to confirm the removal
Step 10: Navigate to the CDP Container tab
Step 11: If present select the Delta CRL associated with the deprecated CA and click the Remove button
Step 12: When prompted to confirm the deletion click Yes
Step 13: Select the Base CRL associated with the deprecated CA and click the Remove button
Step 14: When prompted to confirm the removal of the CRL click Yes
Step 15: If prompted that this is the last CRL in the object click Yes to confirm the removal
Step 16: If prompted that this is the last CDP object in the container click Yes to confirm the removal
Step 17: Navigate to the KRA Container tab
Step 18: If there are any certificates associated with the deprecated CA remove them
Step 19: Navigate to the Certification Authorities Container (If the CA is not a Root CA it may be absent from this container)
Step 20: Select the certificate associated with the deprecated CA and click Remove
Step 21: When prompted to confirm the deletion click Yes
Step 22: If prompted that this is the last certificate in the object, click Yes to confirm the deletion
Step 23: Navigate to the Enrollment Services Container (the CA may be absent from this container if ADCS was gracefully removed from the machine)
Step 24: Select the certificate associated with the deprecated CA and click Remove
Step 25: When prompted to confirm the deletion click Yes
Step 26: If prompted that this is the last certificate in the object, click Yes to confirm the deletion
Step 27: Click OK to close the window
Step 28: Right-click on Enterprise PKI and select Refresh from the context menu
Step 29: Verify that the deprecated CA is no longer displayed in Enterprise PKI (may have to wait until AD replication converges).
Below is a video of this same topic that I posted a few days before posting this blog entry.
Thank You for taking time out of your day to visit my blog!