I wanted to draw some attention to an NDES test tool that I have been using for a while. My thanks to the author (Hasain Alshakarti) of the toolbox and steps as it is one of the few ways that I am aware of to test NDES without access to actual hardware or an MDM solution. I am going to cover the steps to use the tool. I understand that the instructions on the authors website are pretty straight forward and pretty easy to follow. However, I think the screenshots may give you all an idea of what to expect when using the tool.
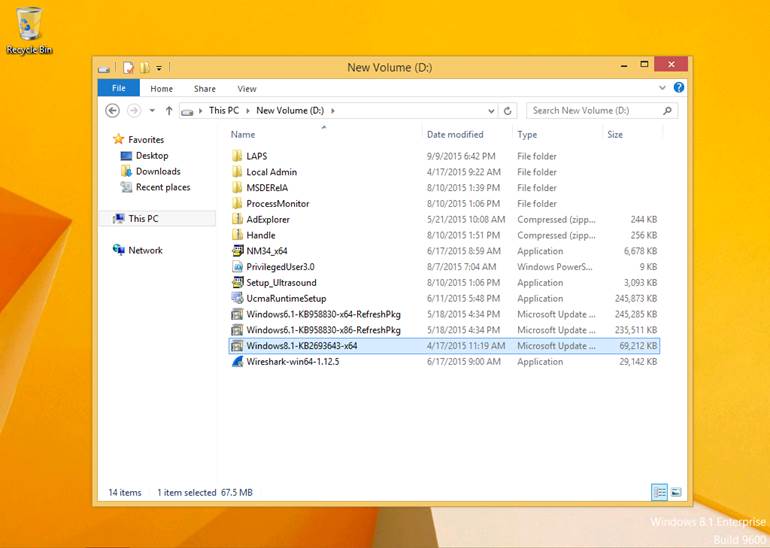
Once you have downloaded an extract the tool and perform the following steps:
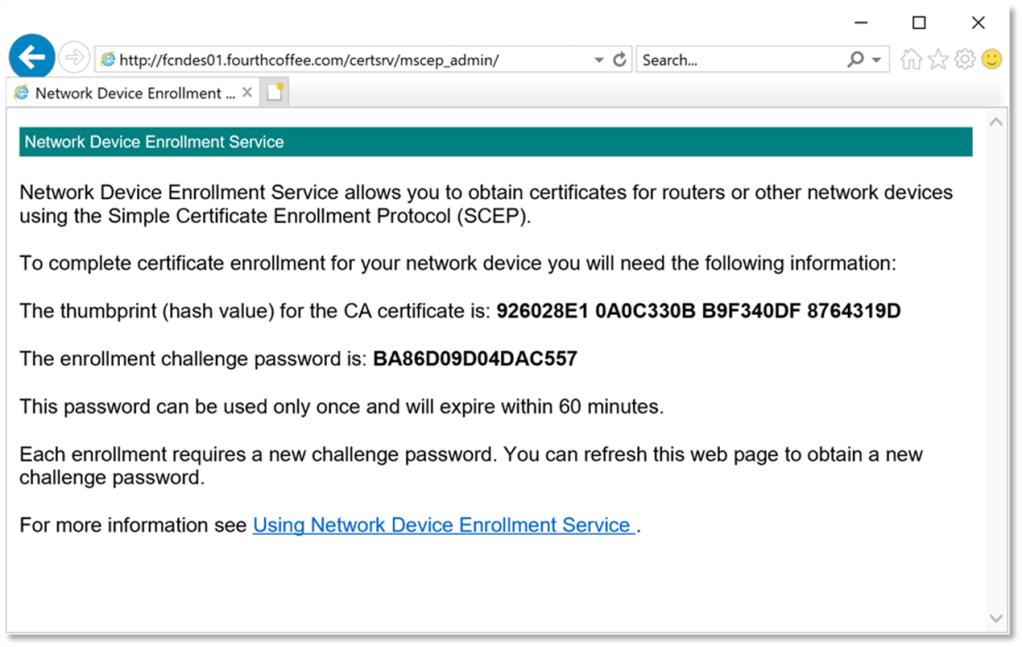
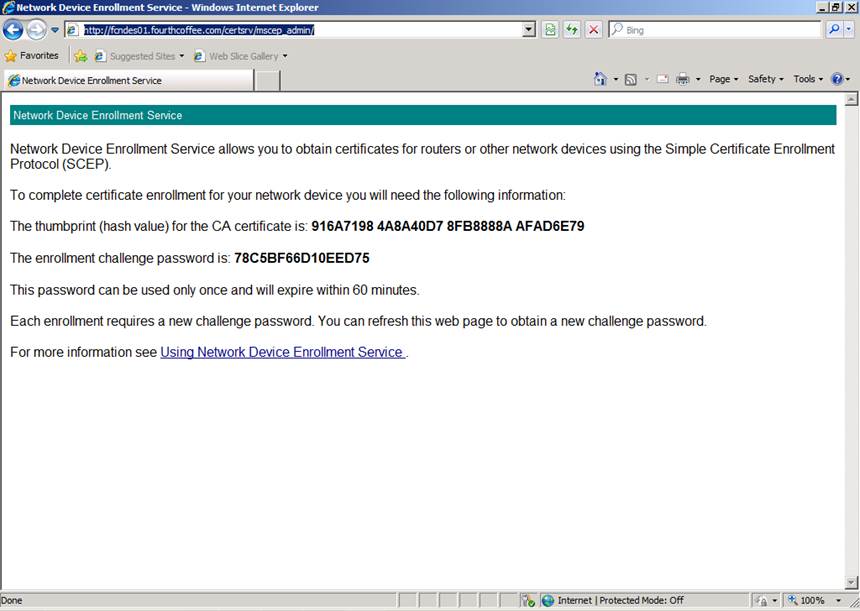
Step 1: Access the mscep_admin site on your web server as a Device Admin. In my example this is http://fcndes01.fourthcoffee.com/certsrv/mscep_admin. Note: My certsrv directory is not protected with TLS. As a best practice it should be protected with TLS.
Step 2: Copy the enrollment challenge password for later use. In my example the password is BA86D09D04DAC557
Step 3: Open a command prompt and navigate to the directory where the tools were extracted
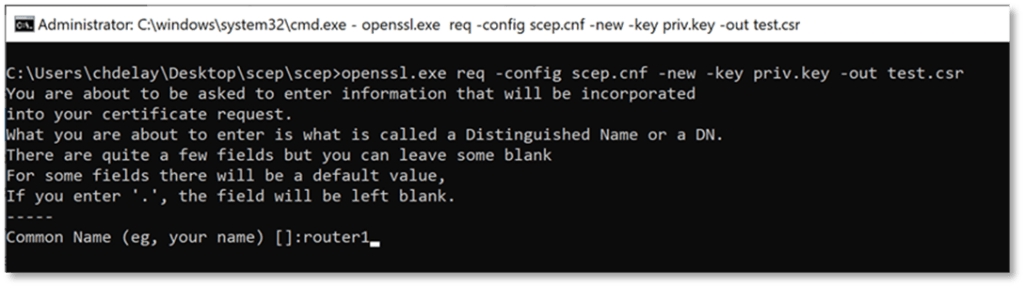
Step 4: Run openssl.exe req -config scep.cnf -new -key priv.key -out test.csr, to generate the reques
Step 5: Enter the Common Name (subject) for the certificate and click Enter
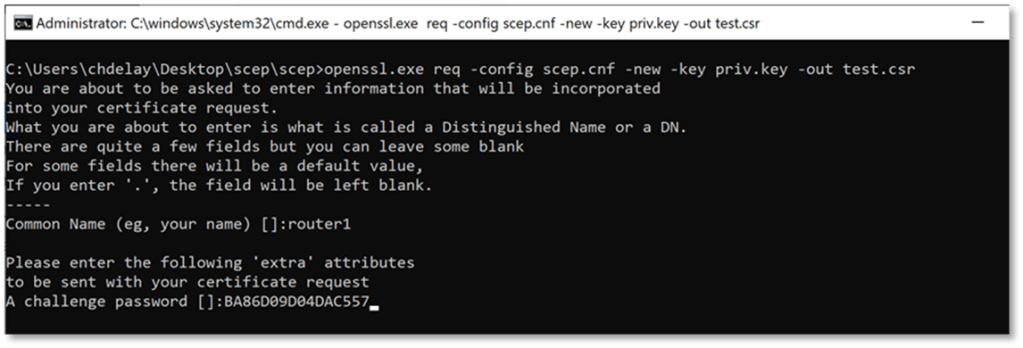
Step 6: Paste or manually enter the enrollment challenge password, then click Enter. In my example it is: BA86D09D04DAC557
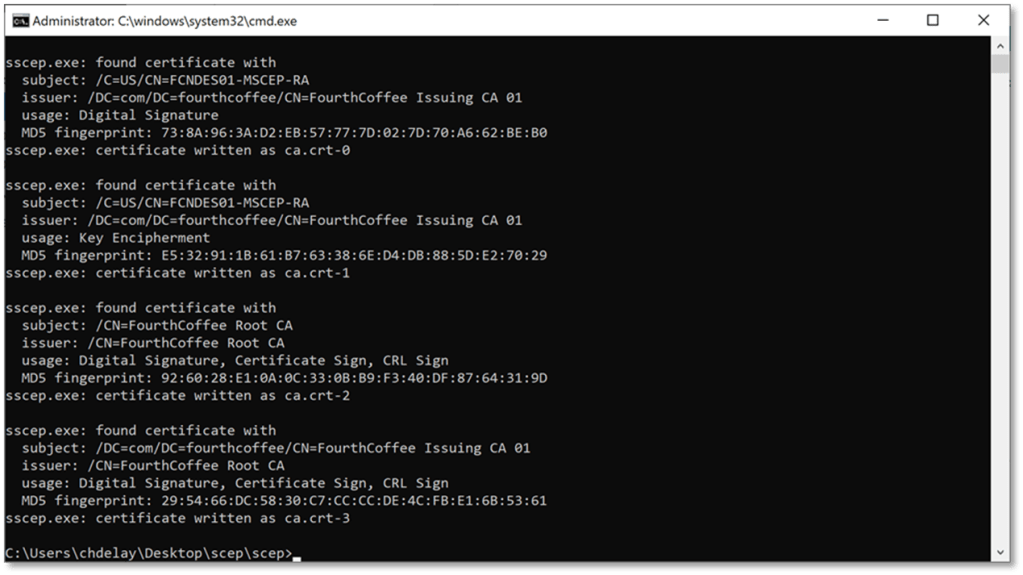
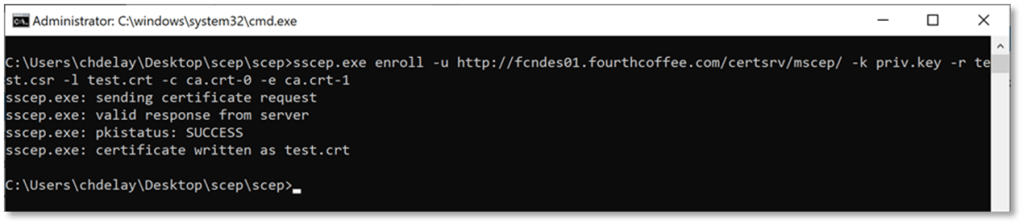
Step 7: To retrieve the CA certificate (which is part of the NDES enrollment process), run the following command: sscep.exe getca -u http://<your NDES server DNS Name or IP address here>/certsrv/mscep/ -c ca.crt
The output you receive will look something like this:
Step 8: Run the following command to enroll for the certificate: sscep.exe enroll -uhttp://<your NDES server DNS Name or IP address here>/certsrv/mscep/> -k priv.key -r test.csr -l test.crt -c ca.crt-0 -e ca.crt-1
Step 9: Verify the pkistatus is Success
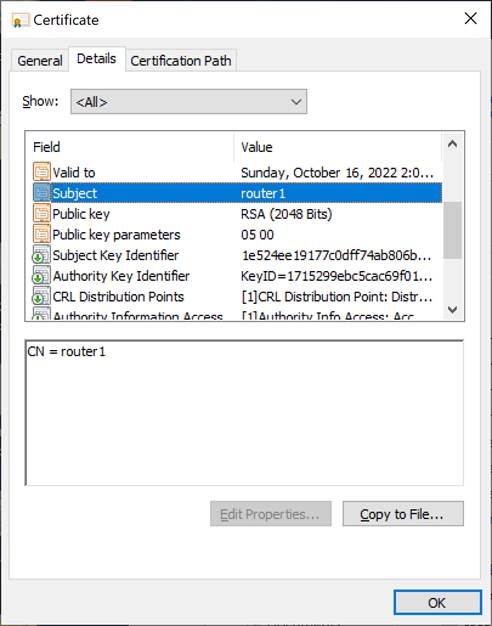
You can also open test.crt to verify the result:
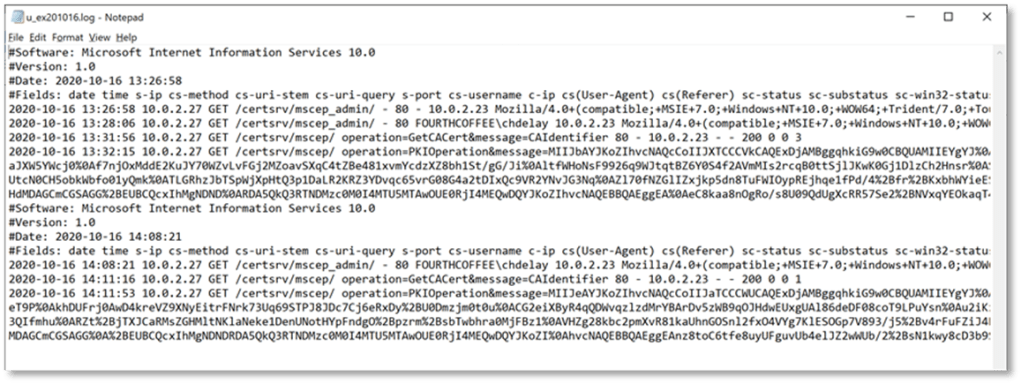
In addition you can view the request in the IIS logs of the NDES server:
Thanks to Hasain Alshakarti for putting the toolbox and process to test NDES enrollment.
The following steps are the steps to reset the NDES service account password. This is pretty simple and straight forward.
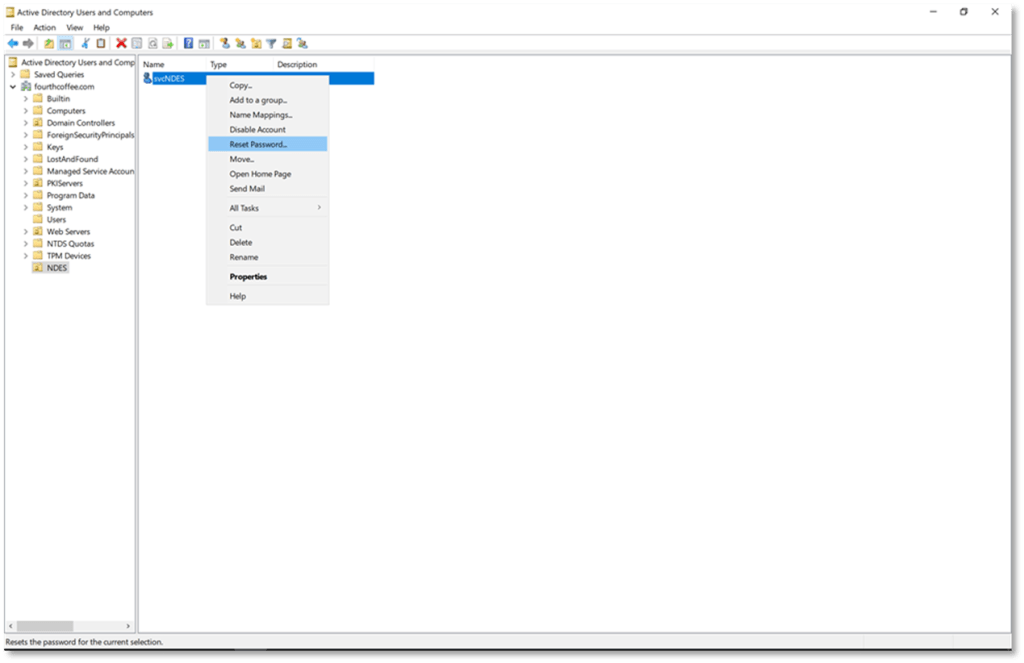
Step 1: As a Domain Administrator or a user that has been delegated the ability to reset passwords open up Active Directory Users and Computers (dsa.msc)
Step 2: Locate the service account
Step 3: Right-click on the account and select Reset Password…
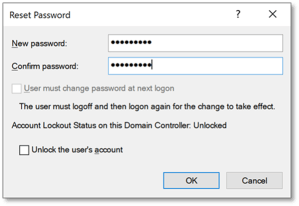
Step 4: Enter and confirm a password and click OK
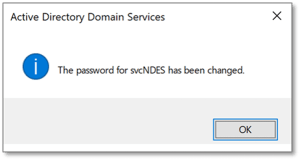
Step 5: Click OK to acknowledge the prompt
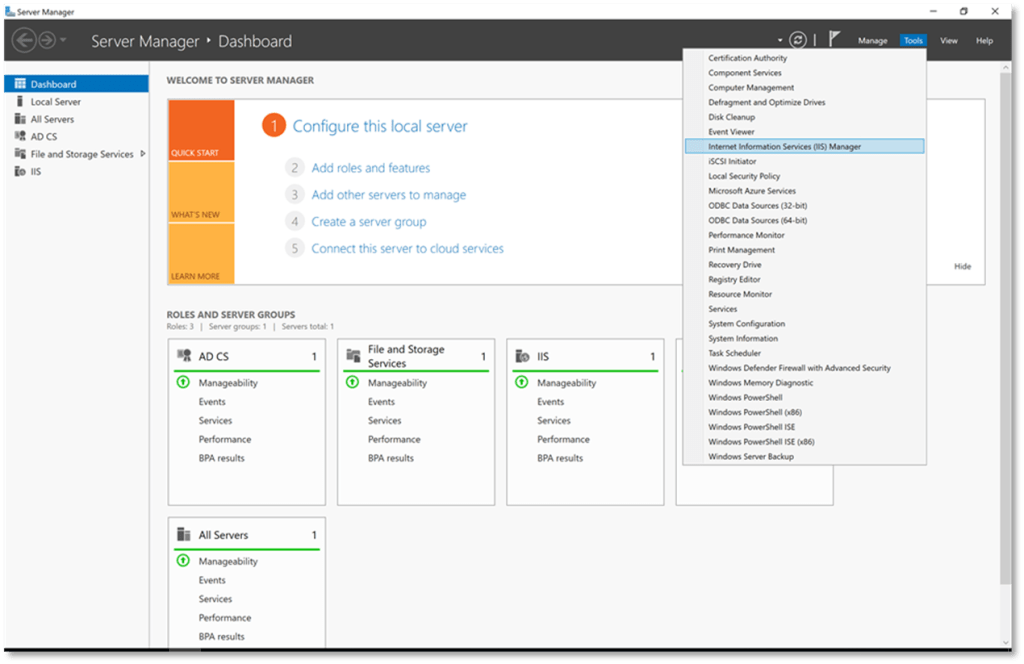
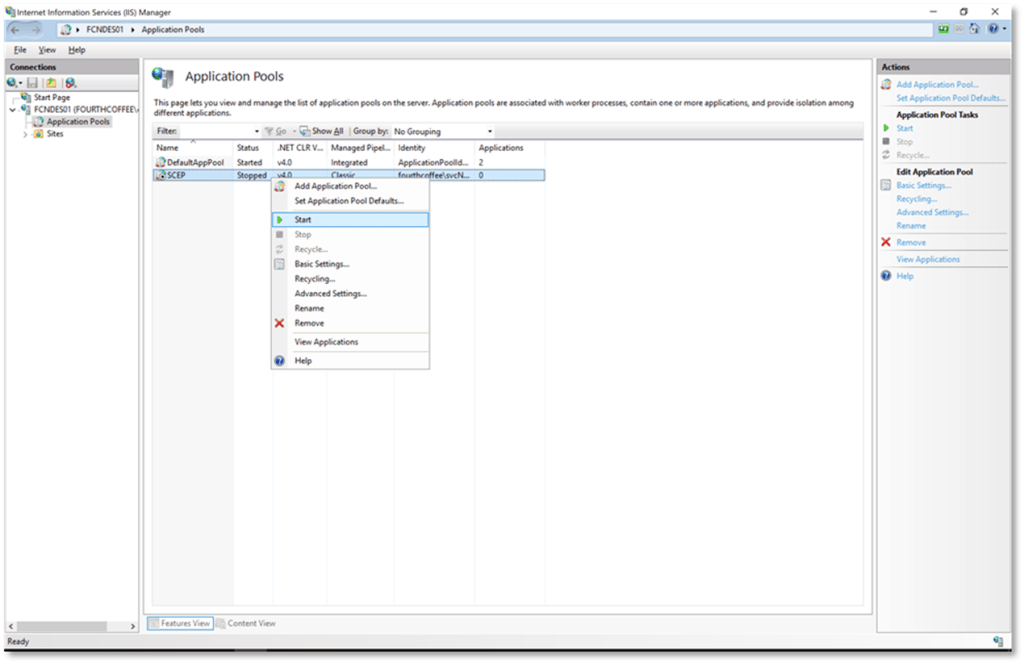
Step 6: On the NDES server open Server Manager
Step 7: From the Tools menu select Internet Information (IIS) Manager
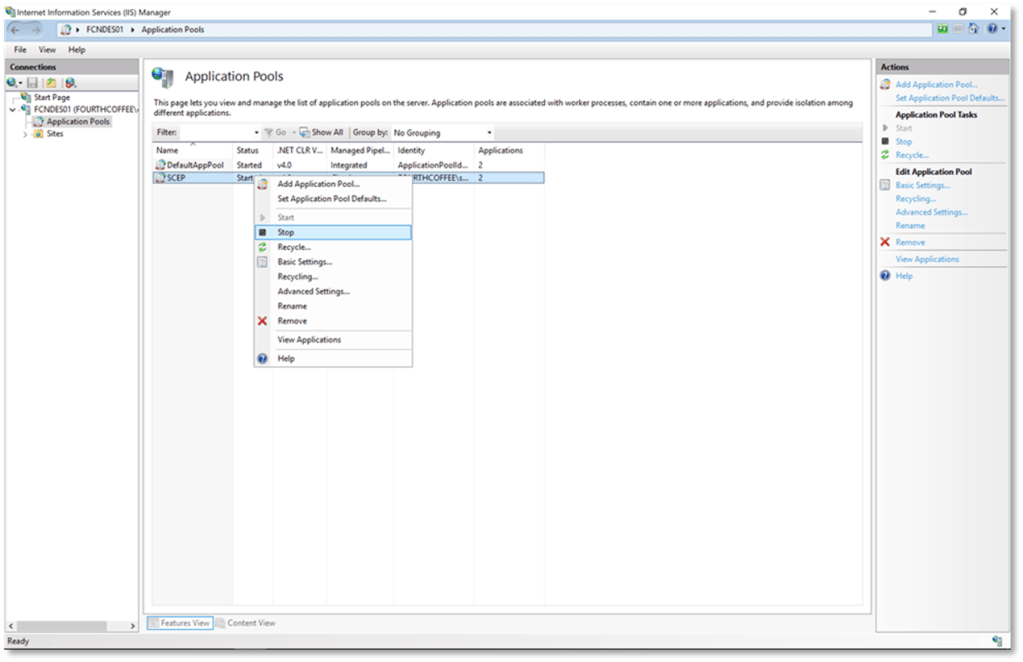
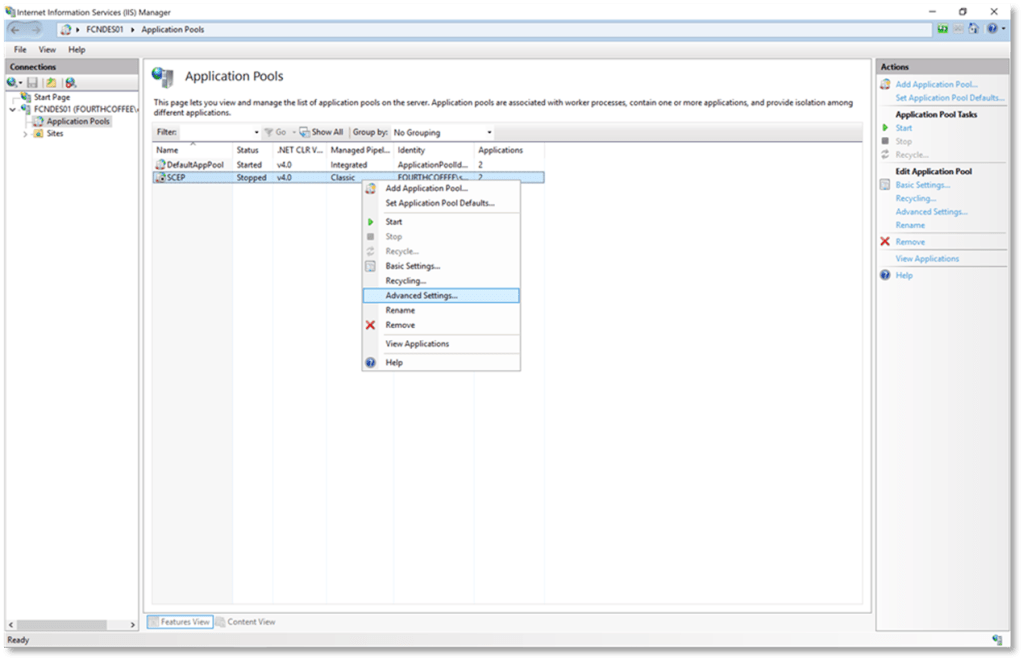
Step 8: Navigate to Application Pools
Step 9: Right-click on the SCEP application pool and select Stop
Step 10: Right-click on the SCEP application pool and select Advanced Settings…
Step 11: Click the 3 dots … after the service account under Identity
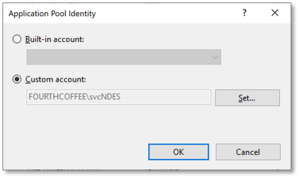
Step 12: In the Application Pool Identity window click the Set… button
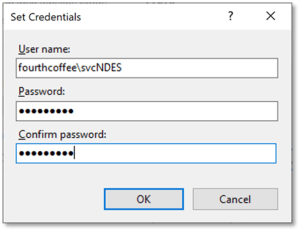
Step 13: Enter the service account name in domain\user format
Step 14: Enter and confirm the password
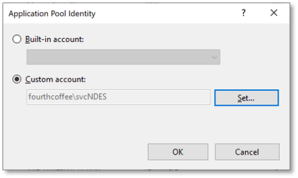
Step 15: Click OK
Step 16: Click OK
Step 17: On Advanced Settings click OK
Step 18: Right-click on the SCEP application pool and select Start
That’s it. I’m going to continue writing NDES articles until I exhaust the topics that come to mind. At some point I will move on to configuration and known issues with the Web Enrollment Proxy.
This blog posting is just a list of PKI best practices and common practices. If you are implementing your own PKI or simply assessing your own PKI you can use this list to determine if your design or implementation is inline with industry best practices. This is by no means an exhaustive list, just common and best practices that I am aware of.
Offline CAs such as Root and Policy CAs are only brought on the network for administrative tasks such a Certificate Renewal or CRL Renewal. These Certification Authorities typically have CRLs with a long validity period such as 6 months or 1 year. Due to this configuration Offline CAs should be configured to not publish Delta CRLs and to not populate the Freshest CRL extension in Base CRLs.
FTP is not supported as an AIA or CDP repository in Windows and SMB locations are no longer supported in Windows for AIA and CDP locations. Therefore, FTP and SMB locations should not be used for AIA and CDP.
To help ensure the security of CA certificates they should have a key length of 2048 or larger. This larger key space is currently considered secure. There have been security issues found with keys that are 1024 or smaller. Additionally, certificates that are issued by the PKI should have a key length of 2048 or large if RSA is used.
Since offline CAs are not regularly connected to a network they should not be members of an Active Directory domain. Another reason for not making these CAs a member of the domain as it can potentially increase the number of users that have administrator privileges on the machine that host the Certification Authority.
Windows does not perform a revocation check on the Root CA. Therefore, a CDP location defined in the Root CA certificate is unnecessary. Also, a CRL published for the Root CA would need to be published by itself. So, whether a Root CA is trusted or not should be determined by including the Root CA certificate the Trusted Root Certification Authority store, and if it is not trusted it should be removed from this store. In other words, trust of the Root CA certificate should not depend on its serial number being included in a CRL. Also, there is no need to have an AIA location defined in a Root Certificate. Because if you were to include one it would define a location where the Root CA certificate is located and can be retrieved. However, if you are viewing the AIA extension on a Root CA certificate you already have possession of the certificate.
For ease of configuration AIA locations can use the default variables, by default this looks like %1_%3%4. This translates to <ServerDNSName>_<CAName><CertificateName>. The %4 variable is the most important variable and the one that should be kept even if you decide to use a different name for the certificate. This variable configures the CA to increment the number of a certificate as new certificates are issued. So, for example if the first CA certificate is named MYCACERT.crt, after renewal the new certificate name would be MYCACERT(1).crt. And if the certificate is renewed a second time the new filename would be MYCACERT(2).crt.
There is a similar situation for the CRLs. The default syntax is %3%8%9. This translates to the
<DeltaCRLAllowed> will configure the CA to include a character/symbol to represent a delta
CRL. By default, the + sign is used. So, if the base CRL is MYCA.crl the delta CRL would be MYCA+.crl. The <CRLNameSuffix> is the most import variable. This appends the incrementing number at the end of the CRL name each time the CA certificate is renewed with a new key. This only happens when the certificate is renewed with a new key because if the key does not change the CRL can be signed with a key that is used by the current and previous certificate. However, if a new key is generated the CA will create a separate CRL for each key that is associated with a valid CA certificate. So, again the <CRLNameSuffix> allows for the incrementing number at the end. An example would be that the first CRL is named MYCA.crl, after a key renewal the new CRL will be named MYCA(1).crl and so on.
The main point here is that the %4 variable is important for CA Certificate paths and the %8 variable is critical for CRL paths. Without these variables the CA would simply overwrite the existing file.
CRLs for Offline CAs should not have a validity period that exceeds one year. Typical configuration for a CRL for an offline CA is 6 months or 1 year. The reason for the longer validity periods is due to the fact that in order to publish a new CRL the Offline CA needs to be brought online. Having longer validity period reduces how often the Offline CA needs to be accessed.
Certification Authorities should not use the SHA1 hash algorithm. There are known attacks against SHA1 that demonstrate that this hashing algorithm is insecure. In other words, there are known ways to create collisions in which the input text can be predetermined. This opens the possibility for CA certificates to be “spoofed”. Windows supports the following SHA2 hashing algorithms: SHA256, SHA384, and SHA512. While SHA 512 provides greater security, SHA256 is more likely to be supported by applications.
A child CA should be half the life of the parent. In other words, if the Parent CA has a validity period of 20 years, the child CA should have a validity period of 10 years.
CD AutoPlay should be disabled to increase the security of the machines hosting the CA. Although this is less of a security issue today as most servers are Virtual Machines and may not have a CD-ROM drive attached or configured.
By default, Enterprise Admins, Domain Admins, and Local Administrators will have Manage CA permissions on the CA. These permissions should be reduced to a security group that only contains members who are responsible for managing the CA. See the following article for steps to configure this properly:
The following excerpt describes the different types of PKI Hierarchies. For most environments a 2 Tier PKI is recommended. In environments where administration of portions of the PKI must be delegated to different groups or subordination to a public CA is used a 3 Tier PKI would be recommended
Single/One Tier Hierarchy
A single tier Hierarchy consists of one CA. The single CA is both a Root CA and an Issuing CA. A Root CA is the term for the trust anchor of the PKI. Any applications, users, or computers that trust the Root CA trust any certificates issued by the CA hierarchy. The Issuing CA is a CA that issues certificates to end entities. For security reasons, these two roles are normally separated. When using a single tier hierarchy they are combined. This may be sufficient for simple implementations where ease of manageability and lower cost outweigh the need for greater levels of security or flexibility. The level of security can be enhanced if the CA’s keys are protected by an HSM, but at the expense of higher equipment and management costs.
Two Tier Hierarchy
A two tier hierarchy is a design that meets most company’s needs. In some ways it is a compromise between the One and Three Tier hierarchies. In this design there is a Root CA that is offline, and a subordinate issuing CA that is online. The level of security is increased because the Root CA and Issuing CA roles are separated. But more importantly the Root CA is offline, and so the private key of the Root CA is better protected from compromise. It also increases scalability and flexibility. This is due to the fact that there can be multiple Issuing CA’s that are subordinate to the Root CA. This allows you to have CA’s in different geographical location, as well as with different security levels. Manageability is slightly increased since the Root CA has to be brought online to sign CRL’s. Cost is increased marginally. I say marginally, because all you need is a hard drive and Windows OS license to implement an Offline Root. Install the hard drive, install your OS, build your PKI hierarchy, and then remove the hard drive and store it in a safe. The hard drive can be attached to existing hardware when CRLs need to be re-signed. A virtual machine could be used as the Root CA, although you would still want to store it on a separate hard drive that can be stored in a safe.
Three Tier Hierarchy
Specifically the difference between a Two Tier Hierarchy is that second tier is placed between the Root CA and the issuing CA. The placement of this CA can be for a couple different reasons. The first reason would be to use the second tier CA as a Policy CA. In other words the Policy CA is configured to issue certificates to the Issuing CA that is restricted in what type of certificates it issues. The Policy CA can also just be used as an administrative boundary. In other words, you only issue certain certificates from subordinates of the Policy CA, and perform a certain level of verification before issuing certificates, but the policy is only enforced from an administrative not technical perspective.
The other reason to have the second tier added is so that if you need to revoke a number of
CAs due to a key compromise, you can perform it at the Second Tier level, leaving other “branches from the root” available. It should be noted that Second Tier CAs in this hierarchy can, like the Root, be kept offline.
Following the paradigm, security increases with the addition of a Tier, and flexibility and scalability increase due to the increased design options. On the other hand, manageability increases as there are a larger number of CAs in the hierarchy to manage. And, of course, cost goes up
The DSConfigDN registry key should be configured on Offline CAs. This gives the Offline CAs information on where the forests configuration partition is located in case CRLs or CA certificates are published to AD. Even if you do not use AD (LDAP) as an AIA or CDP repository it is still recommended to store the Root CA Certificate and Policy CA certificates in Active Directory, so they can be deployed to domain members.
To not enable Subject Alternative Names in all Certificate request. If this is enabled any user can potentially request a SAN of their choosing a corticate that they request. See the following link for more information:
To reduce the attack surface of a Certification Authority, no other Server Roles should be installed on the Certification Authority. Also, Certification Authorities should not be installed on Domain Controllers.
Active Directory Certificate Services supports role separation. The following roles can be delegated in a PKI: CA Administrator, Certificate Manager, Backup Operator, and Auditor.
The table below explains the various roles:
Roles and groups
Security permission
Description
CA administrator
Manage CA
Configure and maintain the CA. This is a CA role and includes the ability to assign all other CA roles and renew the CA certificate. These permissions are assigned by using the Certification Authority snap-in.
Certificate manager
Issue and Manage Certificates
Approve certificate enrollment and revocation requests. This is a CA role. This role is sometimes referred to as CA officer. These permissions are assigned by using the Certification Authority snapin.
Backup operator
Back up file and directories Restore file and directories
Perform system backup and recovery. Backup is an operating system feature.
Auditor
Manage auditing and security log
Configure, view, and maintain audit logs. Auditing is an operating system feature. Auditor is an operating system role.
The reason for storing Database and Log files on a separate drive is to increase the performance of the CA. Also, since the Database and Log files increase in size over time, there is the potential that they could fill up the system drive resulting in issues for the underlying OS, and the inability to issue new certificates.
The SMTP Exit Module is a monitoring tools that enables the CA Administrator to receive email alerts on various actions that take place on the CA. It is recommended that the SMTP Exit Module be implemented to provide partial coverage for some of the actions that need to be monitored. Additional information on the SMTP Exit Module can be found here:
If OCSP is utilized in the environment, there should be multiple OCSP servers that load balanced. This configuration provides high availability. There is a feature call an Array that simplifies the management of multiple OCSP servers.
In many environment virtualization is used since it reduces cost, increases recovery options, and eases management of systems. However, virtualization does reduce security since there are a larger number of individuals that have access to the environment. If possible Offline CAs should be hosted on physical machines so that they can be physically secured. For Online CAs if virtualization is used, additional security controls should put in place to help increase the security of hosting CAs in this type of environment.
The general guidance is to disable Terminal Services on servers hosting the CA. However, keep in mind that in most environments Terminal Services is required for management of the OS.
If you utilize Delta CRLs, Double Escaping must be enabled on the IIS server that is hosting the HTTP CDP Repository. This is due to the fact that delta CRLs have a + character in their name, which is an escape characters.
To provide high availability for enrollment, Certificate Templates should be available on more then one CA. Keep in mind that high availability for enrollment is not required in many environments. And this configuration does not provide complete high availability for CA services, it only provides high availability for enrolment.
Offline CAs should be protected to prevent someone from creating an unauthorized certificate or having access to the Private Key. Some of these protections include:
Using a Hardware Security Module to protect the private keys.
Using a physical machine that can be secured by locking it in a rack or storing the hard drive in a safe.
Storage of the physical machine should require multiple individuals to get physical access to the machine. Example would be one person having the combination for the safe, and another person having badge access to the room where the safe is stored.
Access to the physical machine should be audited. In other words the individual accessing the physical CA should be required to recorded when they physically access the CA. This auditing should be enforced by the organization. In high security environments approval should be required before physically accessing the Certification Authority.
Root CAs and Intermediate or Policy Certification Authorities that do not regularly issue certificates should be kept offline. By offline we mean that the CA is not connected to a network. See Offline CAs and Physical Security for additional information.
Online Certification Authorities should be regularly updated with Security Updates, they should also be updated with new Services Packs or Upgrades as they are released, in order to keep the OS of the CA in a supported version of Windows. Offline CAs are not vulnerable to network attacks due to the fact that they are not connected to the network, therefore security updates are not required for Offline CAs. However, Offline CAs should be upgraded to the current Service Pack level to ensure that the OS is supported by Microsoft.
The Last logged on User should not be displayed on Certification Authorities. Steps for disabling the display of the last logged on user is available here:
Microsoft recommendations for Maximum Password Age, Minimum Password Length, Password
Complexity, Password History Size, Account Lockouts. For CAs that are part of an Active
Directory domain this will be configured by the Domain Policy. However, Offline Certification Authorities are not connected to a domain, so their password policy needs to be managed via Local Group Policy. For assistance with configuring these settings see:
Documentation should be created for the following scenarios Offline CA Retrieval and Standup, Rebuild of the PKI, Renewals of CA certificates, Disaster Recovery, and Emergency CRL signing.
CAs should be monitored. Monitoring should include up/down monitoring, monitoring of the CA services, monitoring of security events, CRL Freshness, and expiring certificates.
The CA computer object should be a member of the Cert Publishers group in each domain. This gives the CA write permission to the userCertificate attribute on computer and user objects. Which allows the CA to write certificates to this attribute.
Components of the PKI, including Certification Authorities should be installed on the newest operating system. One of the main reasons for this is that each Windows OS has security features to protect against known attacks of the time and by deploying the newest OS you are receiving those protections on you servers that host the PKI environment. The other reason is it increases the amount of time before you have to upgrade the OS. The latest OS at the time of writing is Windows Server 2016.
The CA should be regularly backed up. The CA can be backed up through System State backups or through a CA specific backup. Online CAs should be backed up every day. Offline CAs should be backed up whenever their configuration changes. Additionally, private keys should be backed up separately and stored in a secured and restricted location.
Enroll and Autoenrollment permissions on Certificate Templates should be restricted to only those user or computers that should be enrolling or autoenrolling for this type of certificate
Windows supports both HTTP and LDAP locations for AIA and CDP repositories. The best practice is to use HTTP repositories and not LDAP repositories. HTTP locations should be identified with DNS name or in other words a FQDN. An example would be pki.fourthcoffee.com. Additionally, the DNS name should not be the name of a server or computer. The DNS name should be an alias such as pki.fourthcoffee.com or certs.fourthcoffee.com that can easily be redirected if the hosting environment changes.
HTTP repositories should be highly available. This means that multiple Web Servers should be load balanced to provide redundancy. Also, if possible there should be an HTTP repository available in each site so that clients get more rapid responses. This configuration would require a load balancer that can give site specific responses to the client.
Additionally, multiple HTTP locations can be used to increase the availability of these locations.
Hello, this blog covers the process I developed to renew the NDES Service Certificates. I thought I had also created a blog with steps to enable these to autoenroll, but I can’t find it at the moment. Basically, NDES uses a CEP Encryption certificate and Exchange Enrollment Agent certificate. Unless things have changed recently there is no obvious ways to renew them hence this article. If you have a better solution feel free to let me know. Another option is to simply uninstall and then re-install NDES using the same service account.
In an upcoming article I will cover how change the service account passwords and how to replace the NDES service account in case of a compromise or security concerns around the service account.
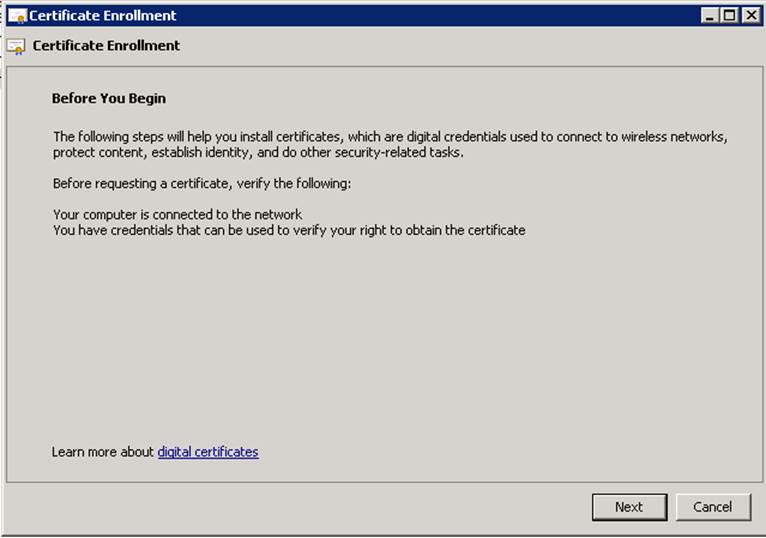
Step 1: First give the NDES Server Read and Enroll permission to the CEP Encryption Certificate Template.
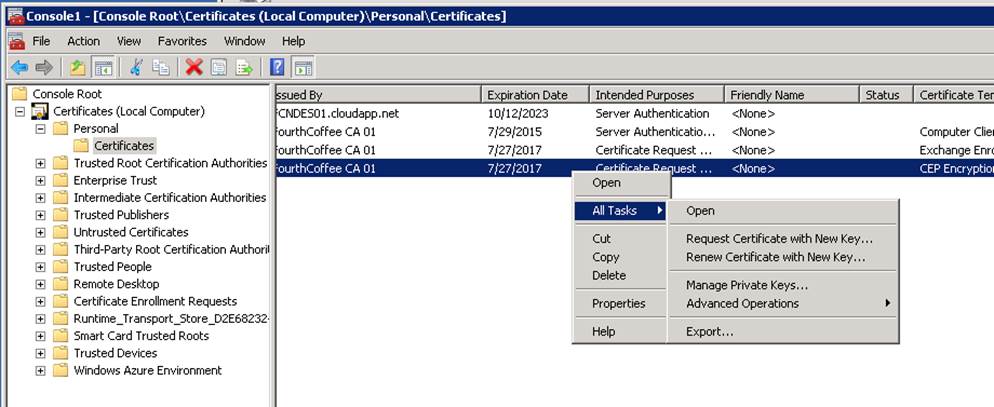
Step 2: Open the certificates MMC targeted to the computer. Expand Personal. Right-click on Certificates. From the context menu select All Tasks then Renew Certificate with New Key…
Step 3: On the Before You Begin page of the wizard, click Next.
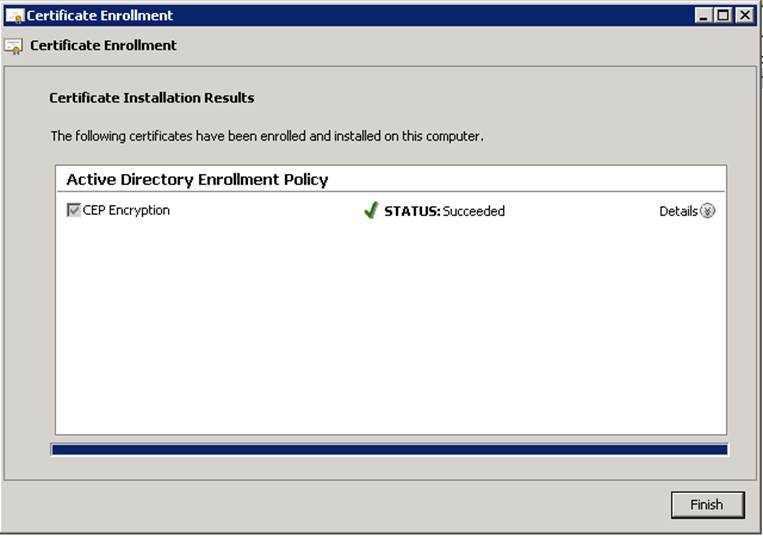
Step 4: On the Request Certificates page, click Enroll.
Step 5: On the final page of the wizard, click Finish.
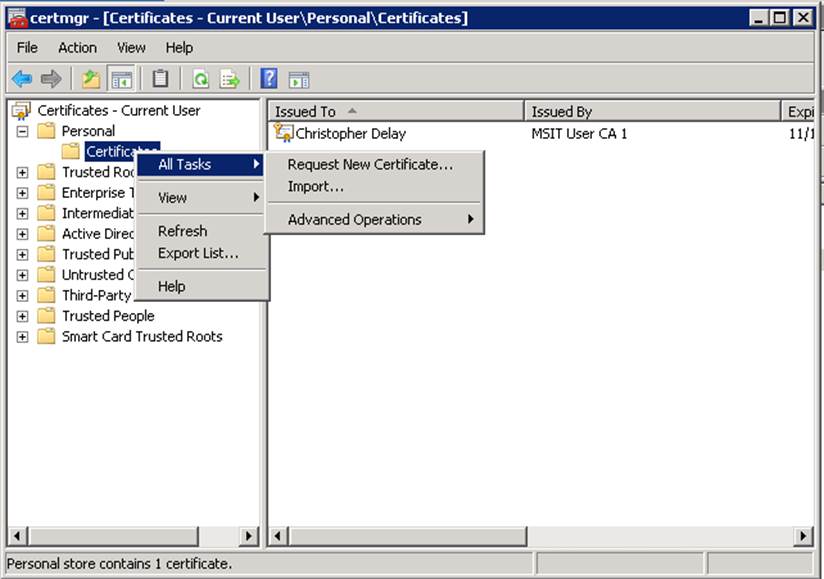
Step 6: Open Certmgr.msc as a user that has Read and Enroll permissions to the Exchange Enrollment Certificate Template. Expand Personal, right click on Certificates. Select All Tasks, and then Request New Certificate…
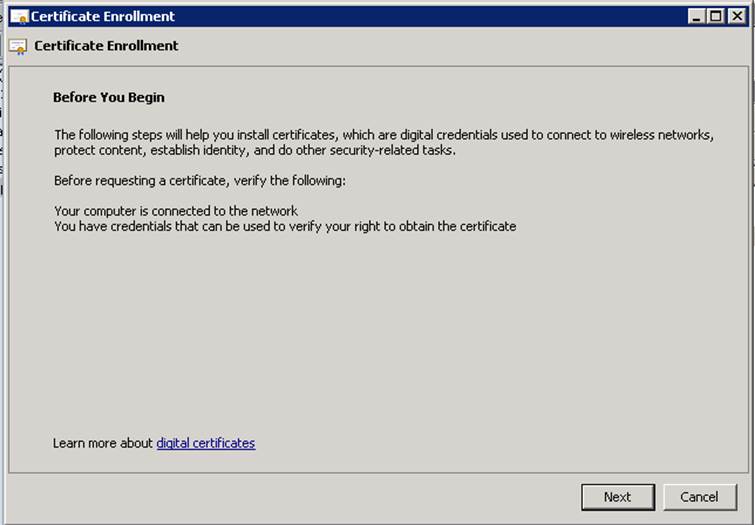
Step 7: On the Before You Begin page, click Next.
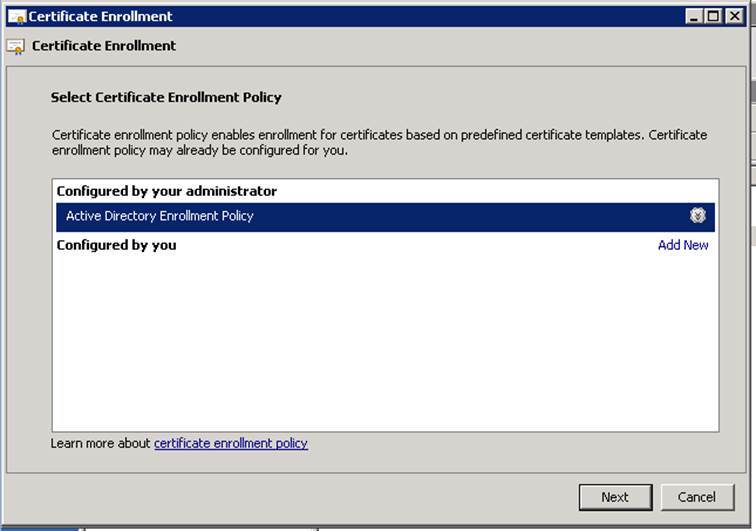
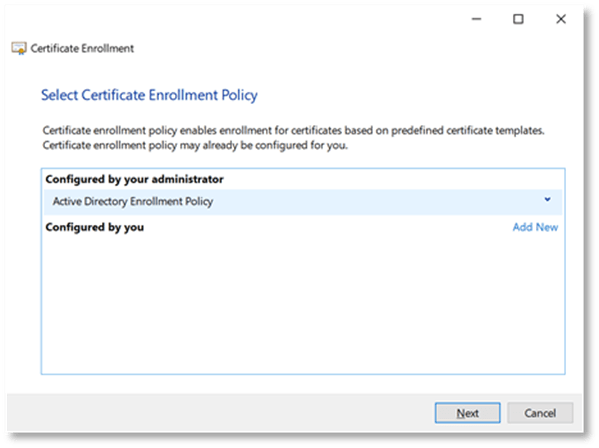
Step 8: On the Select Certificate Enrollment Policy page, click Next.
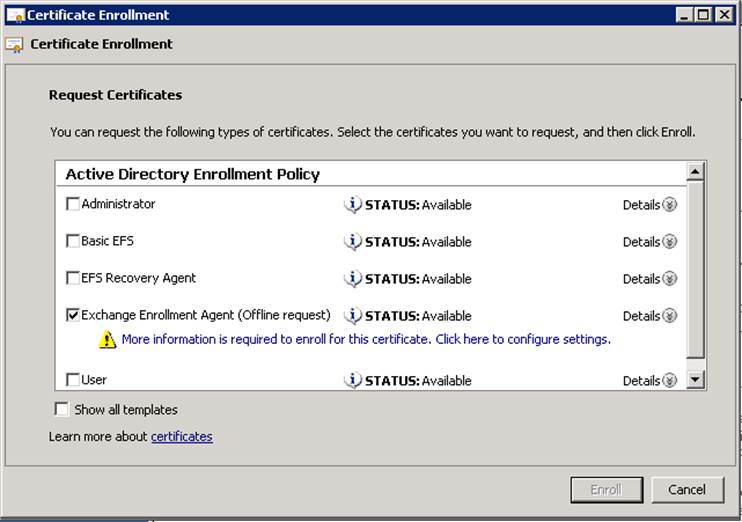
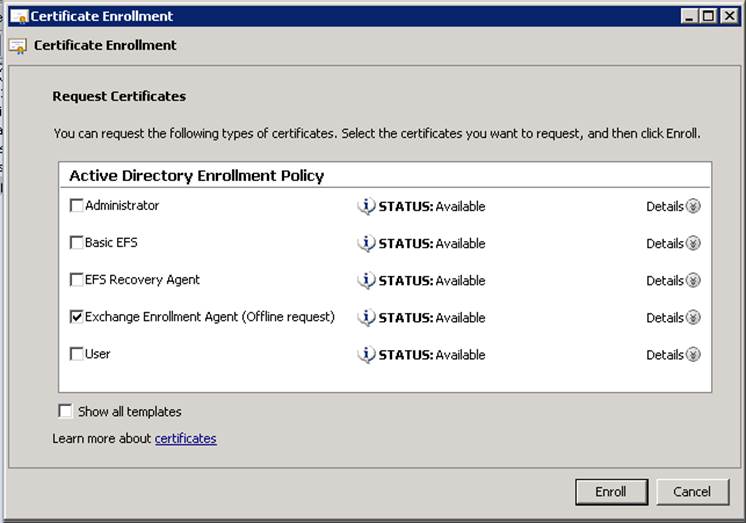
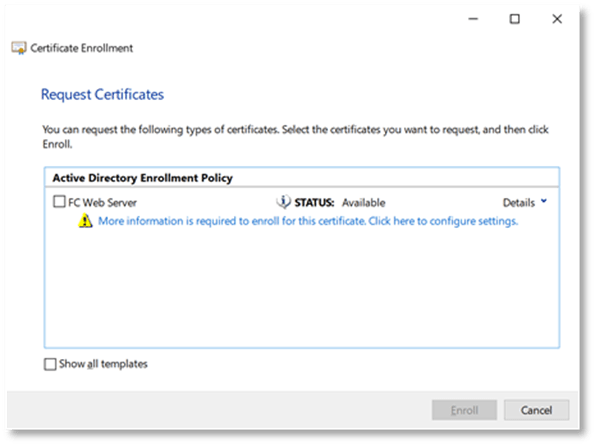
Step 9: Select the Exchange Enrollment Agent certificate template, and click the More information is required to enroll for this certificate. Click here to configure settings. link.
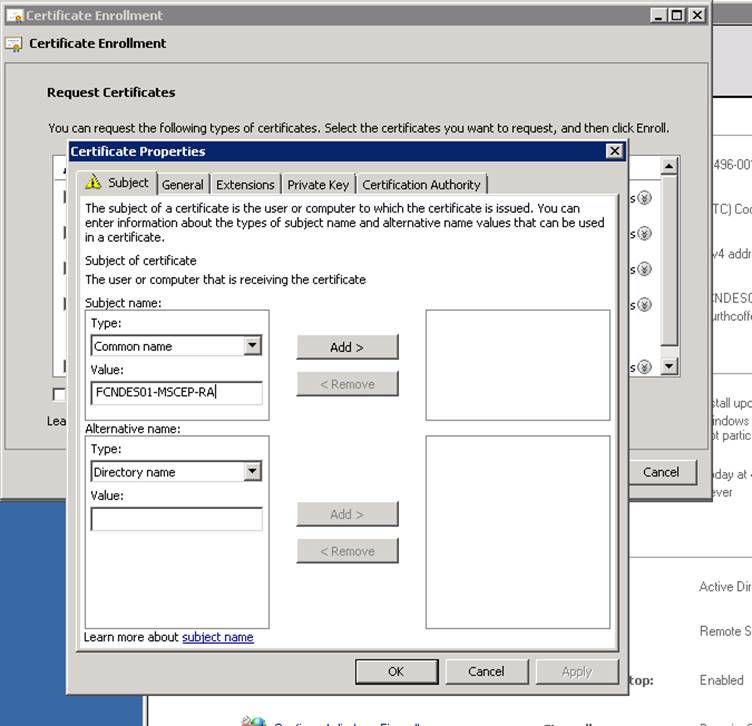
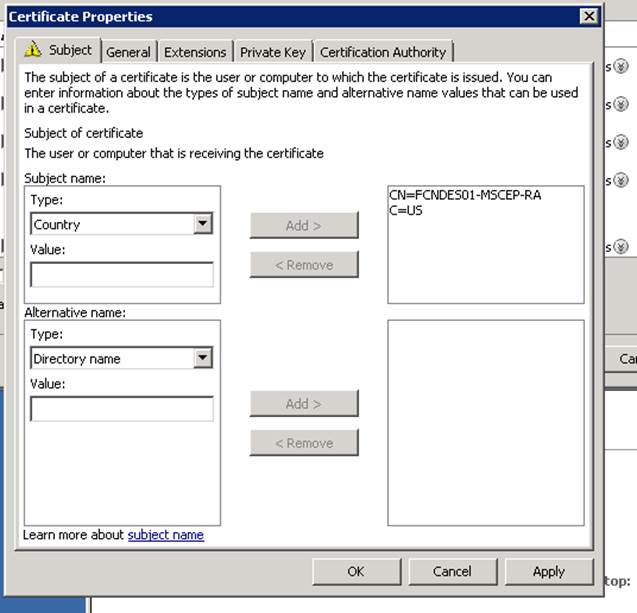
You will want to user the same Subject Name that is in your current Exchange Enrollment certificate. The following steps illustrate the steps needed to do this. You can find the current subject name by opening the Certificates MMC targeted to the local machine and then open the existing Exchange Enrollment Agent certificate. In my example the name was CN=FCNDES01-MSCEP-RA,C=US.
Step 10: Under Subject Name ensure that Common Name is selected and under Value enter the common name that is in your existing certificate. Then click Add.
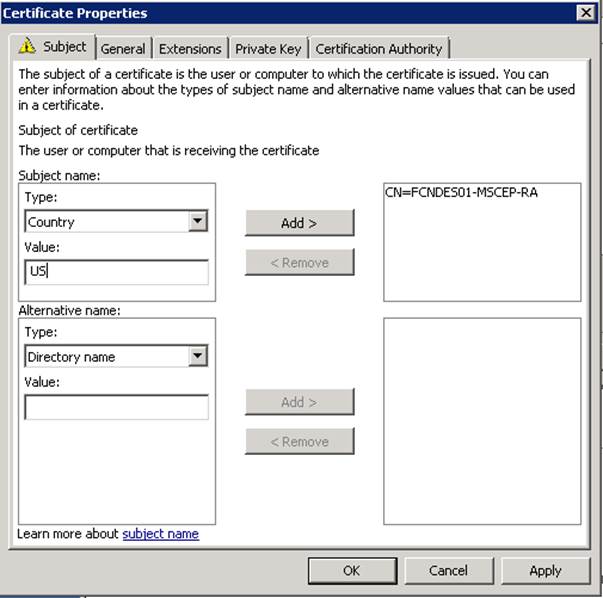
Step 11: Change the Type to Country and under Type the country code that is your existing Exchange Enrollment Agent certificate.
Step 12: Click Add
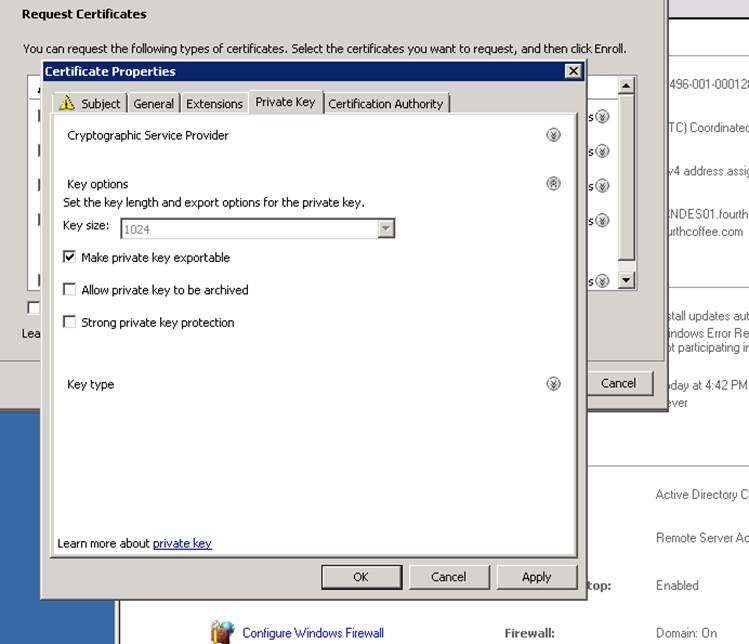
Step 13: On the Private Key tab, select Make private key exportable. Then click OK.
Step 14: Then click Enroll.
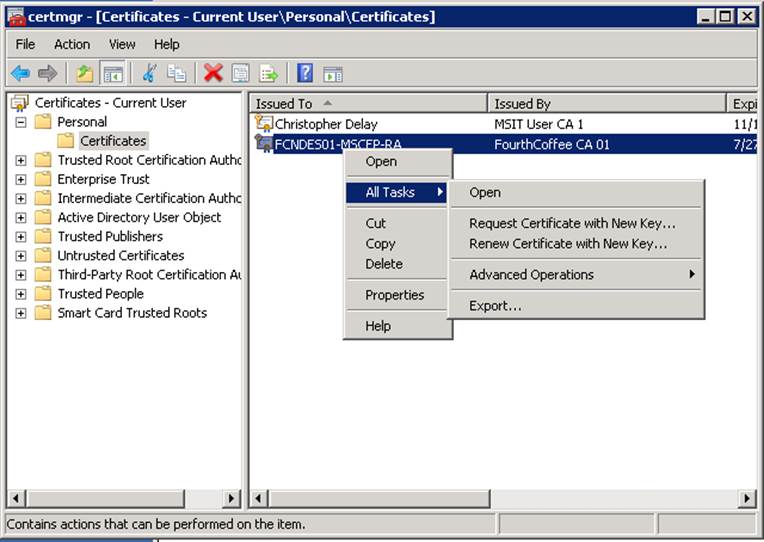
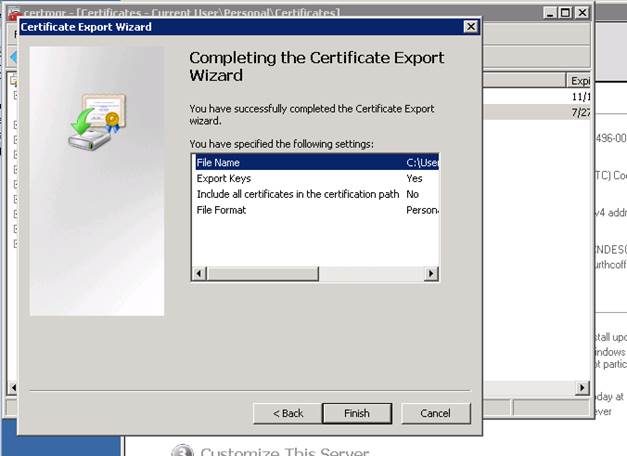
Step 15: Right-click on the Exchange Enrollment certificate in the users personal store. Select Export…
Step 16: When the Certificate Export Wizard opens, click Next.
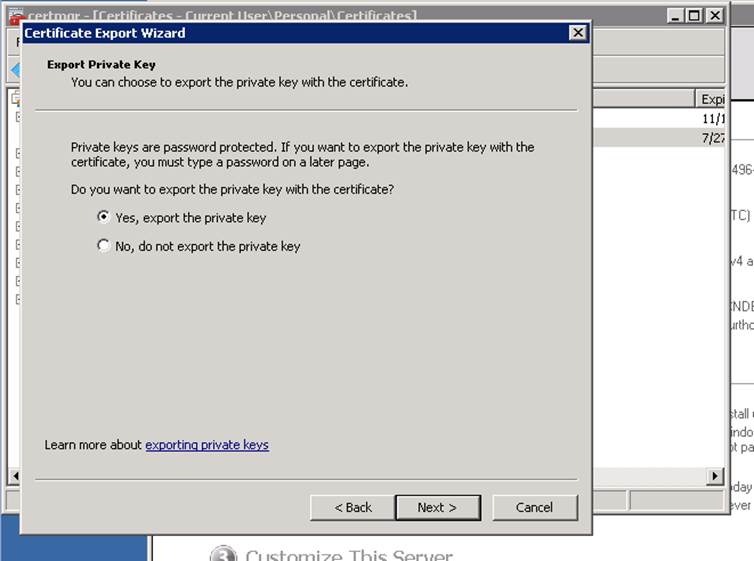
Step 17: On the Export Private Key page, select Yes, export the private key.
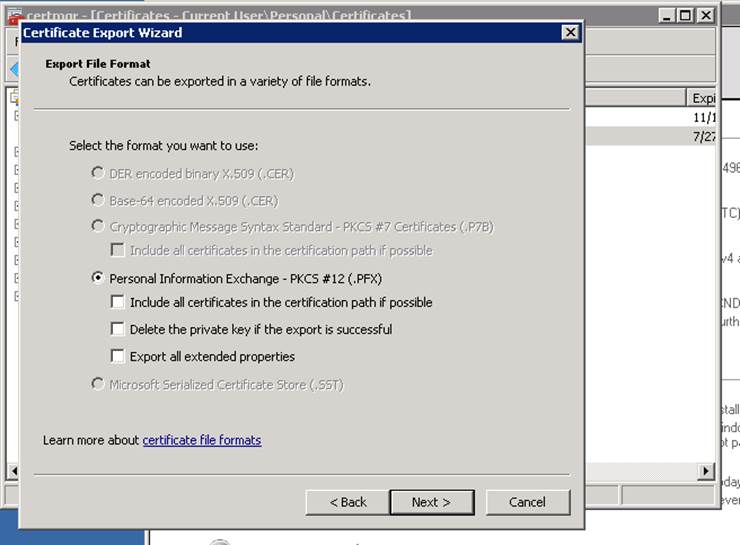
Step 18: On the Export File Format page, select Personal Information Exchange – PKCS #12 (.PFX)
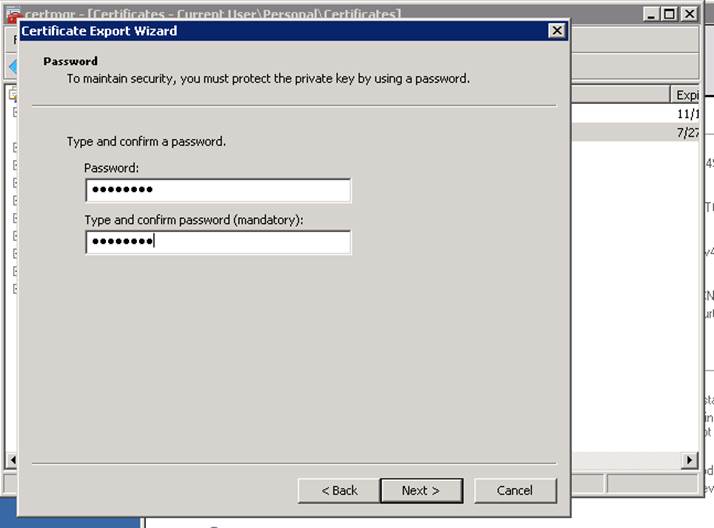
Step 19: On the Password page, enter a password and click Next.
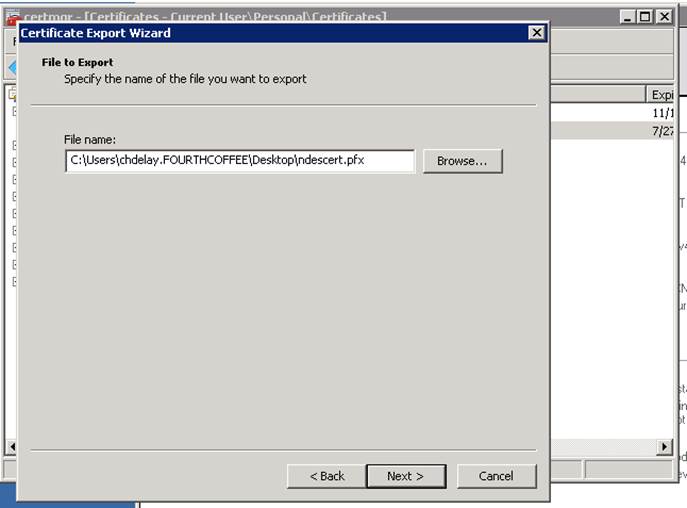
Step 20: On the File to Export page, click the Browse… button. Select the file name and save location. When finished click Next.
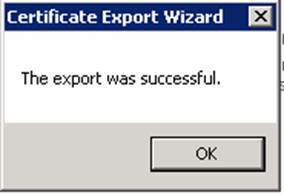
Step 21: n the final page of the wizard, click Finish.
Step 22: Then click OK.
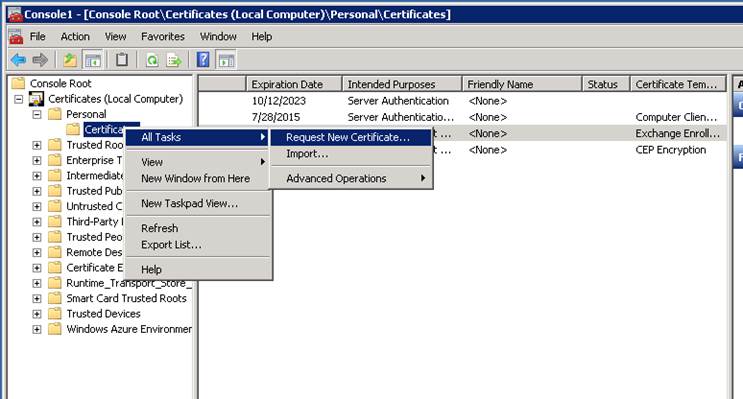
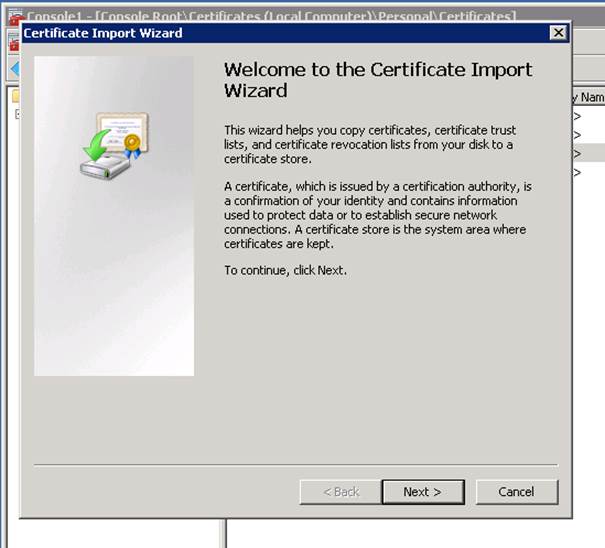
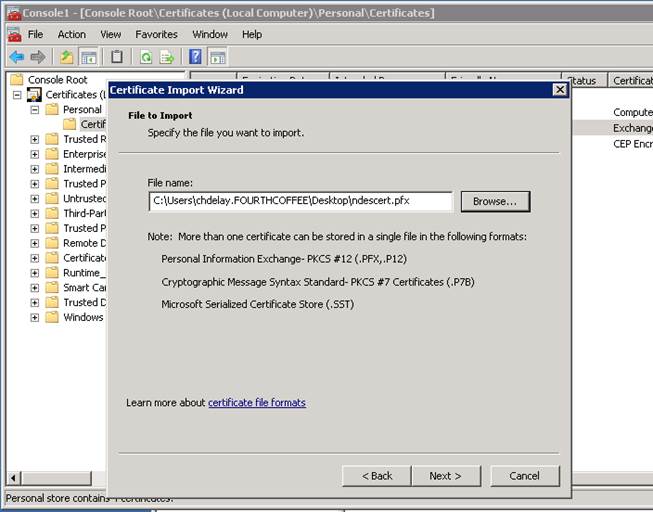
Step 23: In the Certificate MMC on the NDES Server that is targeted to the computer, expand Personal. Right-click on Certificates. From the context menu, select All Tasks and then Import…
Step 24: On the Welcome page, click Next.
Step 25: Browse to the PFX file you previously created, and click Next.
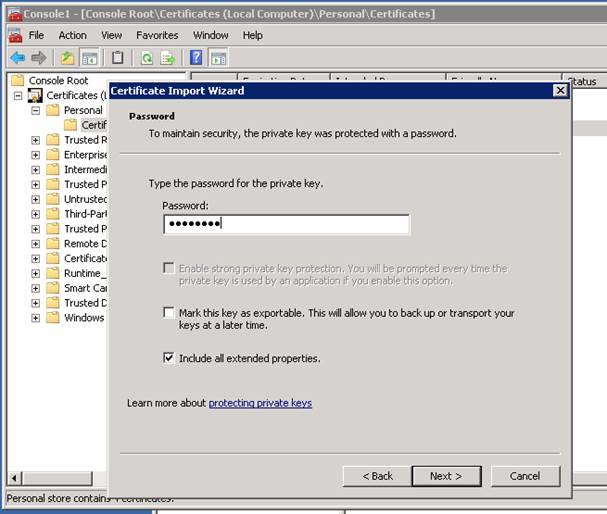
Step 26: On the Password page, enter the password associated with the PFX file.
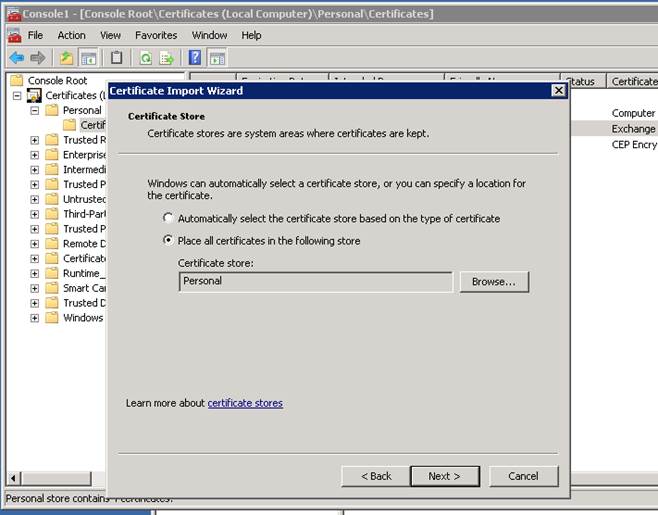
Step 27: On the Certificate Store page, click Next.
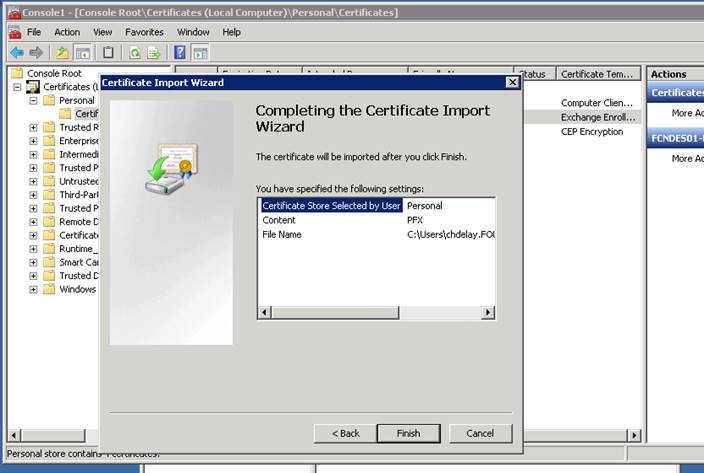
Step 28: On the final page of the wizard, click Finish.
Step 29: Then click OK.
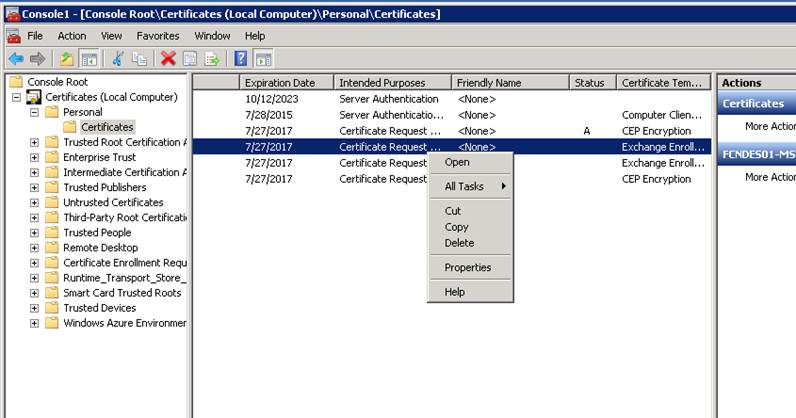
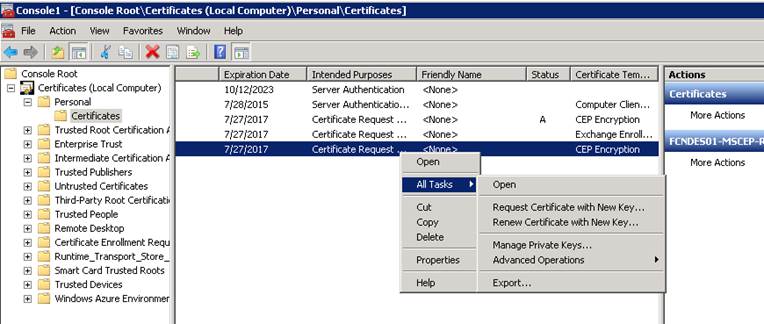
Step 30: In the Certificate MMC on the NDES Server that is targeted to the computer, expand Personal. Right-click on the old Exchange Enrollment certificate, and select Delete.
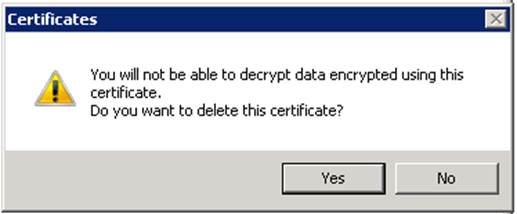
Step 31: Then click Yes, to accept the deletion.
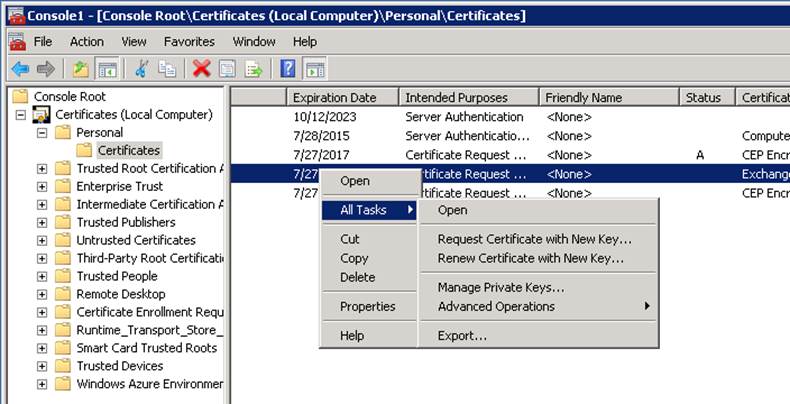
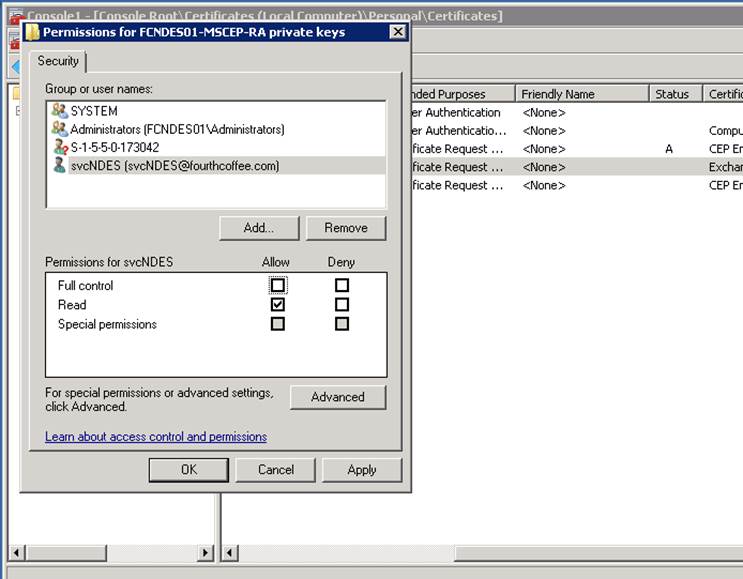
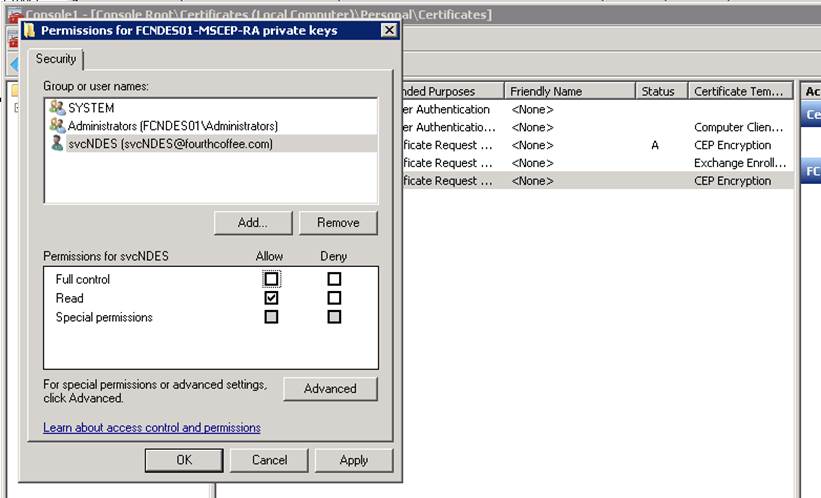
Step 32: Right click on the new Exchange Enrollment certificate. From the context menu, select All Tasks then Manage Private Keys…
Step 33: Add the NDES service account and ensure that it just has Read permission. Click OK.
Step 34: Right click on the new CEP Encryption certificate. From the context menu, select All Tasks then Manage Private Keys…
Step 35: Add the NDES service account and ensure that it just has Read permission. Click OK.
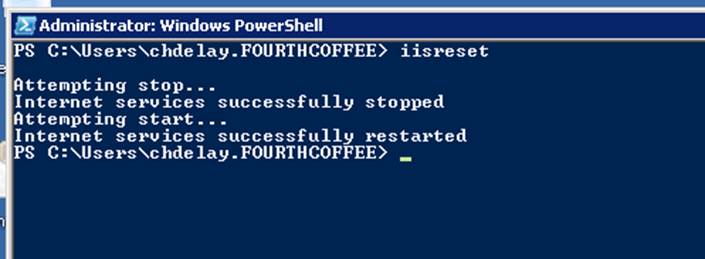
Step 36: Reset IIS using iisreset command.
Feel free to contact me with any topics you would like me to cover with a future blog posting or YouTube video.
In this blog posting I will cover the steps to enable autoenrollment for TLS certificates. Basically, in order to get this working you need to perform the following steps: configure autoenrollment GPO, create a certificate template with the proper settings, enroll for a certificate, configure IIS to use that certificate, and then enable re-binding in IIS.
This will allow you to request the TLS or Server Auth certificate once and then have it automatically renew and have IIS automatically use (rebind) to the new certificate. This eliminates the need to manually re-enroll for certificates.
Configuring Autoenrollment
In order for TLS certificates to be renewed autoenrollment must be enabled via GPO. This section covers configuring the Autoenrollment GPO
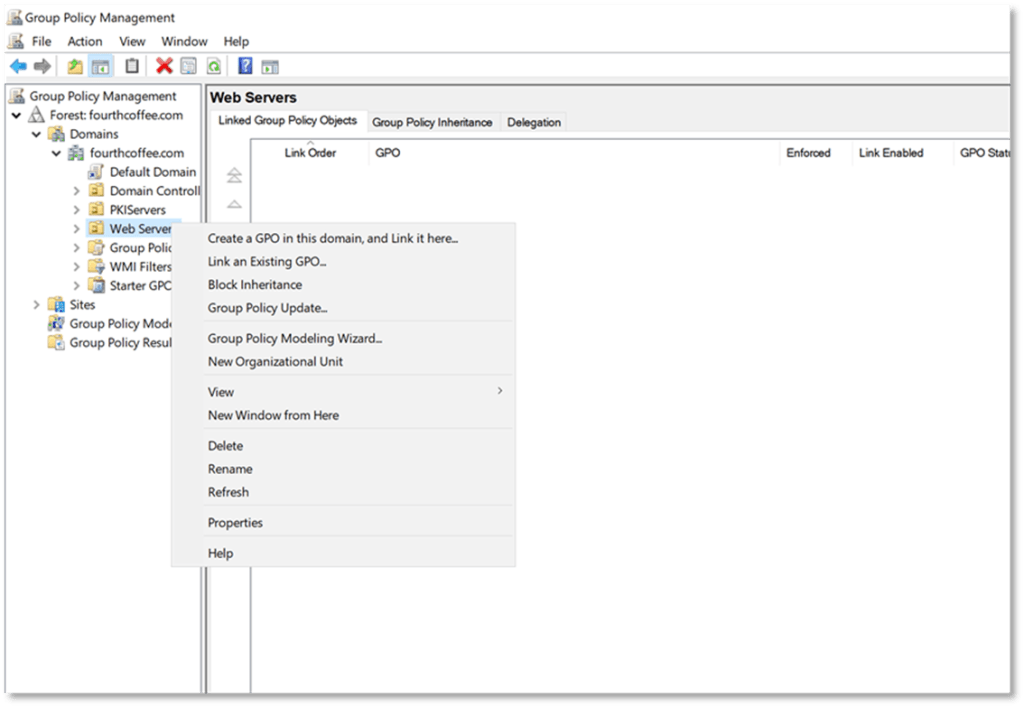
Step 1: Open the Group Policy Management Tool (gpmc.msc)
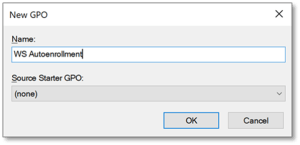
Step 2: Name the GPO and click OK
Step 3: Locate the new GPO
Step 4: Right-click on the GPO and select Edit from the context menu
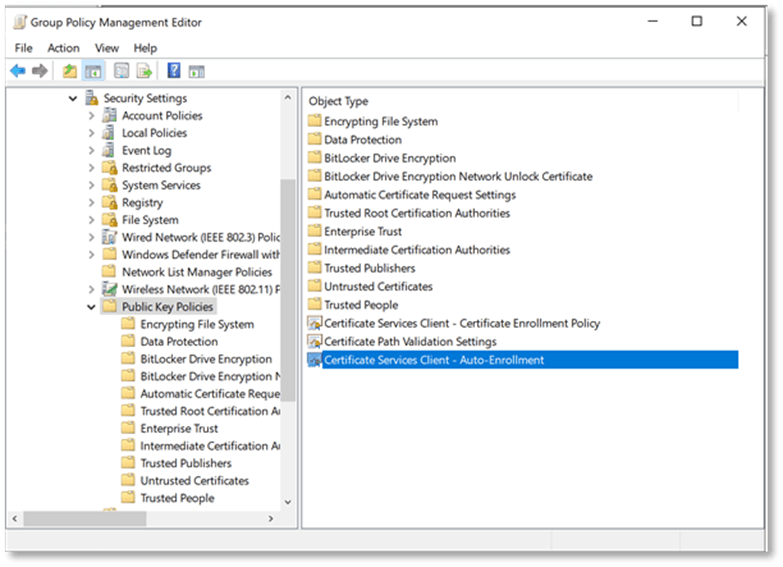
Step 5: Navigate to \Computer Configuration\Windows Settings\Security Settings\Public Key Policies
Step 6: In the right-hand pane select the setting Certificate Services Client – Auto-Enrollment
Step 7: Double-click on this setting to open its properties
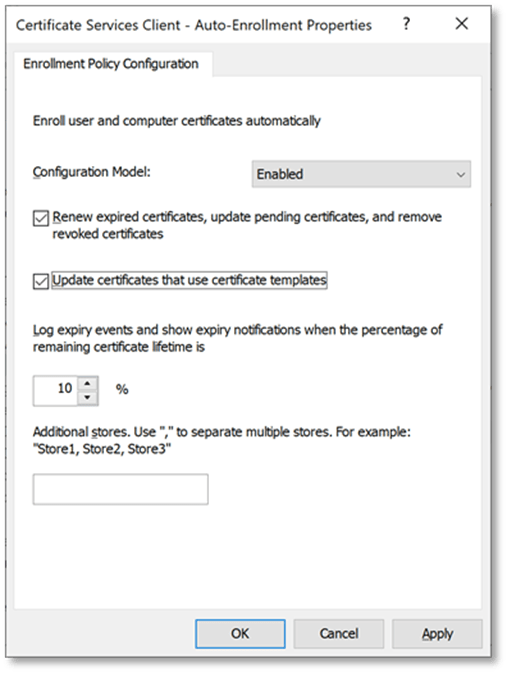
Step 10: Select Update certificates that use certificate templates
Certificate Template
You can re-configure an existing Web Server template or create a new one to enable the autoenrollment permissions. In the example below the process for creating a new certificate template is demonstrated
Step 1: Open certtmpl.msc
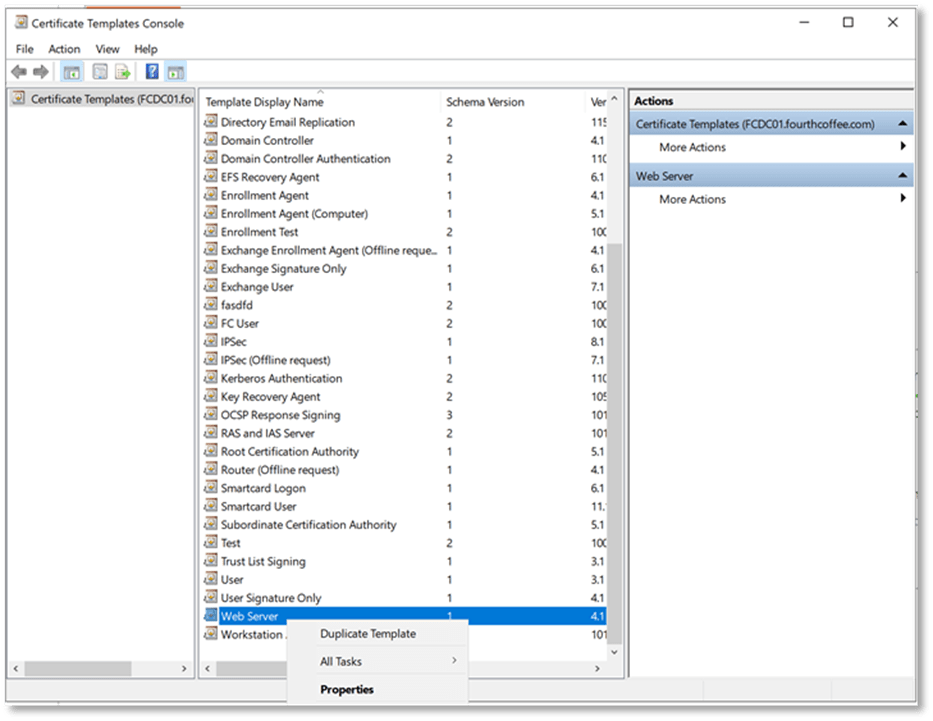
Step 2: Right-click on the Web Server certificate template and select Duplicate Template from the context menu
Step 3: Provide a name for the new certificate template
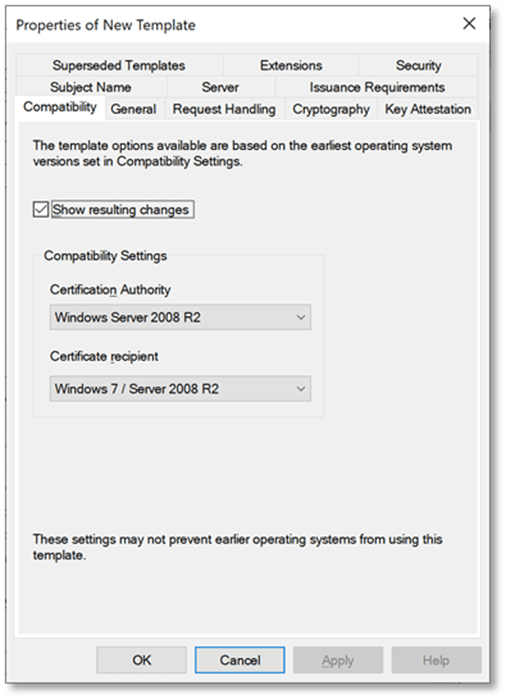
Step 3: On the Compatibility tab, select Windows Server 2008 R2 for the Certification Authority, and Windows 7 / Server 2008 R2 for the Certificate recipient
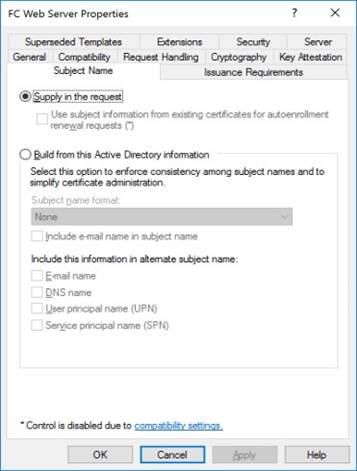
Step 4: Navigate to the Subject Name tab
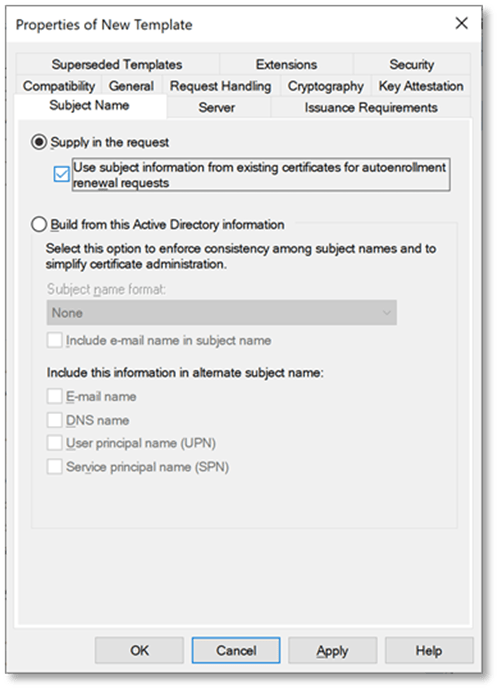
Step 5: Supply in the request should already be selected, but you will need to select Use subject information from existing certificates for autoenrollment renewal requests
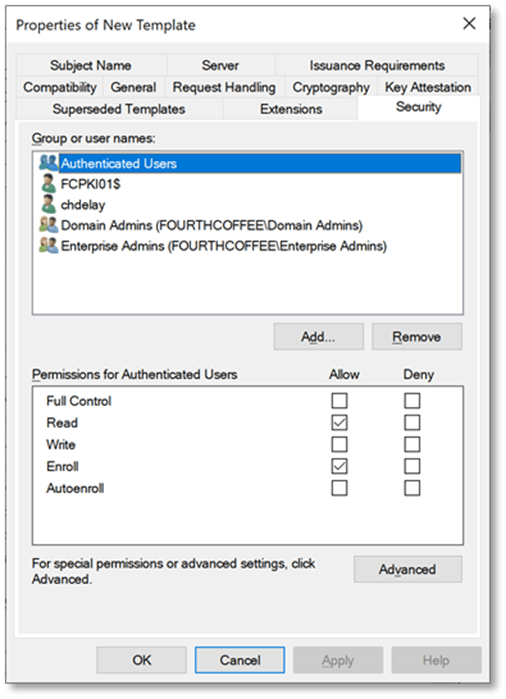
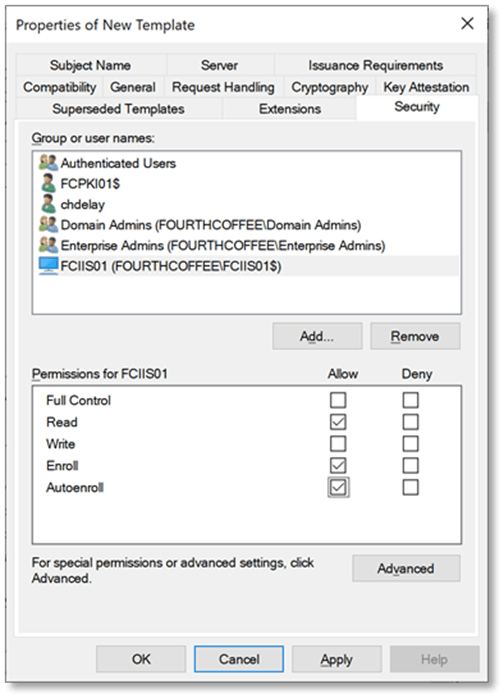
Step 6: Navigate to the Security tab
Step 7: Click Add…
Note: In this example I will be using the name of my web server. This is obviously not a scalable solution. In an enterprise environment you would want to use a security group that contains the web servers.
Step 8: Add the computer or group name and click OK. If using computer name, you will need to click on Object Types… and select Computers
Step 9: Select either the computer or group you added and select Allow permissions for Read, Enroll, and Autoenroll
Step 10: Click OK
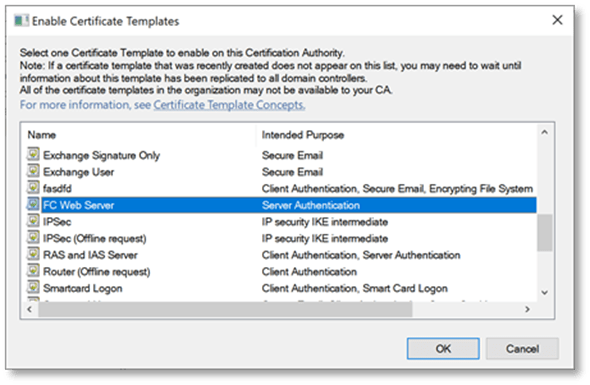
Adding the Certificate Template to the CA(s)
You will need to add the template to an Enterprise CA to support enrollment
Step 1: Open the Certification Authority MMC (certsrv.msc)
Step 2: Right-click on Certificate Templates and from the context menu select New and then Certificate Template to Issue
Step 3: Select the newly created Web Server template and then click OK
Enrolling for the New Web Server Certificate Template
This document covers automatically renewing a TLS certificate and re-binding it in IIS. However, you must have an existing certificate to renew. Autoenrollment in this instance cannot be used to request the initial certificate, because web sites you custom names that must be specified during enrollment.
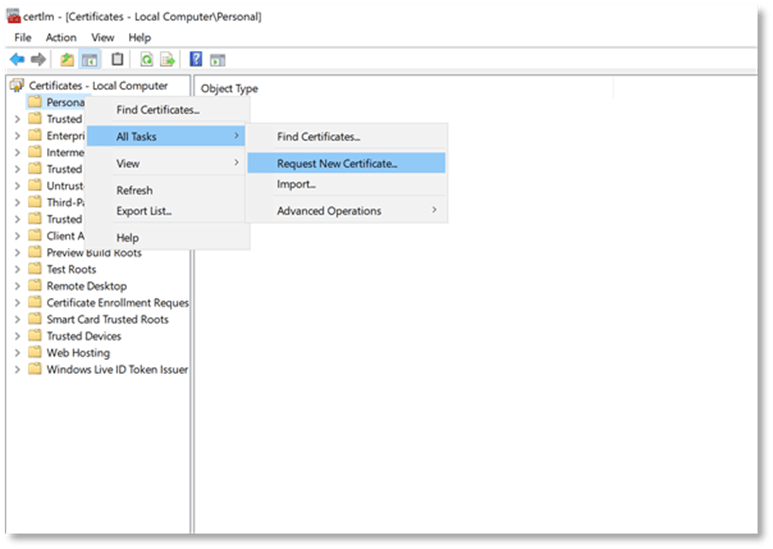
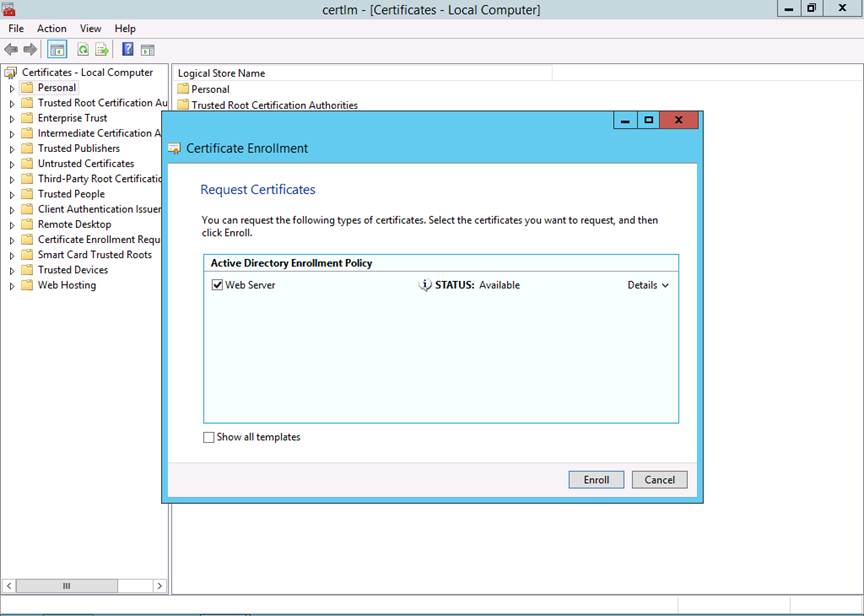
Step 1: Open the Certificates MMC targeted to the Local Computer (certlm.msc)
Step 2: Right-click on Personal and from the context menu select All Tasks and then Request New Certificate…
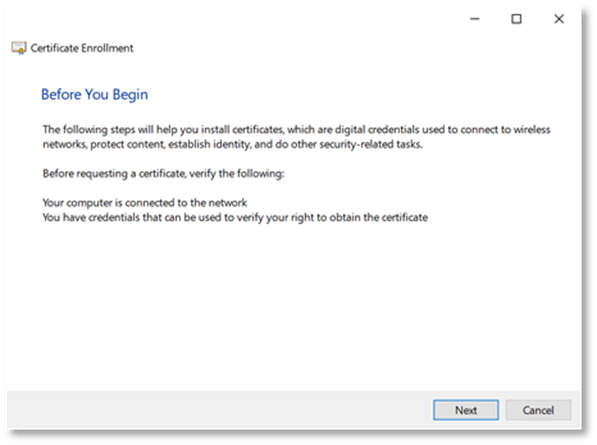
Step 3: The Certificate Enrollment Wizard will open, click Next
Step 4: On the Select Certificate Enrollment Policy page of the wizard, click Next
Step 5: On the Request Certificate page of the wizard click on the blue link (More information is required to enroll for this certificate. Click here to configure settings.)
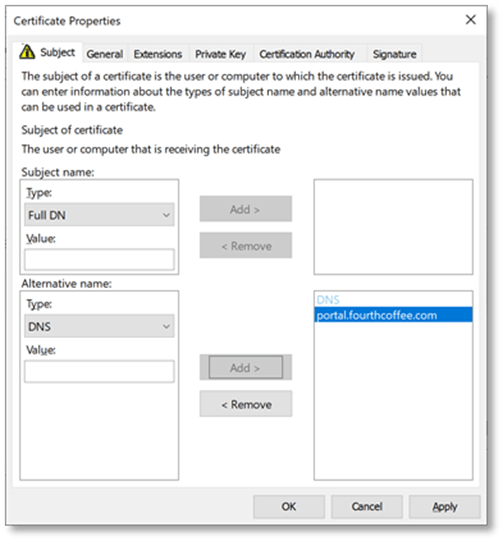
Step 6: On the Subject tab, under Alternative name change the Type to DNS
Step 7: In the Value field, enter the DNS name that is used by the website/webserver
Step 8: Click Add
Repeat Steps 7 and 8 if you need to add additional names
Step 9: Click OK
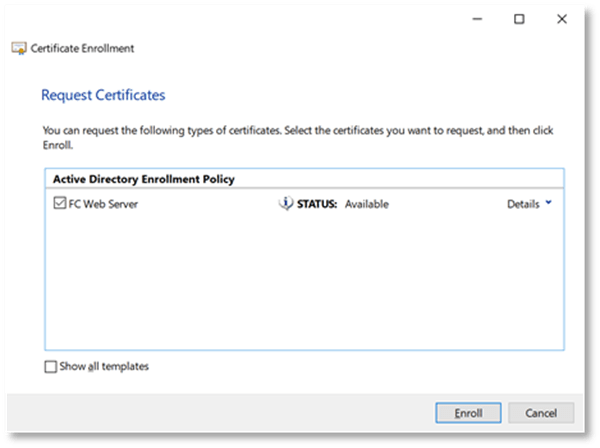
Step 9: Select the certificate template and then click Enroll
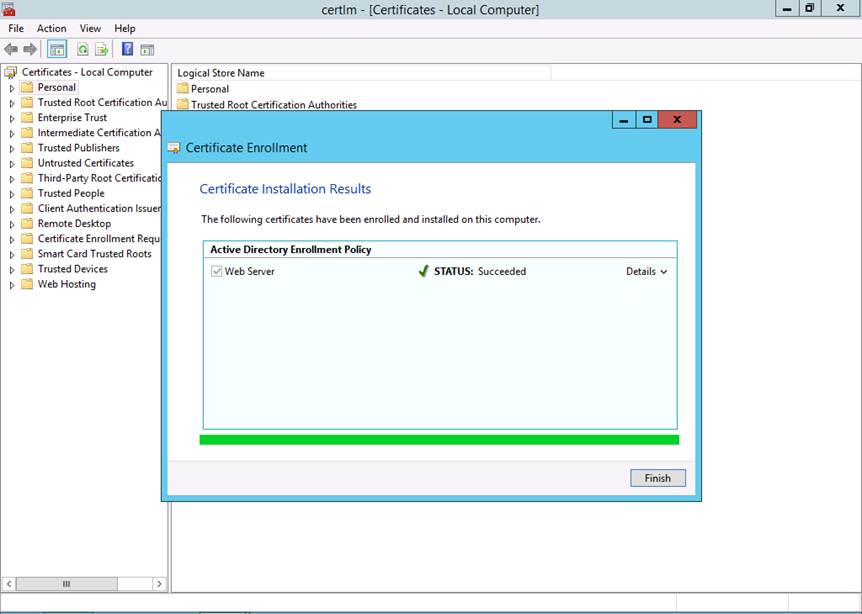
Step 10: After enrollment completes, click Finish
Verifying Re-bind Step 1 (Optional)
The Verifying Re-bind sections of this document just show the steps to verify autoenrollmant and re-bind is working. You do not need to perform these steps unless you are demoing or troubleshooting this process. Also, the process outlined in this step is viewing the serial number of the certificate in the Certificates MMC. You could also, view the certificate by navigating to the website and clicking the lock icon and viewing the certificate.
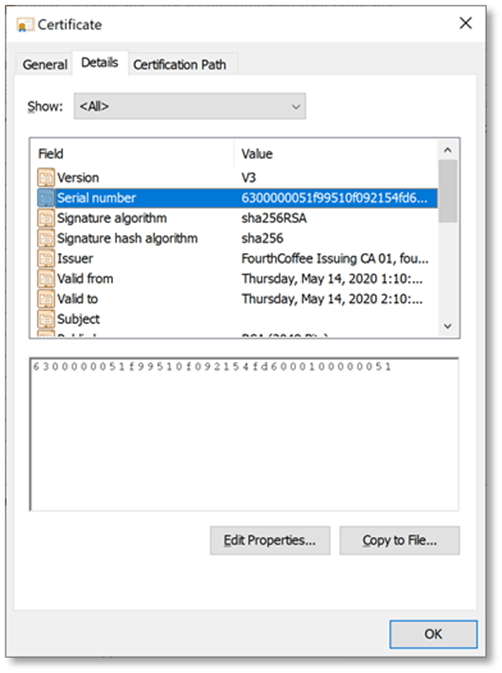
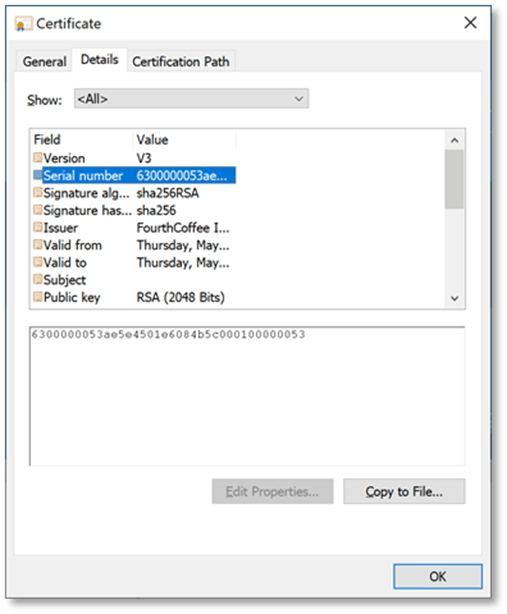
Step 1: Locate the certificate that was previously enrolled
Step 2: Open the Detail tab and locate the Serial number field
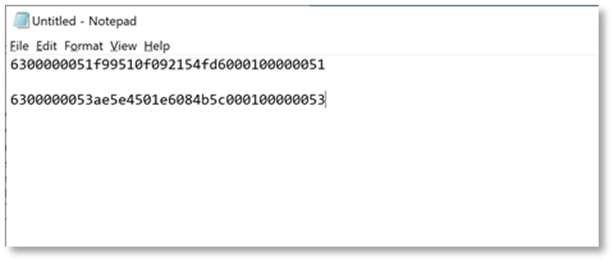
Step 3: Take note of the serial number by copying and pasting it into a notepad file
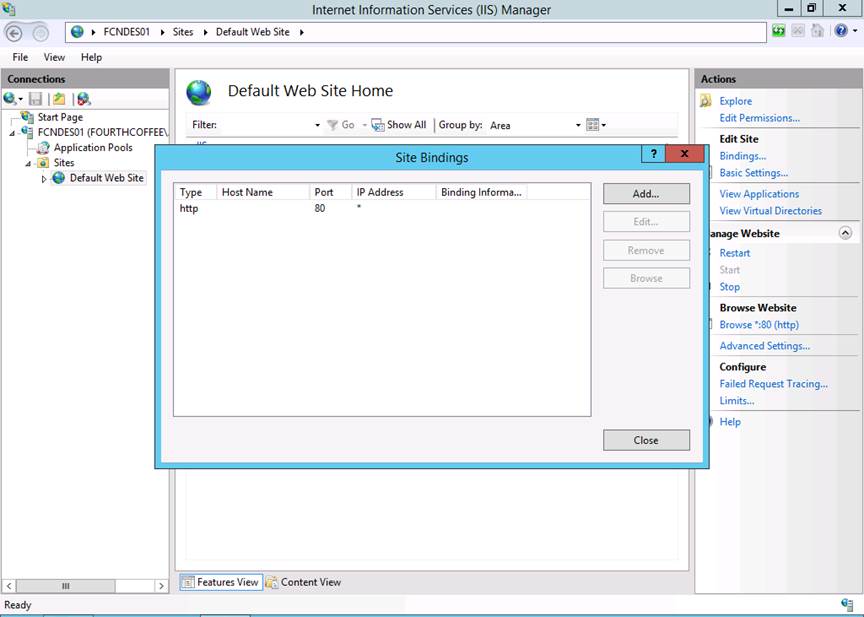
Configuring the Certificate in IIS
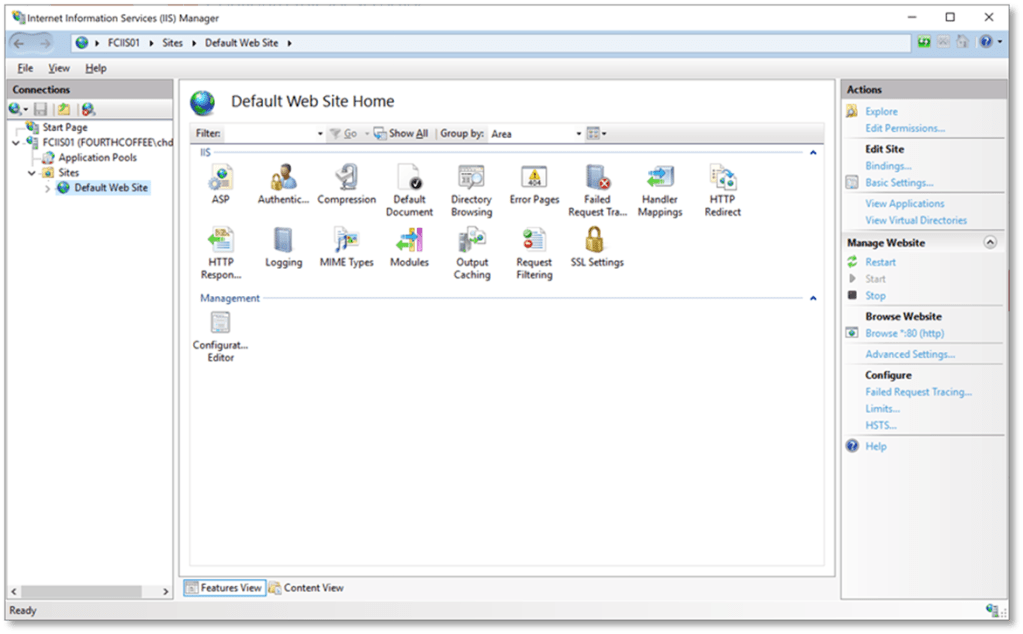
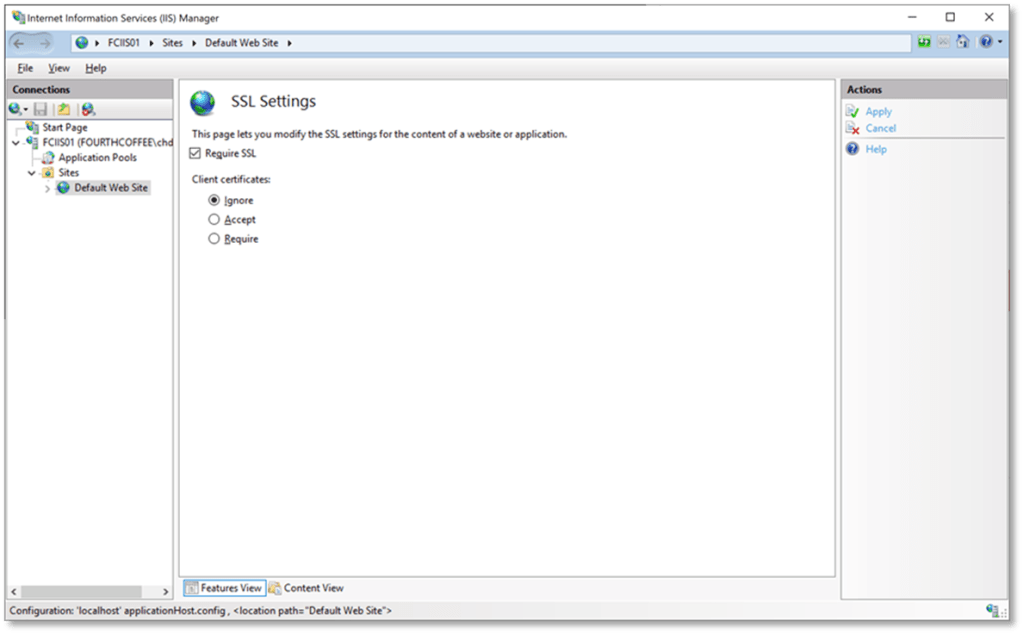
Step 1: Navigate to Default Web Site
Step 2: Click Bindings…
Step 3: Click Add…
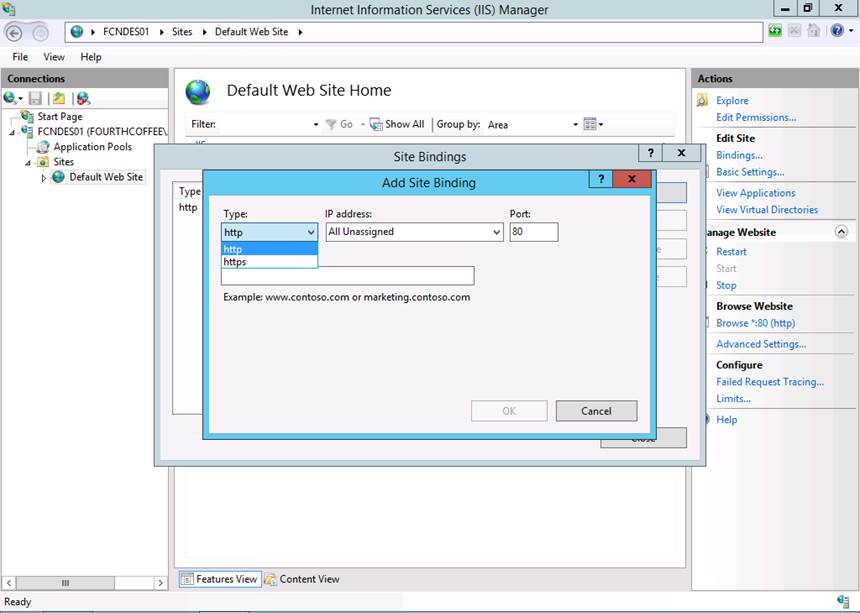
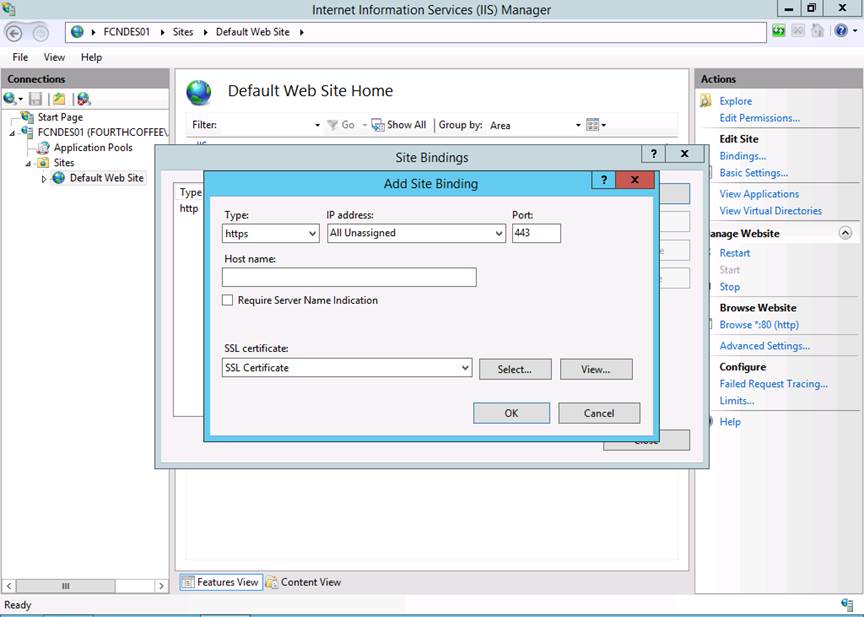
Step 4: Select https from the drop-down menu
Step 5: Select the certificate you previously enrolled from the context menu
Step 6: Click OK
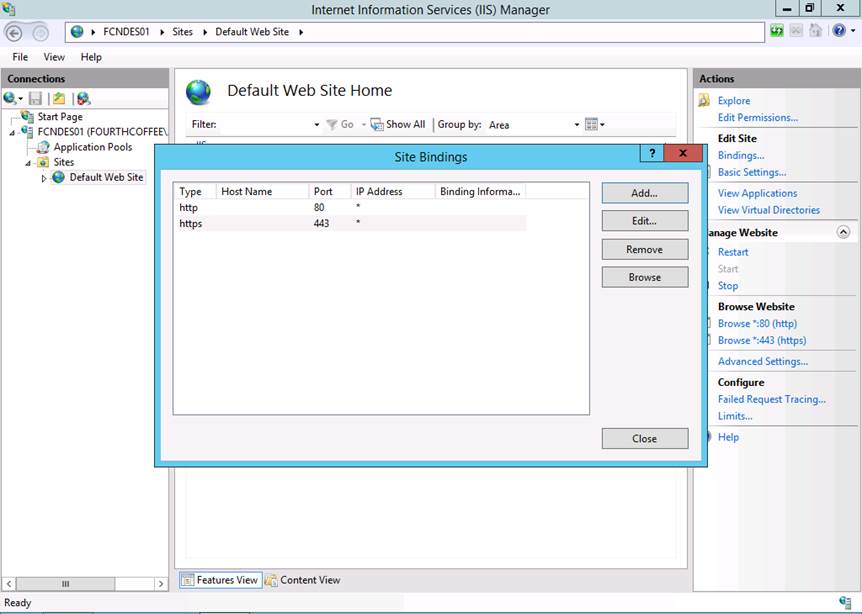
Step 7: Click Close
Step 8: Navigate to the Website you want to protect with the TLS certificate
Step 9: Open SSL settings from the middle pane
Step 10: To require SSL on the Website or Virtual Directory select Require SSL
Enable Certificate Re-binding in IIS
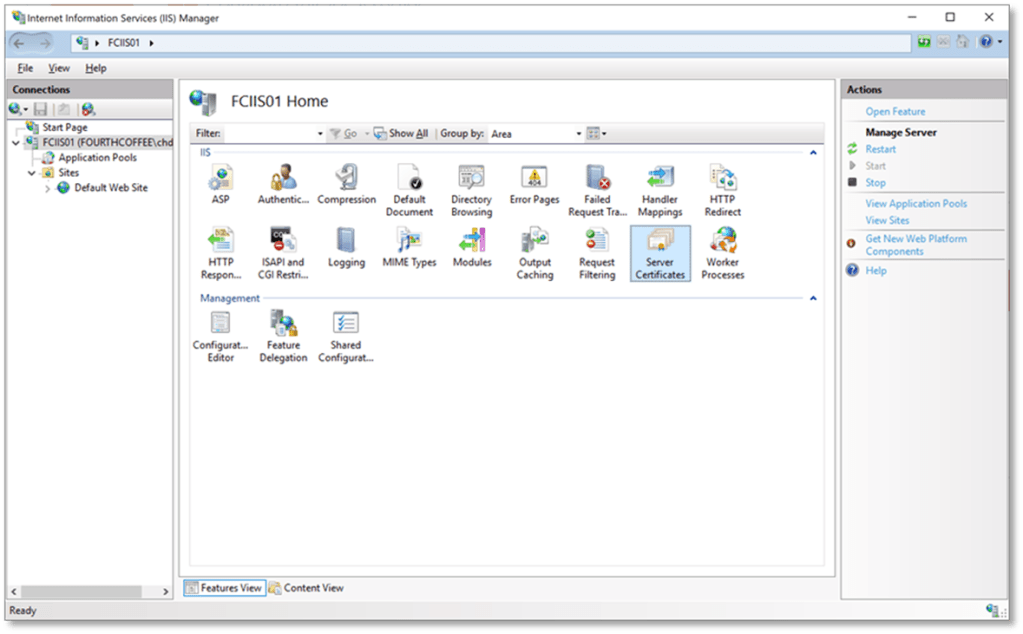
Step 1: Navigate to the server name in IIS Manager
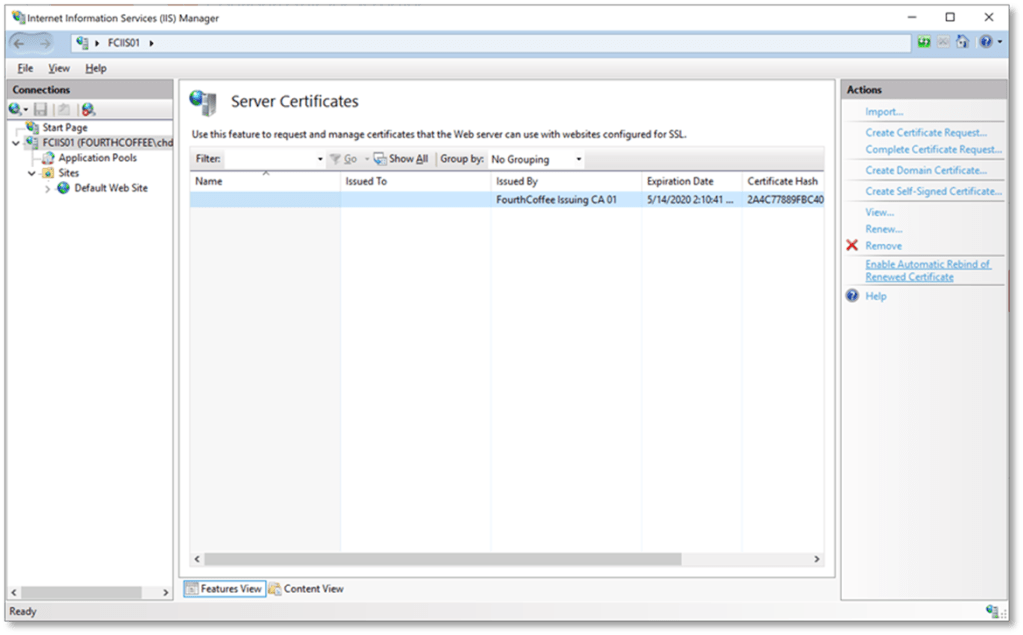
Step 2: In the middle pane open up Server Certificates
Step 3: In the middle pane, select the appropriate certificate
Step 4: In the Actions pane select Enable Automatic Rebind of Renewed Certificates
(Optional) Verifying Re-bind Step 2
The following steps can be re-run after the certificate was supposed to renew to verify the certificate was renewed and re-binded
If testing re-bind you will need to speed up the process of renewal as you may not want to wait a year or so to verify in your pilot that it works
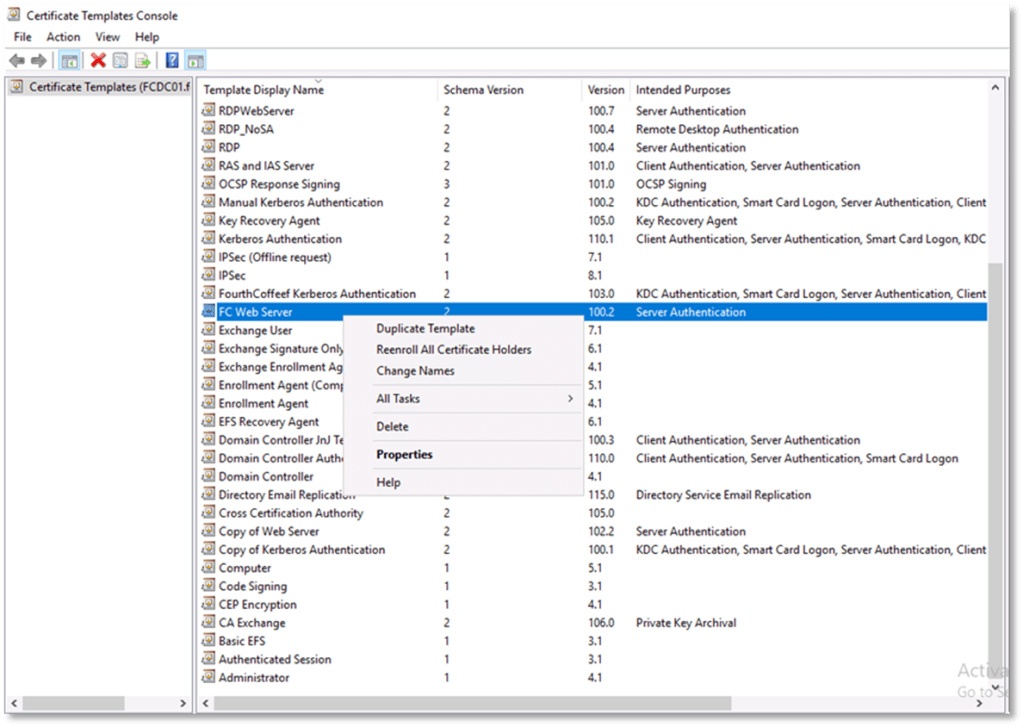
Step 1: Locate the template in Certtmpl.msc
Step 2: Right-click on the template and select Reenroll All Certificate Holders
Step 3: On the Web Server run gpupdate /force or certutil -pule to trigger the autoenrollment client
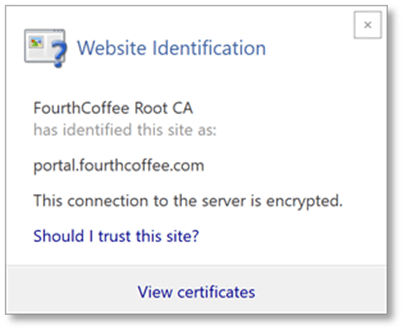
Step 4: Navigate to the website to https
Step 5: Click on the lock icon
Step 6: In the pop up click View certificates
Step 7: Navigate to the Serial number field
Step 8: Take note of the serial number and compare it to the previously recorded serial number and verify that it is a different serial number then the one that was recorded during Verifying Re-bind Step 1
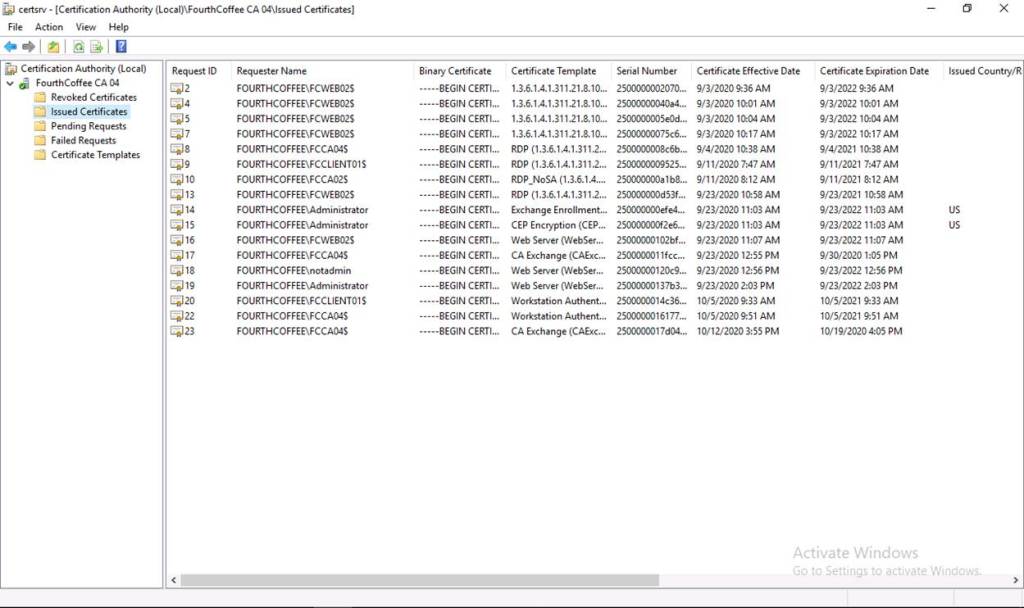
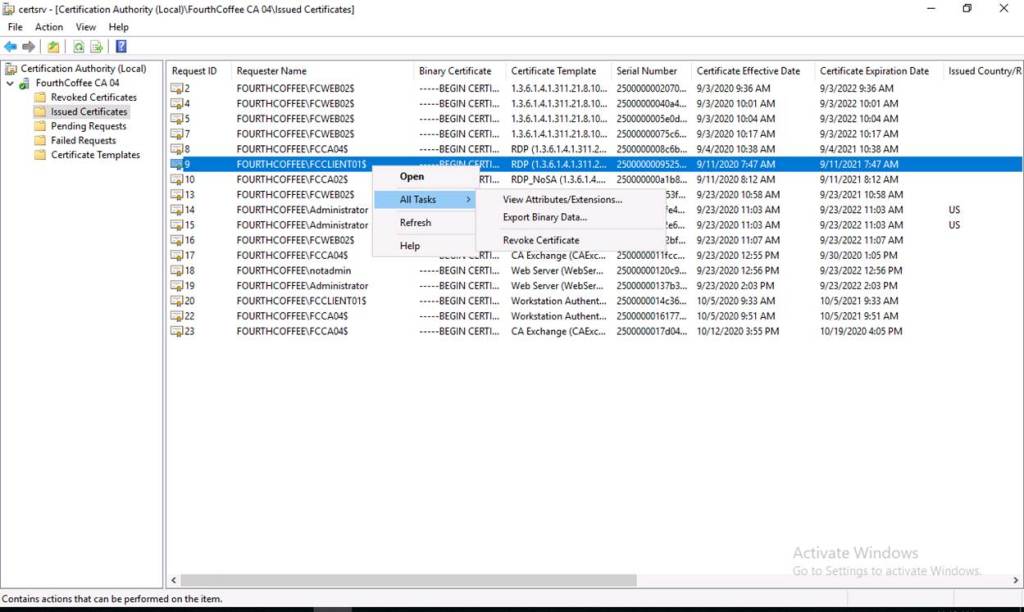
In this blog I will show you how to view certificate requests in the CA database. This can be useful when troubleshooting. It is especially helpful if scenarios where you have to identify what process is requesting the certificate.
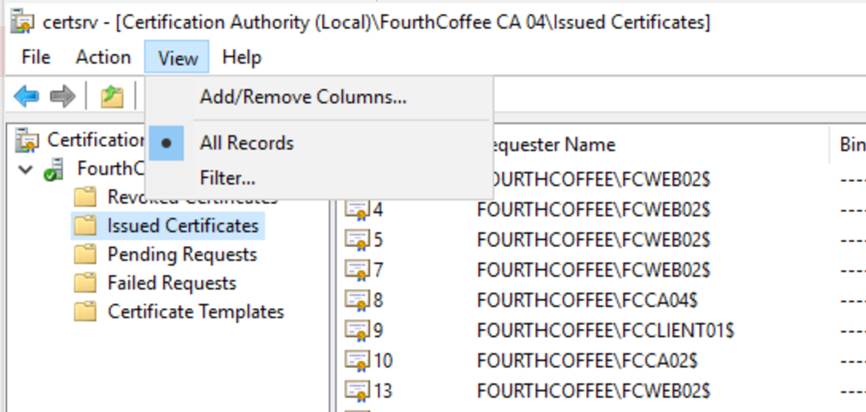
Step 1: Open the Certification Authority MMC (certsrv.msc)
Step 2: Select the View menu and then Add/Remove Columns…
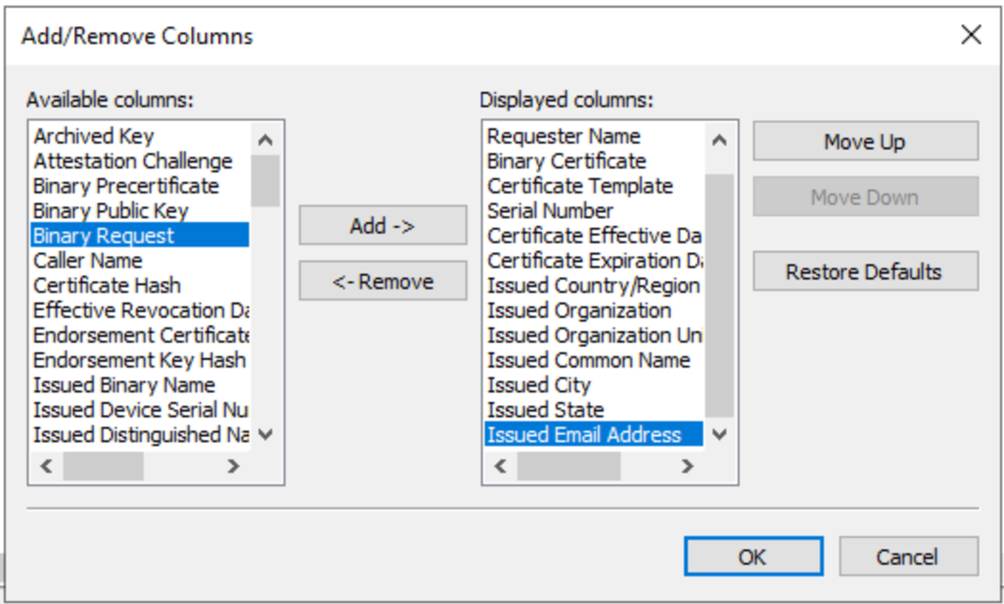
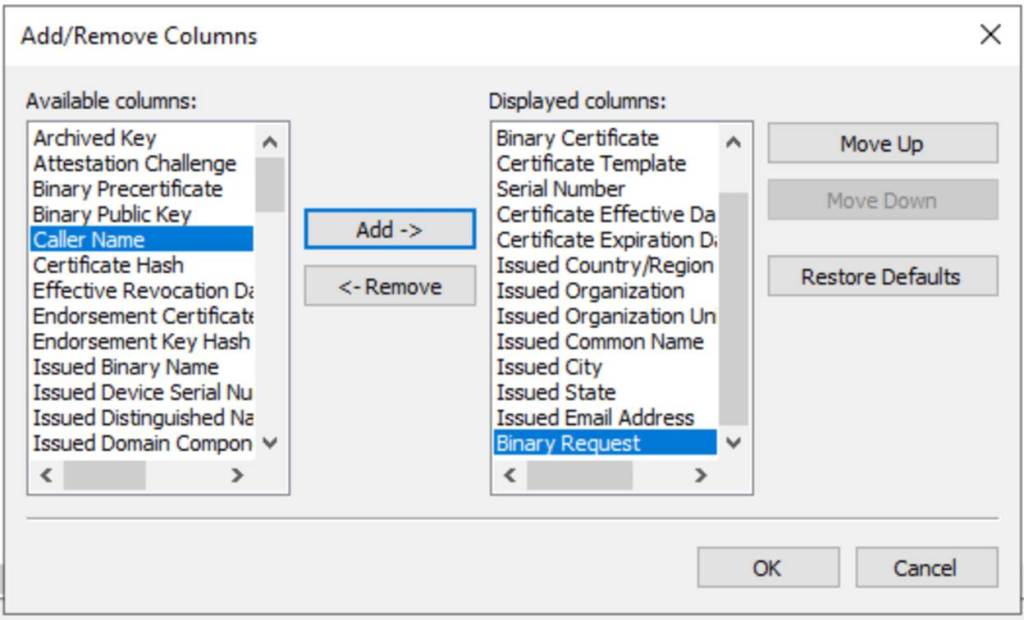
Step 3: In Available columns select Binary Request and then click Add
Step 4: Click OK
To view a request:
Step 1: Navigate to Issued Certificates
Step 2: Identify the certificate you are interested in viewing its associated request
Step 3: Right-click on the certificate and select All Tasks then Export Binary Data…
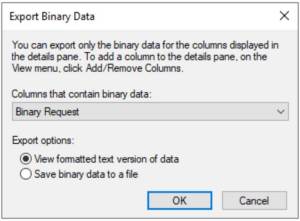
Step 4: Select Binary Request
Step 5: Leave View formatted text version of the data as selected
Step 6: Click OK
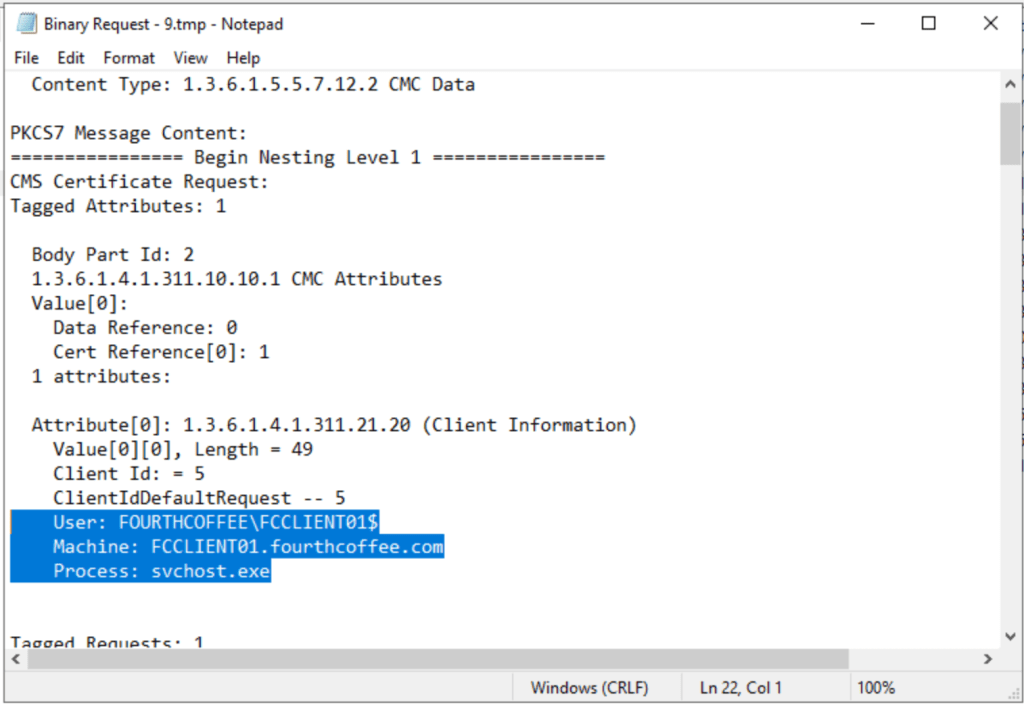
Now you can view the request and identify information such as the User and Machine that made the request as well as the service that initiated the request
Below is a video that covers the same topic covered in this article:
If there are any topics you would like me to cover in future blog posts, reach out to me through my contact page.
This article covers the installation of AGPM. The steps are for an older version of AGPM, but as far as I know they are accurate for current versions as the product has not changed much as far as I know. I will post a blog in the future that covers the configuration of AGPM.
DNS Configuration
The AGPM client will be configured to point to the AGPM Server. It is best to create an alias for the AGPM Server so that if the server name ever changes or is ever replaced you would not need to re-configure the clients.
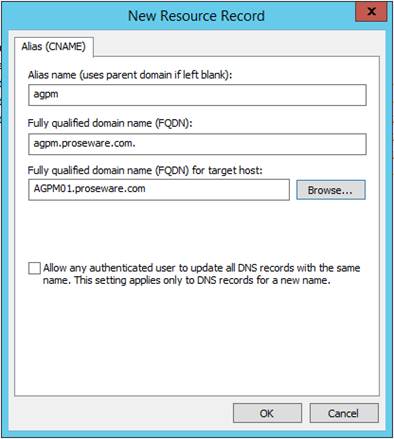
To complete this task right-click on the appropriate DNS Zone. Select New Alias (CNAME)… from the context menu.
When the New Resource Record dialog box opens, enter the Alias Name and the Browse… to the A record for which you want to link the CNAME record. Then click OK.
AGPM Service Account
Creating the AGPM Service Account
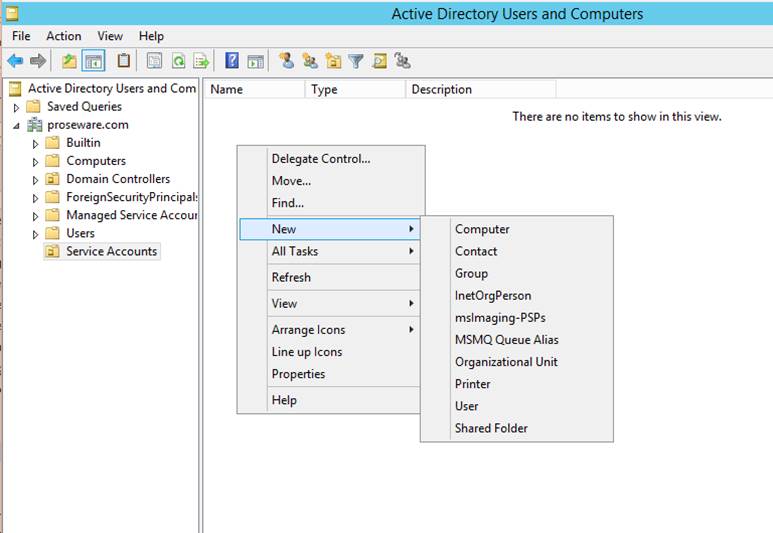
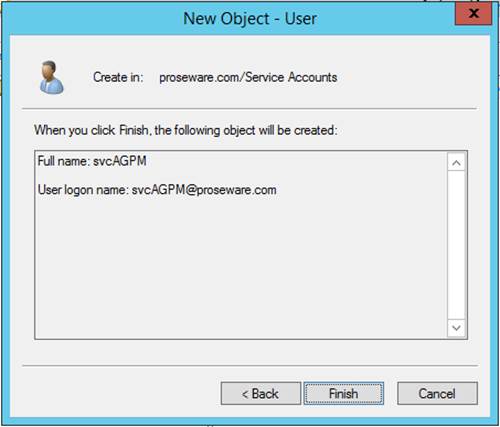
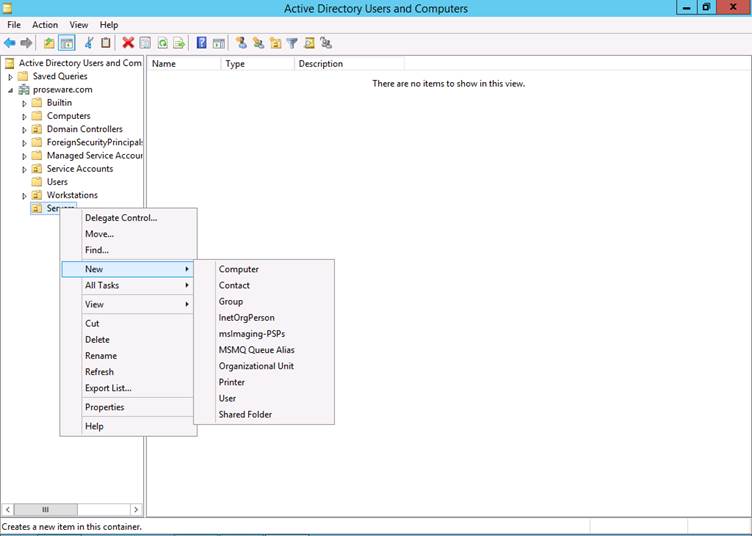
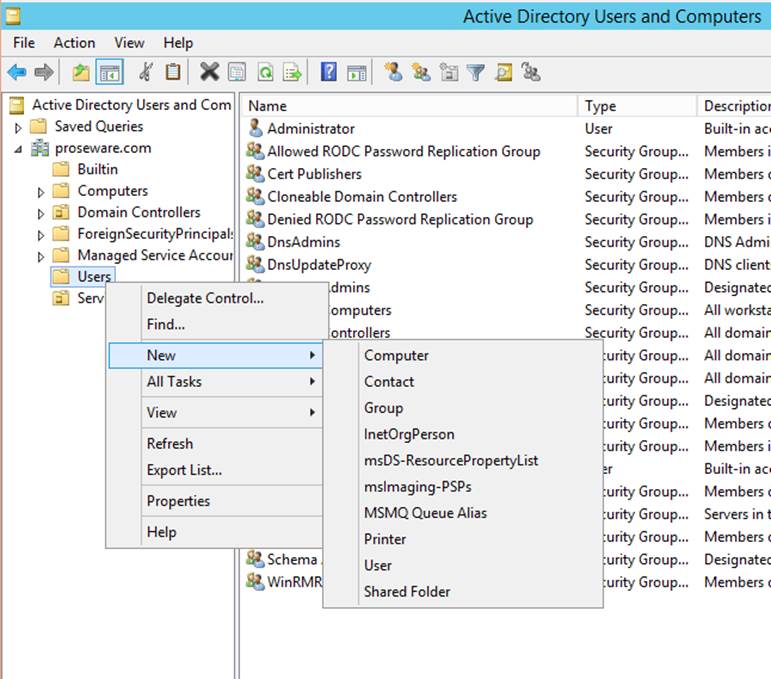
Next you will need to create a service account for the AGPM Service. Locate the OU in which you would like to create the service Account. Right-click on the OU and from the context menu, select New, and then User.
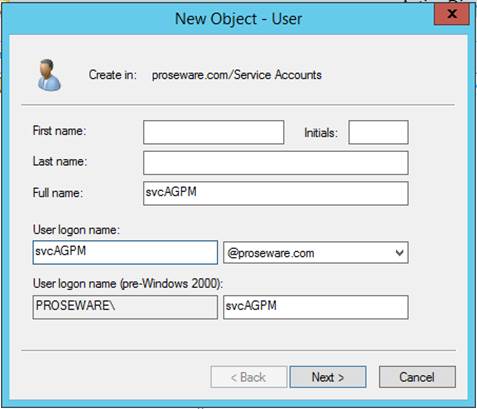
At a minimum fill out Full Name and User logon name, and then click Next.
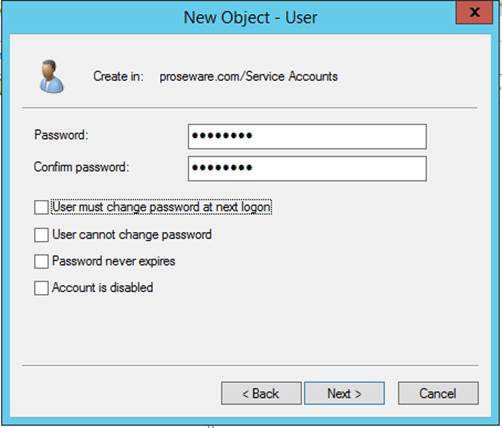
Enter and then confirm a password, then configure the appropriate account/password options and then click Next.
Click Finish to complete the creation of the AGPM service account.
Assigning Permission to AGPM Service Account
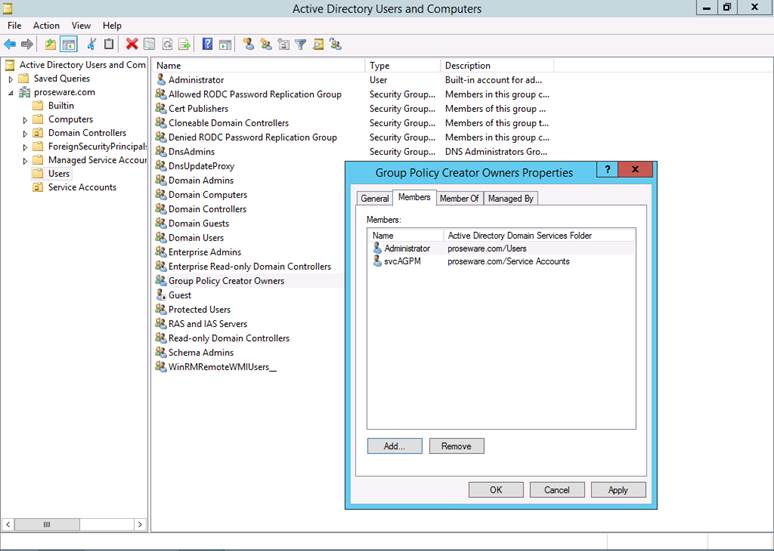
Group Policy Creator Owners Group
The Group Policy Creator Owners group has permissions to create Group Policies in the domain. From a security perspective, members of this group should be restricted. By default the domain Builtin Administrator account is a member of this group. You can leave that account in the group assuming you have locked down that account so that users do not have access to the group and that it has been secured as outlined in the Best Practices for Securing Active Directory (http://www.microsoft.com/en-us/download/details.aspx?id=38785).
The AGPM Service Account will need to be added to the Group Policy Creator Owners group in each domain that is being managed.
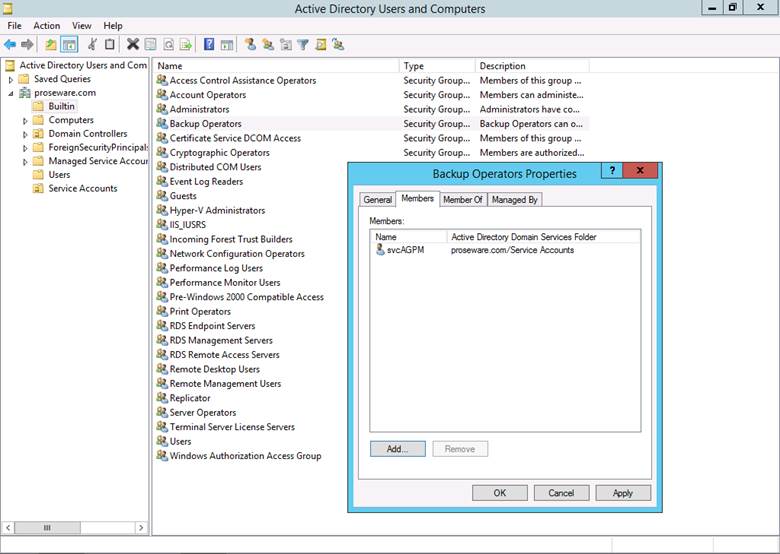
Backup Operators Group
The AGPM service account also needs to be added to the Backup Operators account in each domain that is being managed.
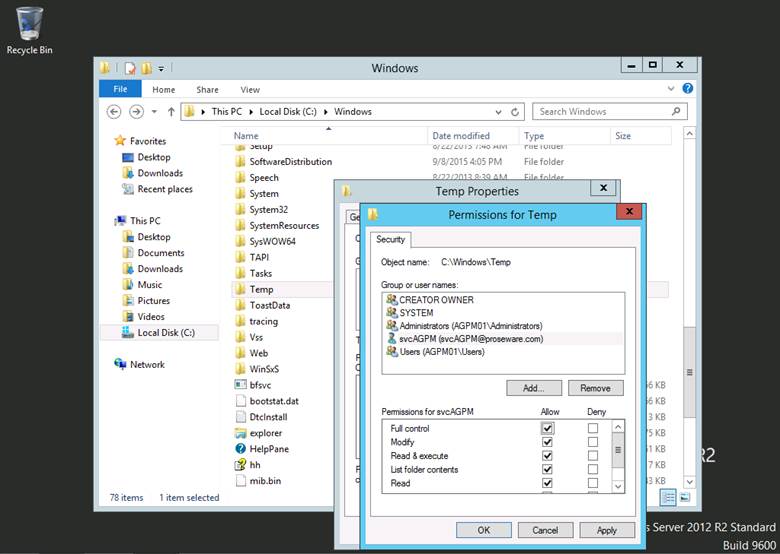
Temp Directory Permissions
The AGPM Service Account needs to be given Full Control permissions on the %Windir%\Temp directory on the “AGPM Server”.
Securing the AGPM Service Accounts
Creating Fine-grained Password Policy
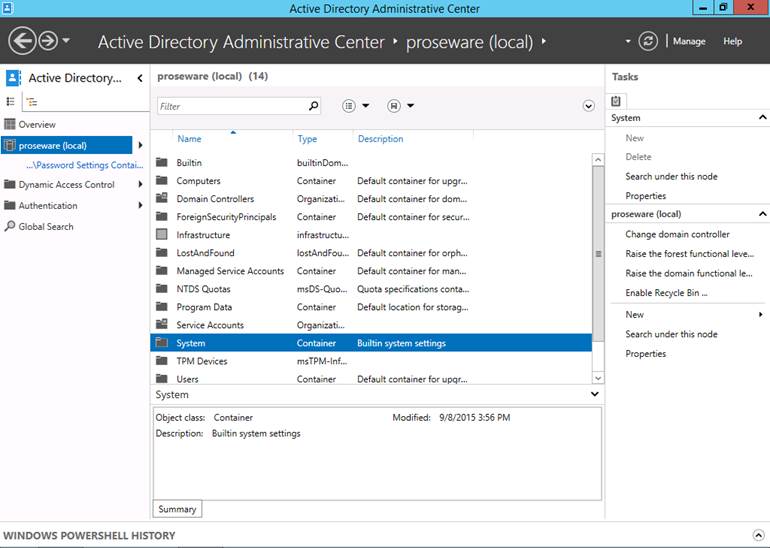
Open the Active Directory Administrative Center. Under the domain in which the AGPM Server is located, navigate and then open the System container.
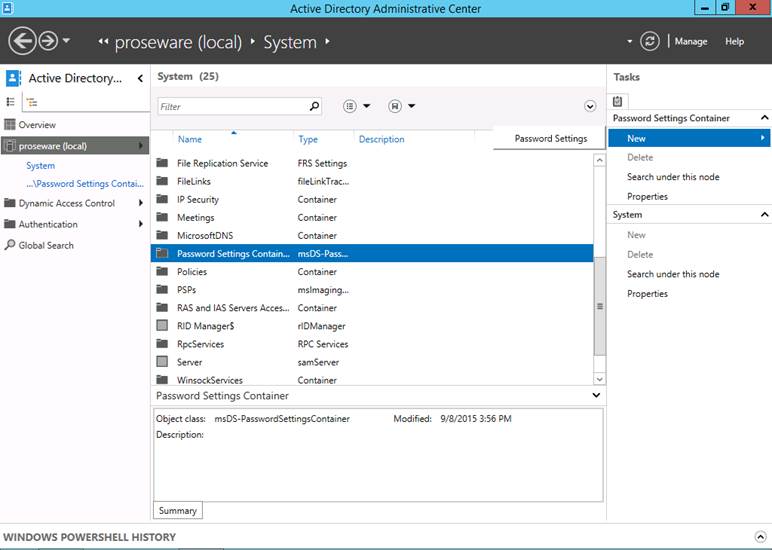
Locate and then select the Password Settings Container. In the Tasks pane click on New, then Password Settings.
Fill out the settings that are required to increase the security of the Password Policy. Configure the Directly Applies To section to include the AGPM Service Account. Then click OK.
Security Policy
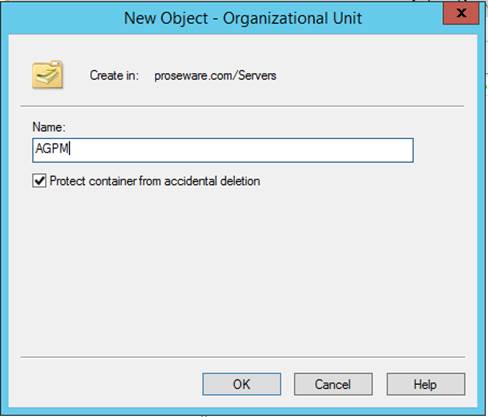
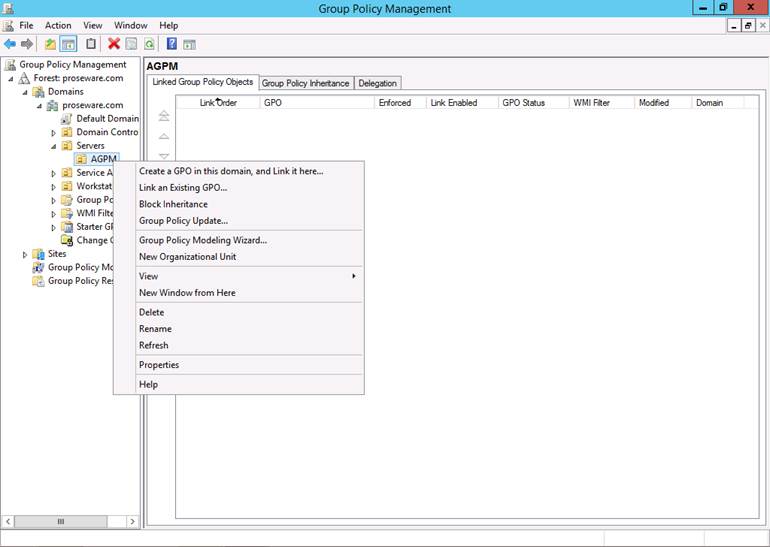
Create a New OU for the AGPM Server(s). To do this right-click on the appropriate OU. Then from the context menu select New, then Organizational Unit.
Enter a Name for the new OU, and then click OK.
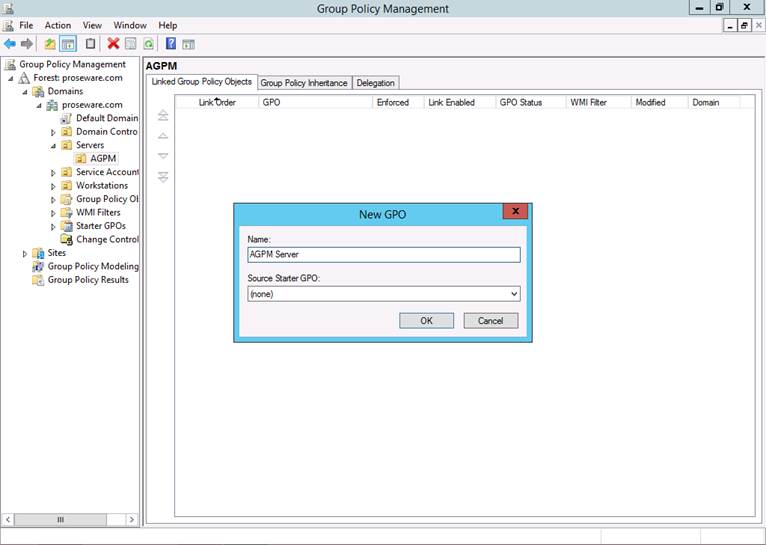
Open up Group Policy Management Console. From the context menu, select Create a GPO in this domain, and Link it here…
Give a Name to the GPO, and the click OK.
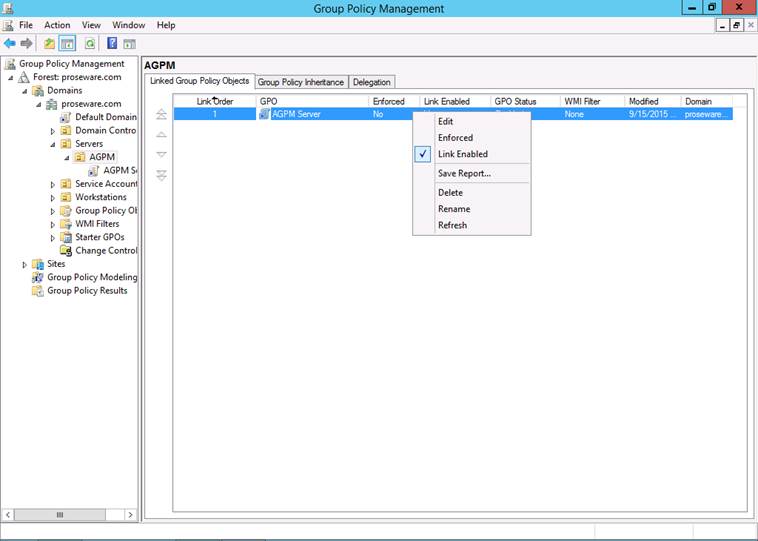
Right-click on the newly created GPO and select Edit from the context menu.
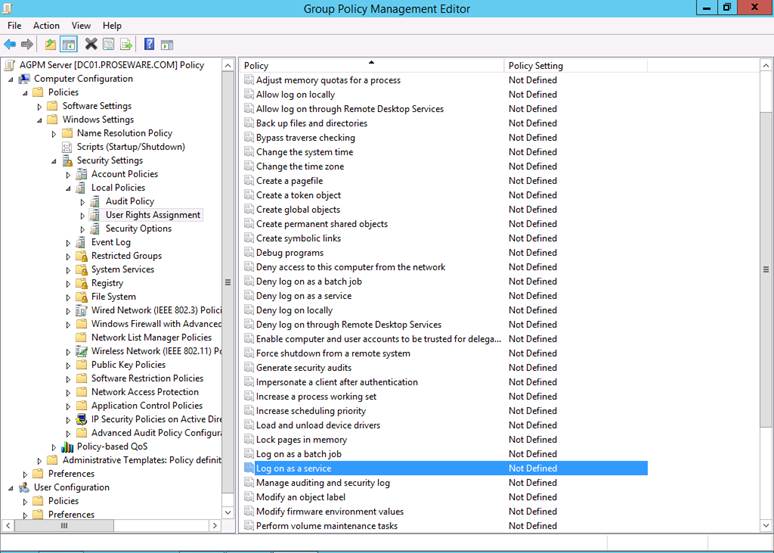
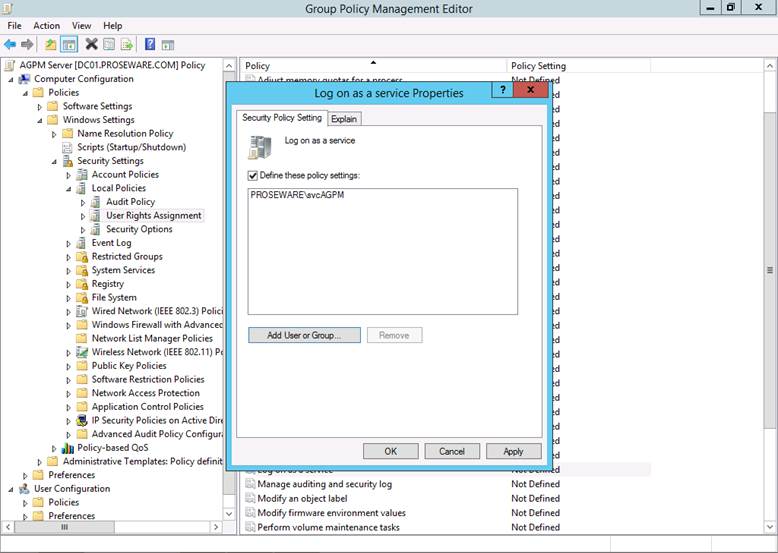
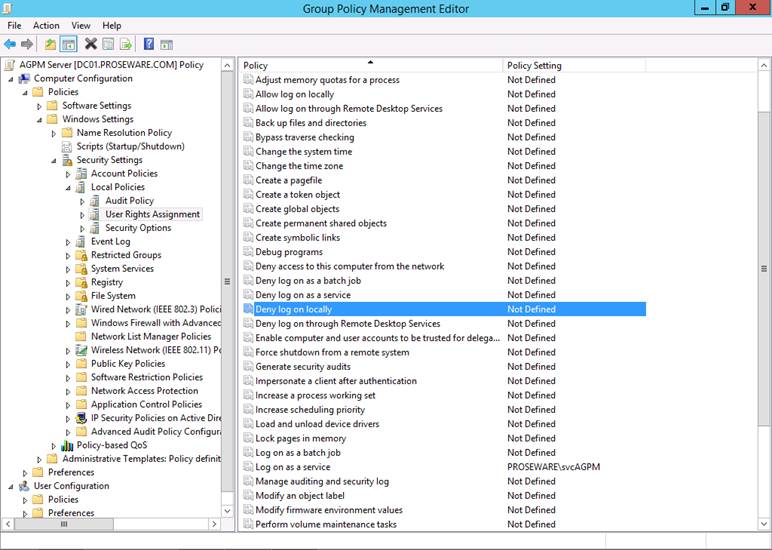
Navigate to \Computer Configuration\Policies\Windows Settings\User Rights Assignment.
Open the setting Log on as a service.
Select Define these policy settings, then add the AGPM Service Account and click OK.
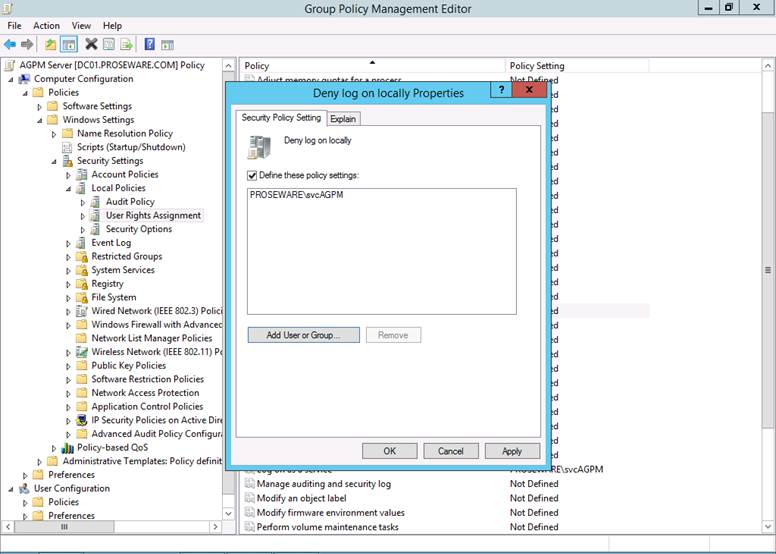
Next, locate the setting Deny log on locally and open the setting.
Select Define these policy settings, then add the AGPM Service Account and click OK.
AGPM Archive Owner
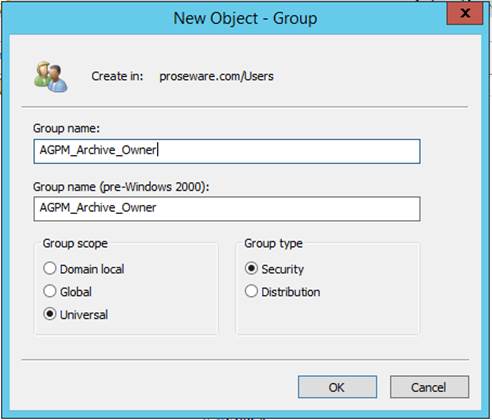
The next step is to create a group that will later be used to give users the AGPM Archive Owner permission. Navigate to the OU or Container in which you would like to create the Group. Righ-clickon the OU or Container. Then from the context menu select New, then Group.
Enter a Group name, change the Group scope to Universal. Then click OK.
AGPM Server Installation
The AGPM installer installs most of the Windows Features that are required by AGPM. However, some features require access to the installation source files to complete installation. One such example is .Net Framework 3.5. So, to prevent any failures in the installation of AGPM you must install this feature prior to the installation of AGPM. To do this insert the Windows Server 2012 R2 Installation Media. Assuming the Installation Media is mounted on the D Drive, Run the following PowerShell command:
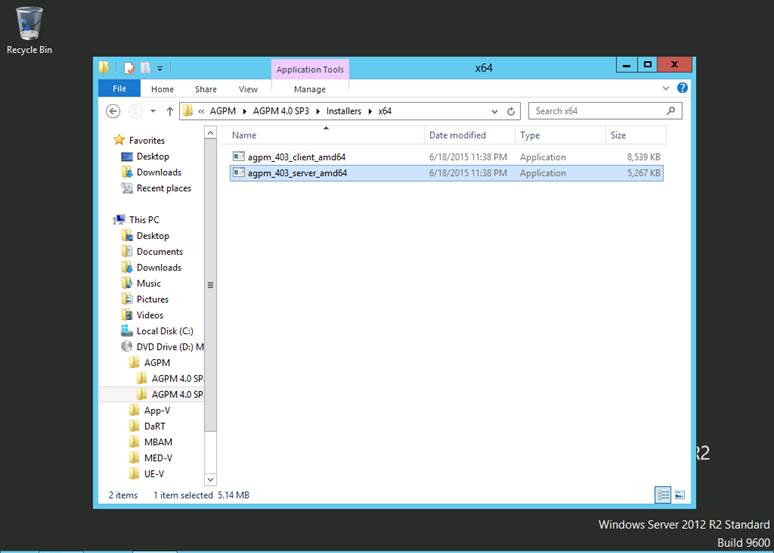
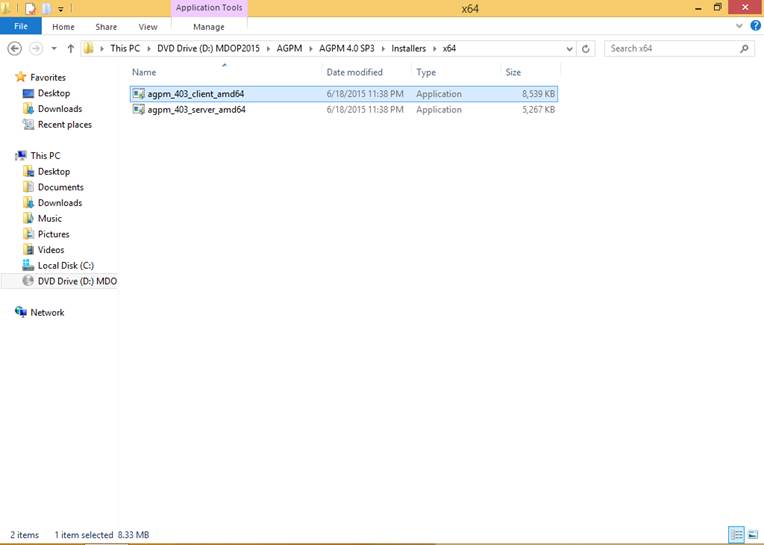
Next, insert the installation media for the Microsoft Desktop Optimization Pack. Assuming the media has been inserted into the D Drive and you are installing AGPM on an x64 platform, navigate to D:\AGPM\AGPM 4.0 SP3. Double-click on agpm_403_server_amd64.exe.
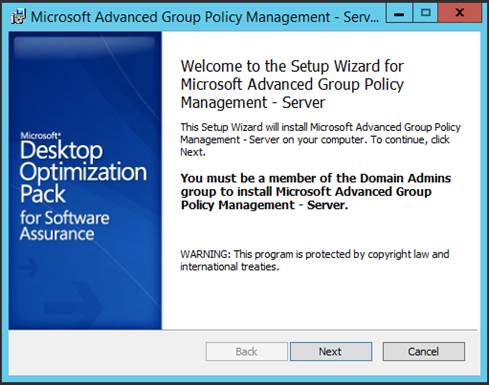
The Setup Wizard for Microsoft Advanced Group Policy Management – Server will then open. On the Welcome page, click Next.
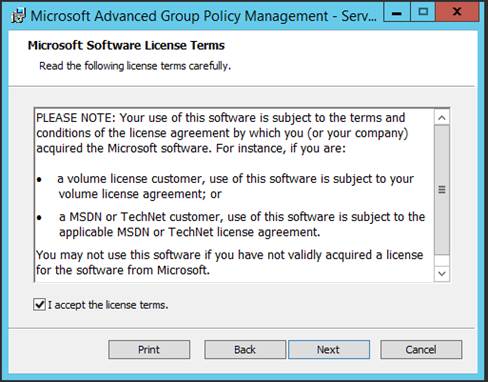
If you agree with the terms of the EULA, check Accept the license terms., then click Next.
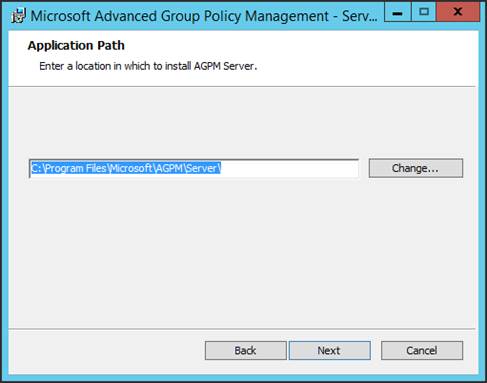
Choose the location where AGPM will be installed, then click Next.
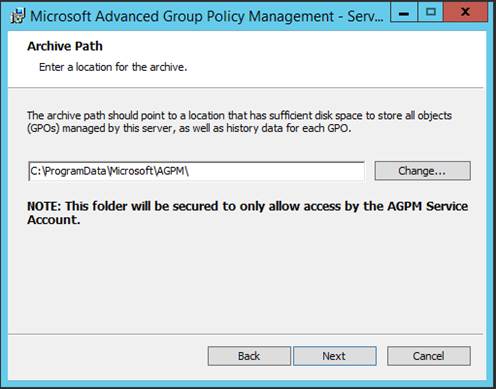
Next you will choose where to install the AGPM Archive. Keep in mind that the size of the Archive will grow over time, so ensure the disk where the archive is located has adequate space. After choosing the Archive Path, click Next.
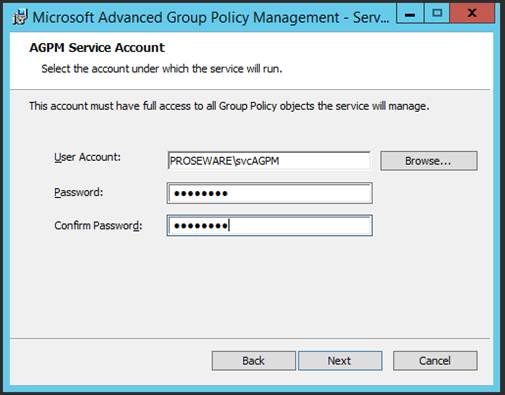
On the AGPM Service Account page of the wizard, enter the AGPM Service Account. Then enter and confirm the AGPM Service Account Password. When complete, click Next.
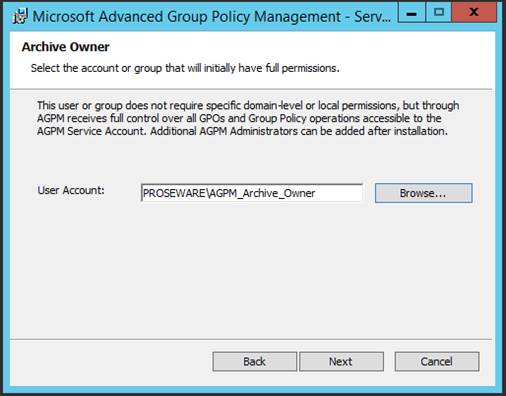
On the Archive Owner page, enter the group that you previously created for the AGPM Archive Owner. Then click Next.
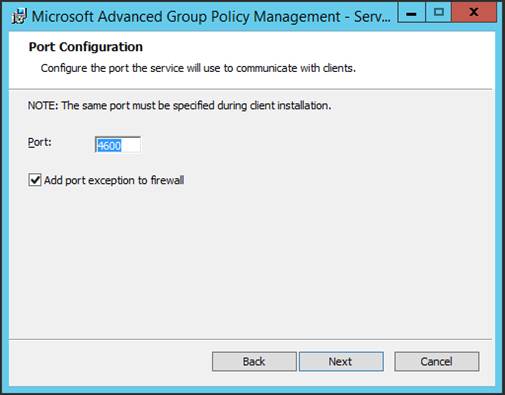
On the Port Configuration page, click Next to accept the defaults.
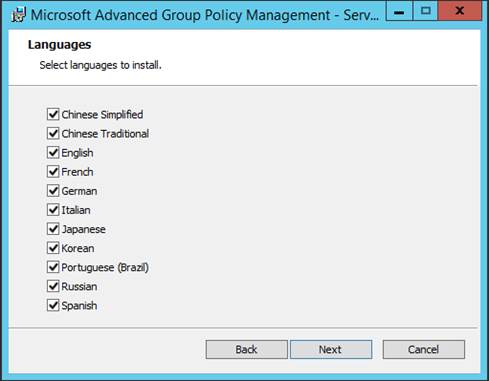
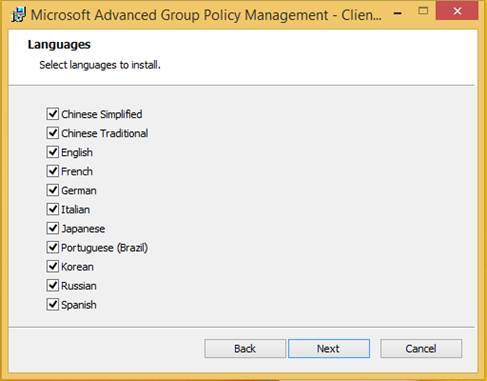
On the Languages page of the wizard, click Next to accept the defaults. Otherwise de-select the languages you do not want to install and then click Next.
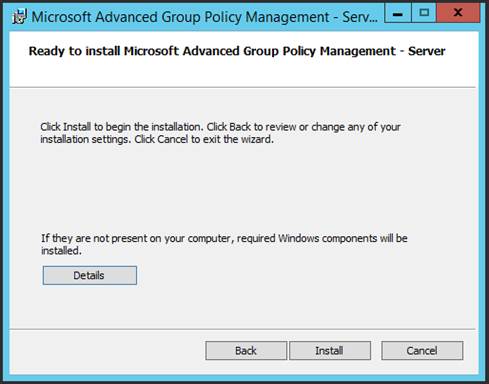
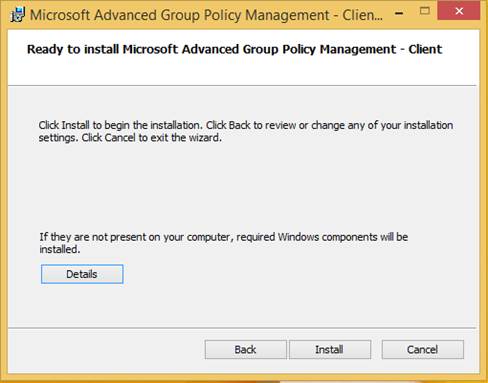
On the Ready to Install… page of the wizard, click Install.
After installation completes, click Finish.
AGPM Client Prerequisites
The AGPM Client requires that the Group Policy Management Console and .NET Framework 3.5 be installed on the client.
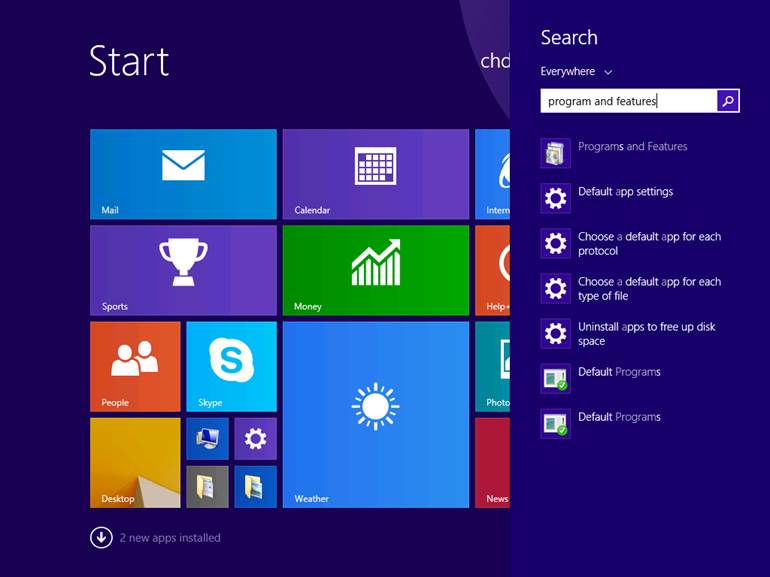
Search for Programs and Features. Then double-click on Programs and Features in the search results.
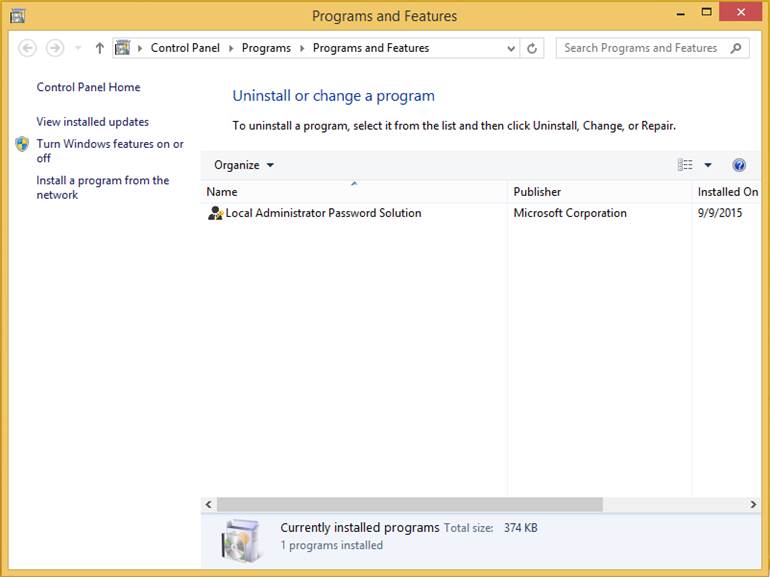
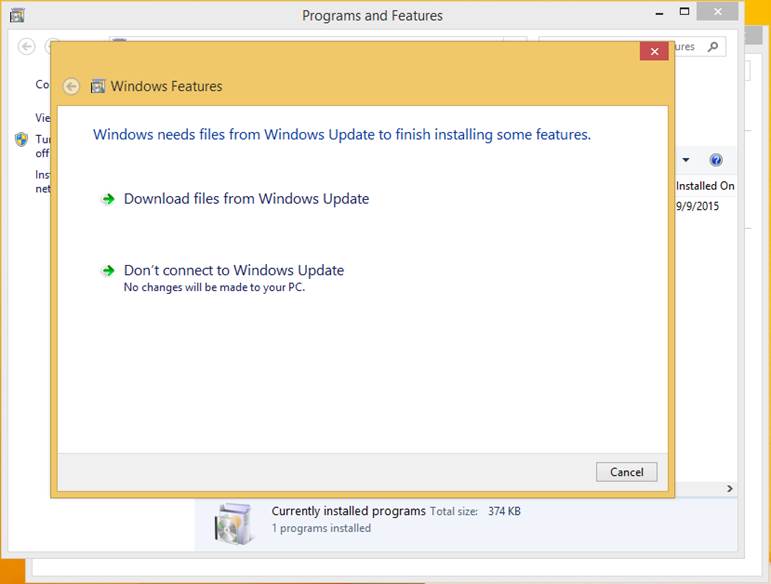
In the Programs and Features window, click on Turn Windows features on or off.
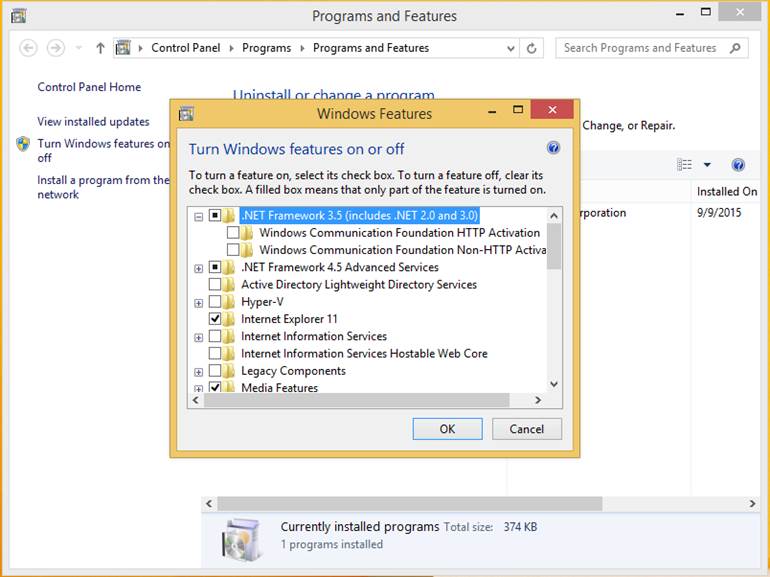
In the Windows Features window, select .NET Framework 3.5 (includes .NET 2.0 and 3.0)
Next, click on Download files from Windows Update.
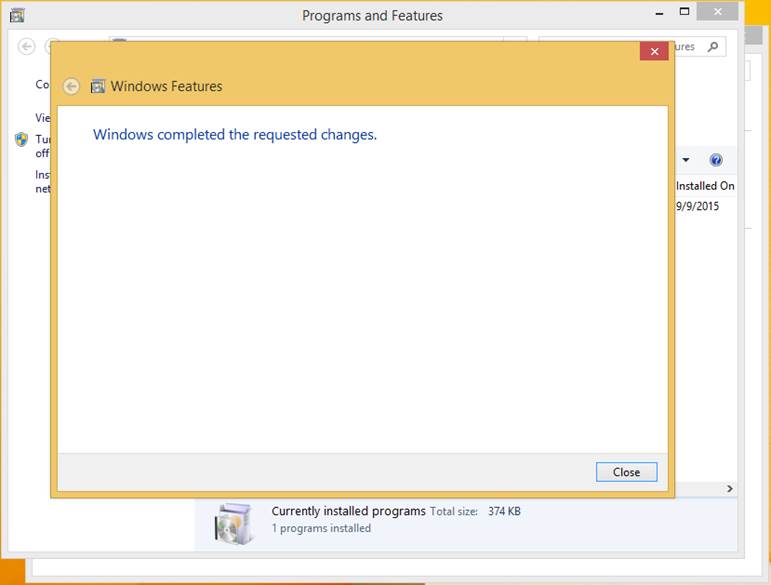
Once installation is complete, click Close
Installing AGPM Client
Next, insert the installation media for the Microsoft Desktop Optimization Pack. Assuming the media has been inserted into the D Drive and you are installing AGPM on an x64 platform, navigate to D:\AGPM\AGPM 4.0 SP3. Double-click on agpm_403_client_amd64.exe.
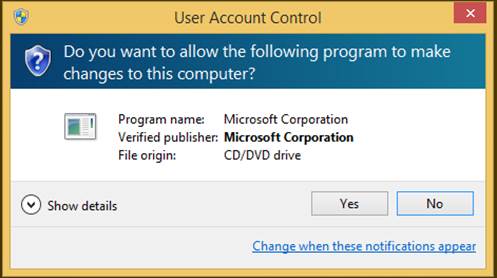
On the User Account Control dialog box, click Yes.
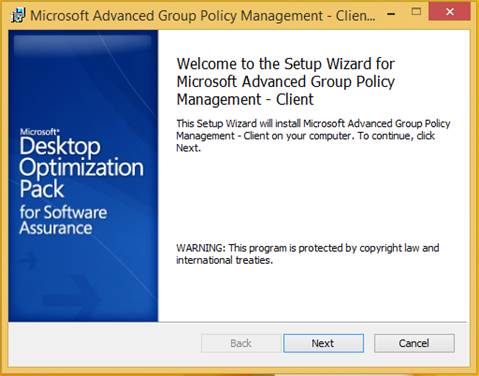
This will open the Setup Wizard for Microsoft Advanced Group Policy Management – Client. On the Welcome page, click Next.
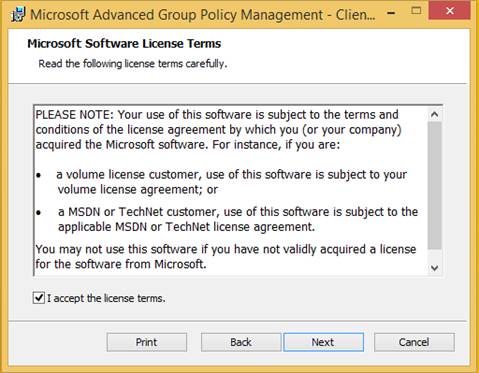
If you agree with the terms of the EULA, check Accept the license terms., then click Next.
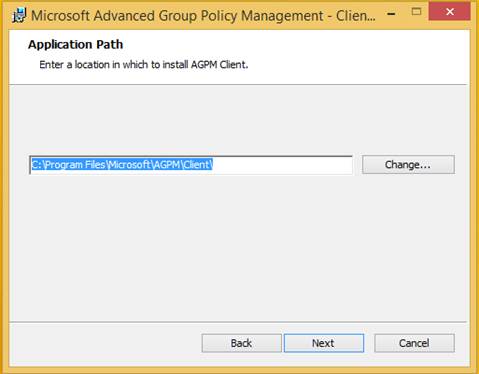
On the Application Path page of the wizard, choose where the AGPM application will be installed. Then click Next.
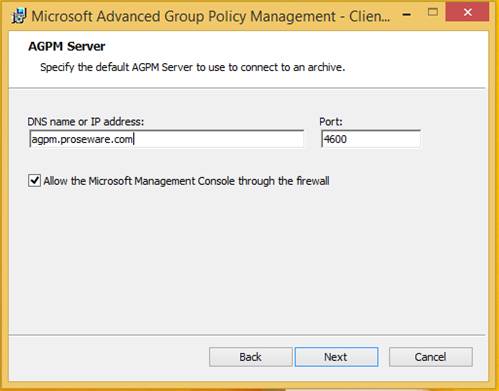
On the AGPM Server page of the wizard enter the DNS Name for the AGPM server that you previously created, then click Next.
On the Languages page of the wizard, click Next to accept the defaults. Otherwise de-select the languages you do not want to install and then click Next.
On the Ready to Install… page of the wizard, click Install.
After installation completes, click Finish.
Stay tuned for the upcoming blog posting on the configuration of AGPM.
This blog is a simple walkthrough of the installation of NDES. The intent of this blog is just to show the steps so that an administrator could follow along with the installation.
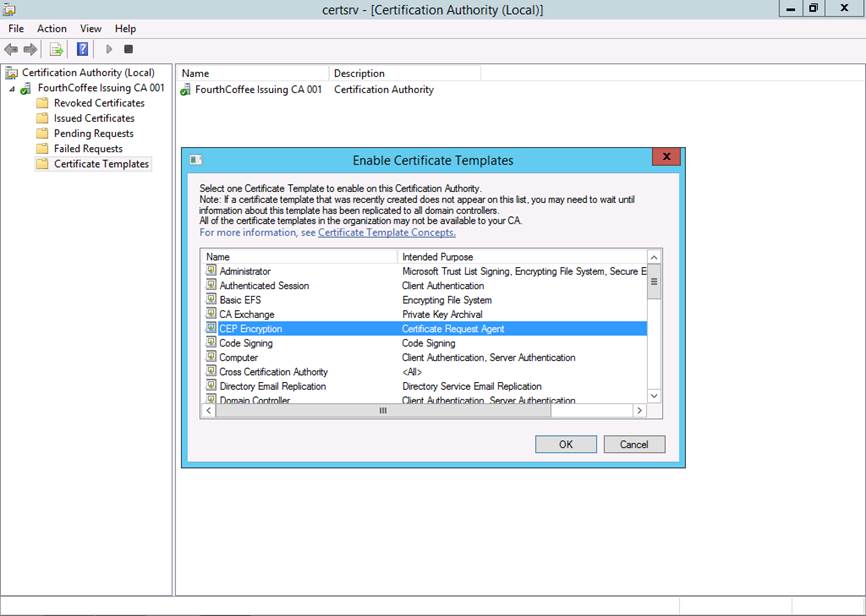
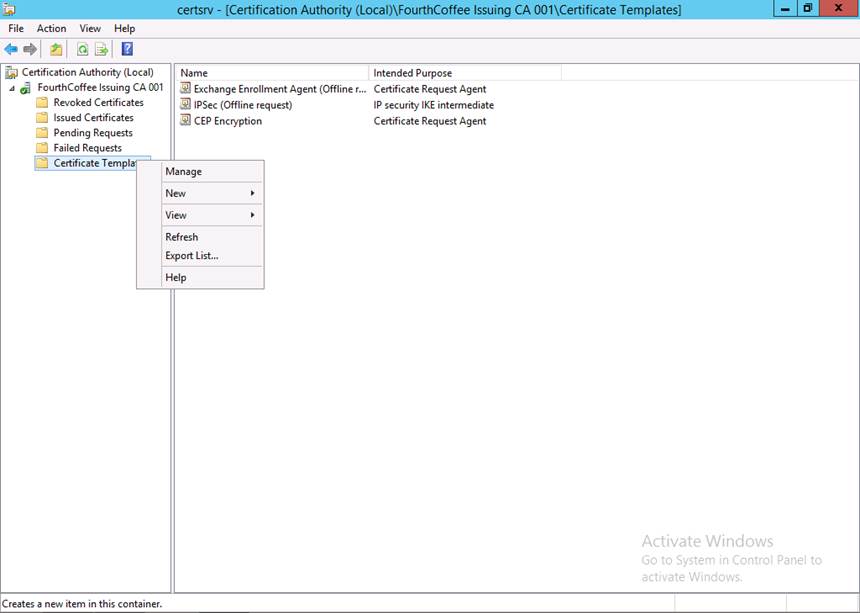
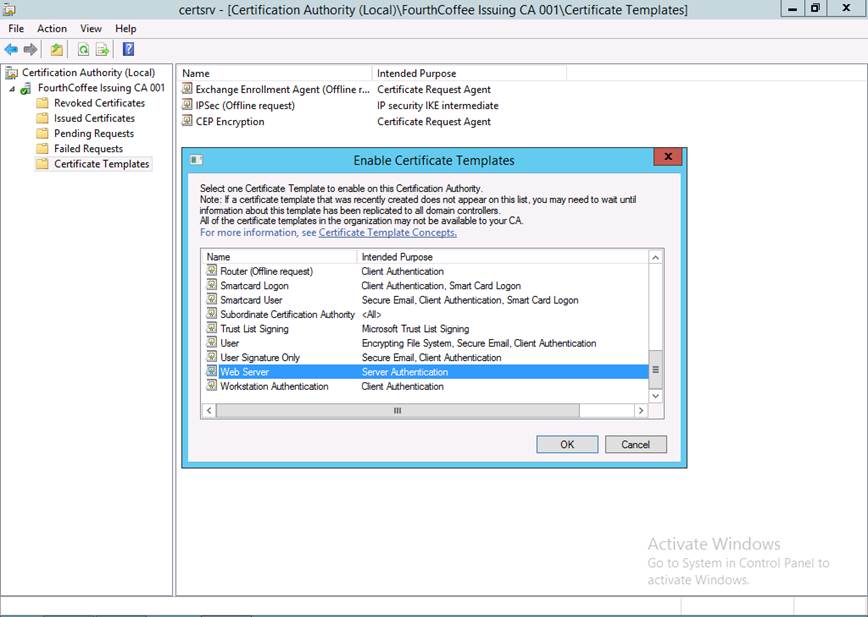
Step 1: Open the Certification Authority MMC (certsrv.msc)
Step 2: Right-click on Certificate Templates and select New and the Certificate Template to Issue from the context menu
Step 3: Select the CEP Encryption certificate template
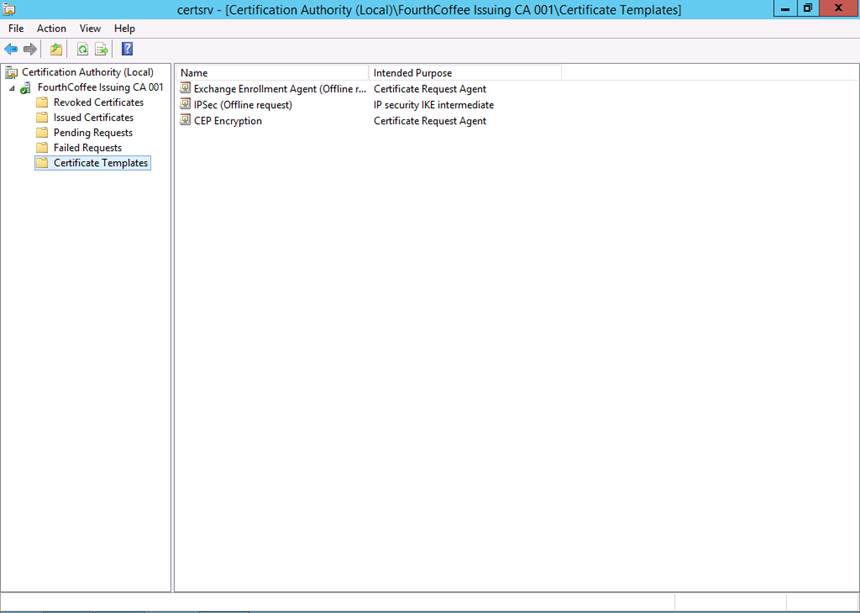
Step 4: Repeat Steps 2 and 3 for the Exchange Enrollment Agent (Offline request) and IPSEC (Offline request) certificate templates
When completed you should see all 3 certificate templates listed
Configuring NDES Service Account
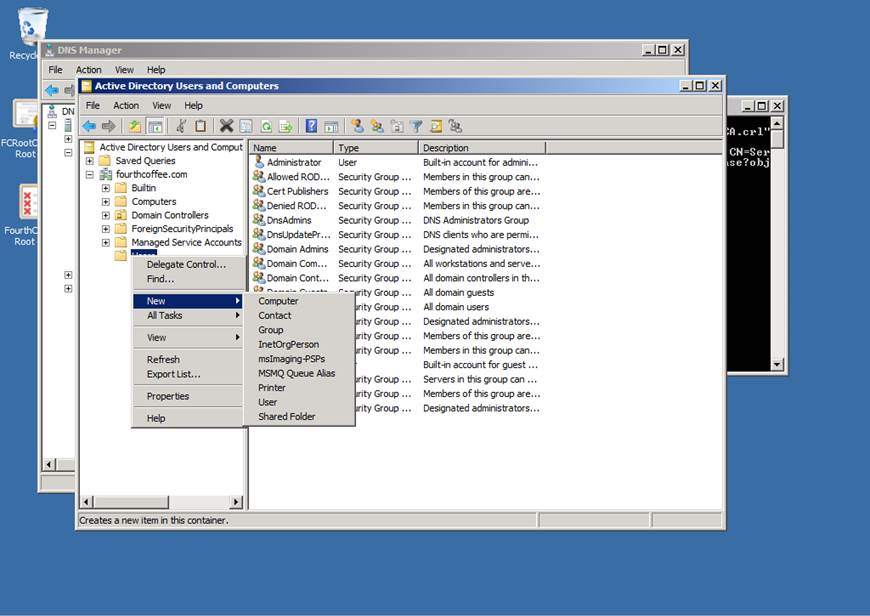
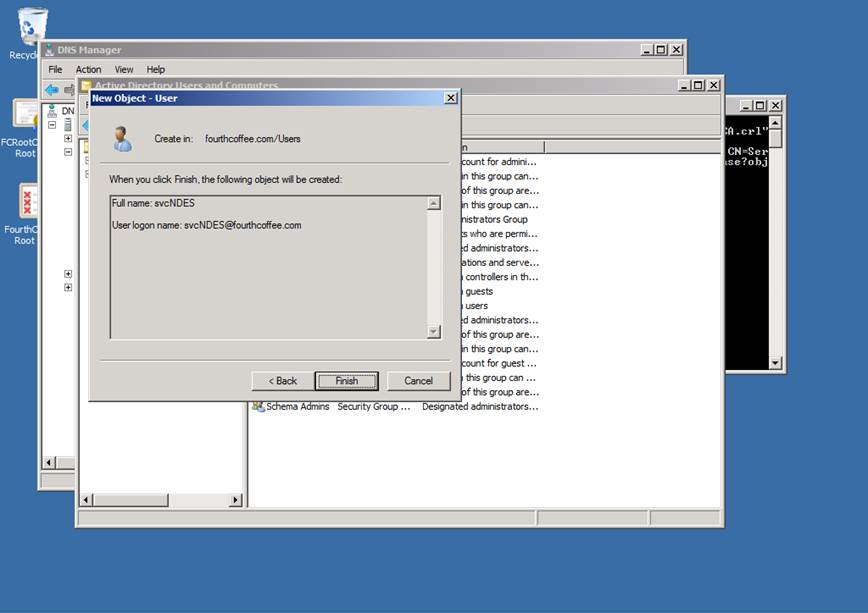
Step 1: Open up Active Directory User and Computers (dsa.msc)
Step 2: Right-click on the OU where you store service accounts and then select New then User from the context menu
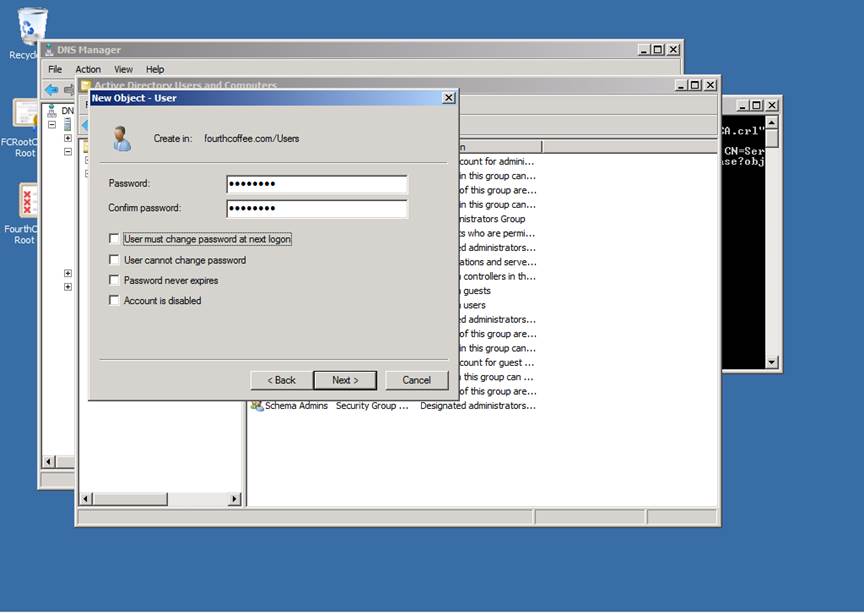
Step 3: Enter the Full name and User logon name for the service account and then click Next
Step 4: Enter and confirm the password for the service account
Step 5: Select or de-select any desired options and then click Next
Step 6: Click Finish
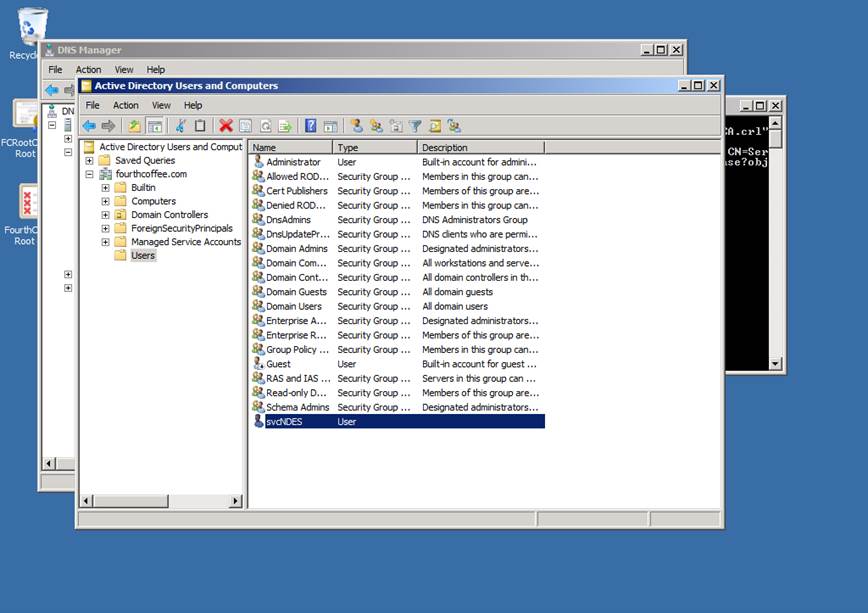
The service account will now be created
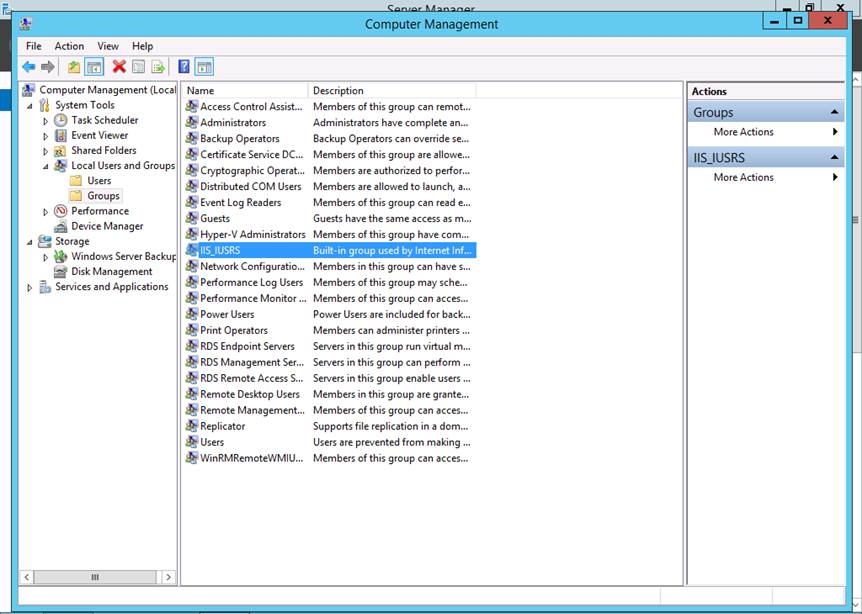
Step 7: Open Server Manager, Select the Tools menu, and the select Computer Management
Step 8: Navigate to Local Users and Groups
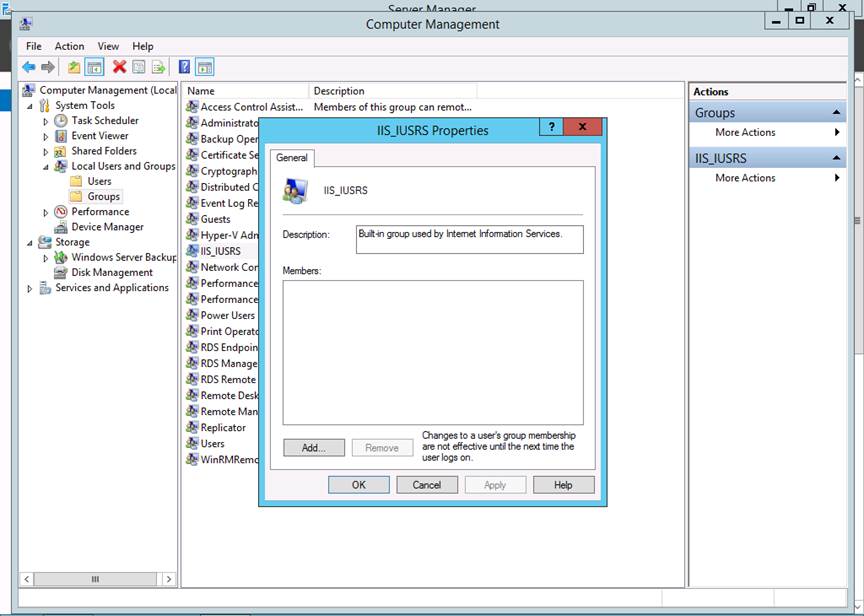
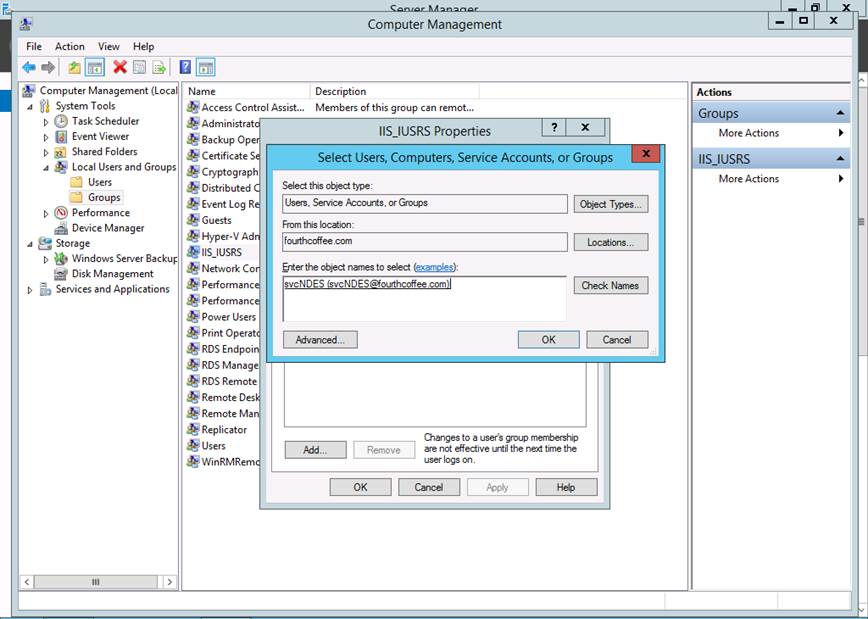
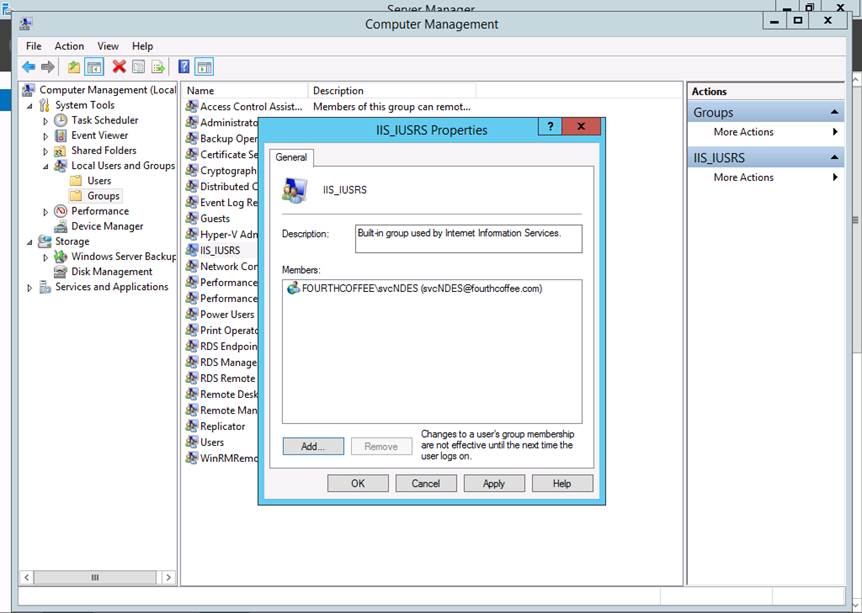
Step 9: Navigate to Groups and then open the group named IIS_IUSRS
Step 10: Click Add…
Step 11: Enter the name of the service account that you previously created and click Check Names, and then OK
Step 12: Click OK
Installing NDES
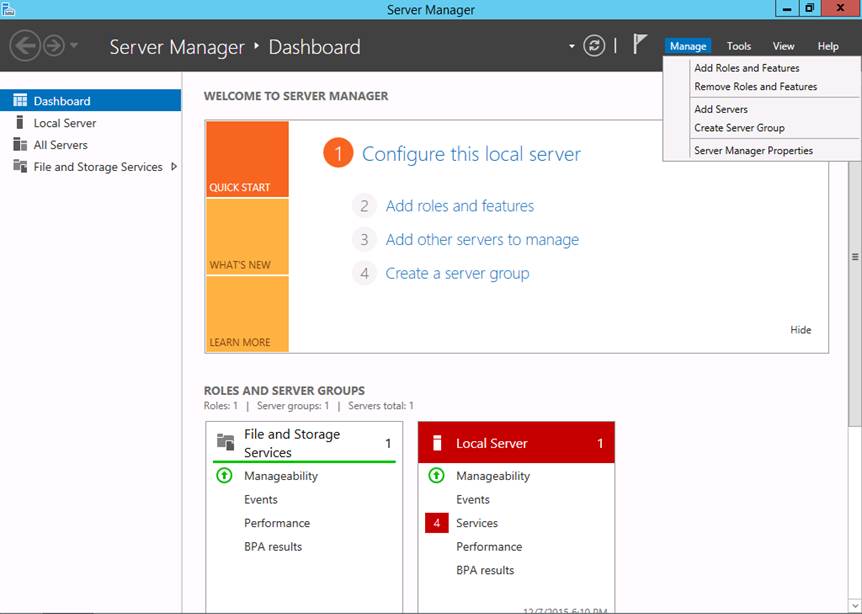
Step 1: Open Server Manager
Step 2: Select the Manage menu and the select Add Roles and Features
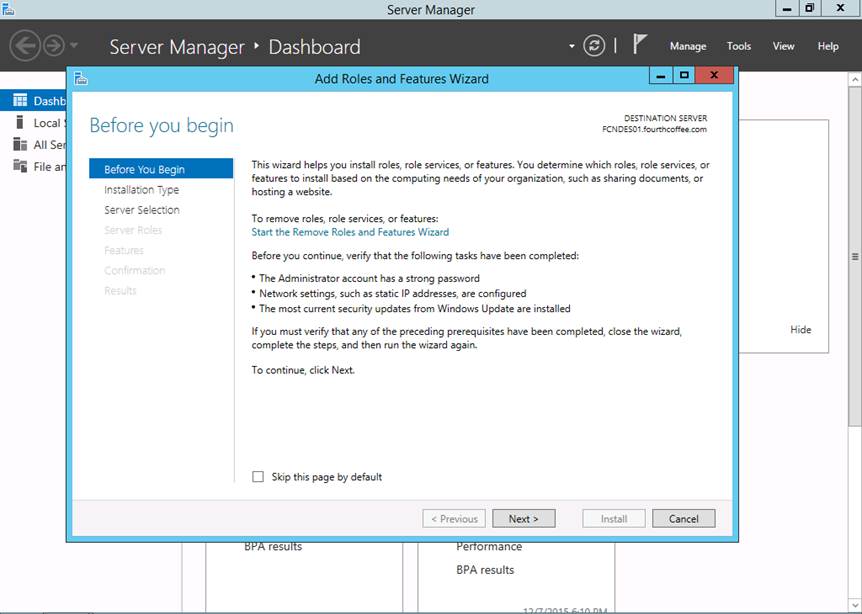
Step 3: On the Before you begin page of the wizard, click Next
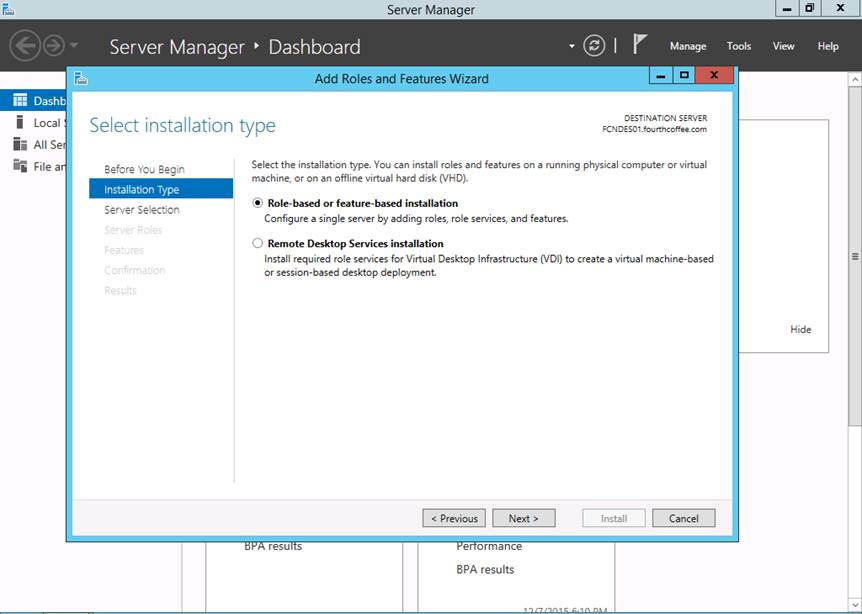
Step 4: On the Select installation type page of the wizard, select Role-based or feature-based installation, and then click Next
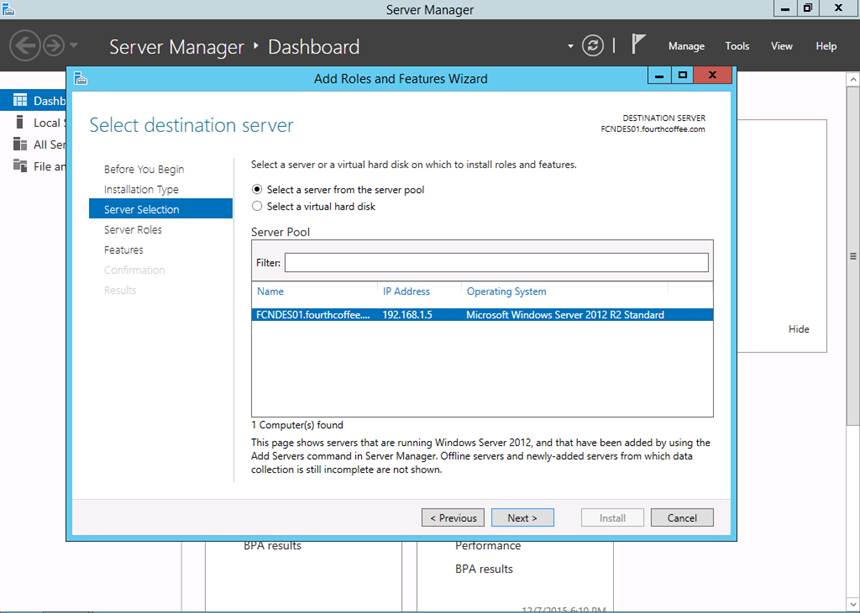
Step 5: On the Select destination server page, click Next
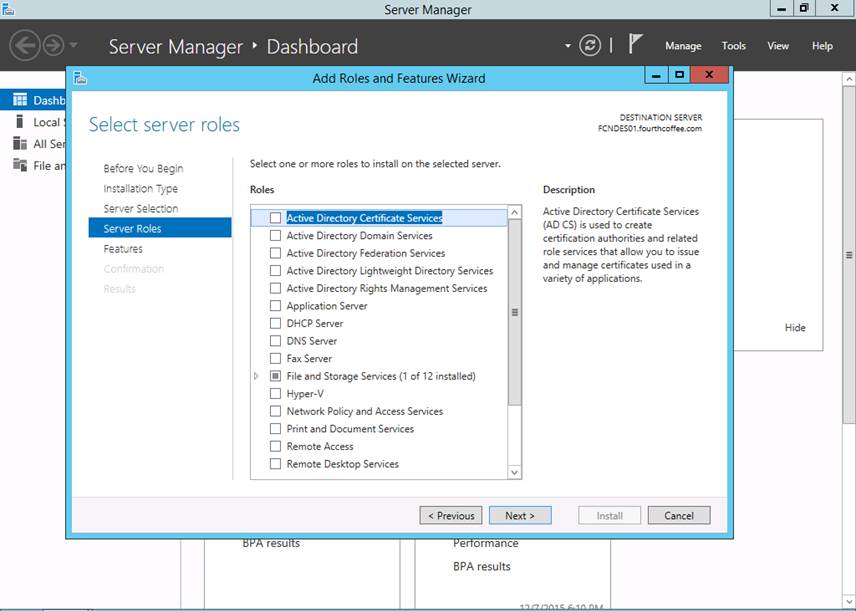
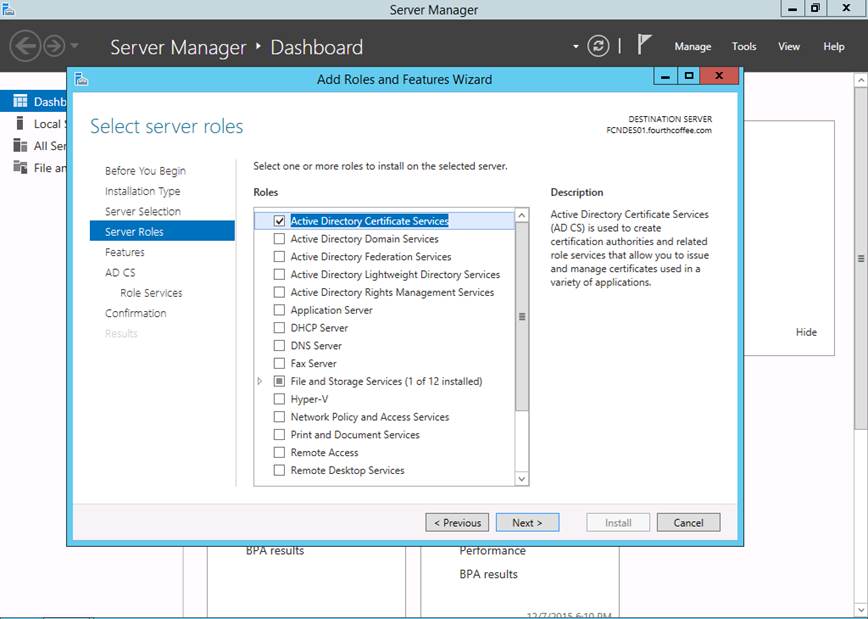
Step 6: On the Select server roles page of the wizard, select Active Directory Certificate Services
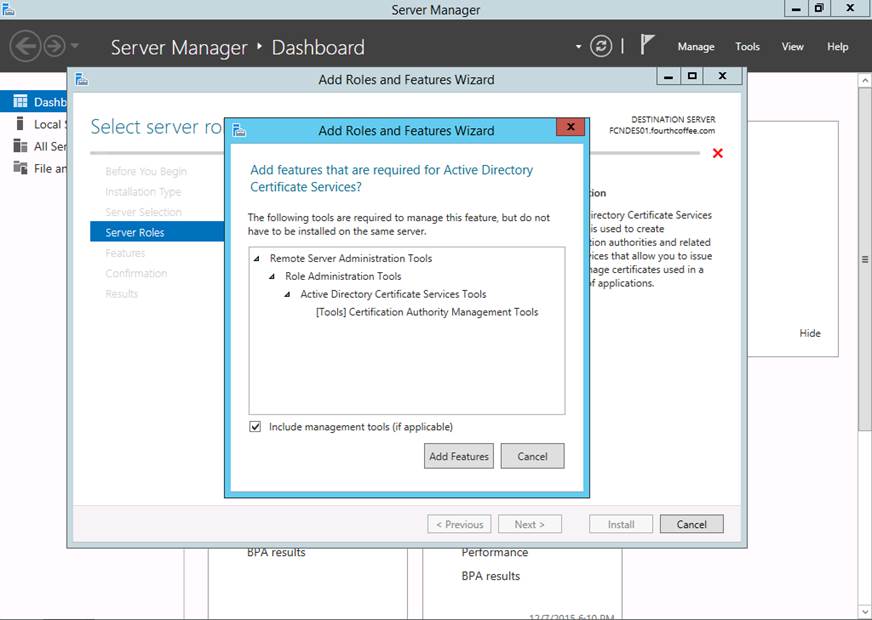
Step 7: Click Add Features
Step 8: Click Next
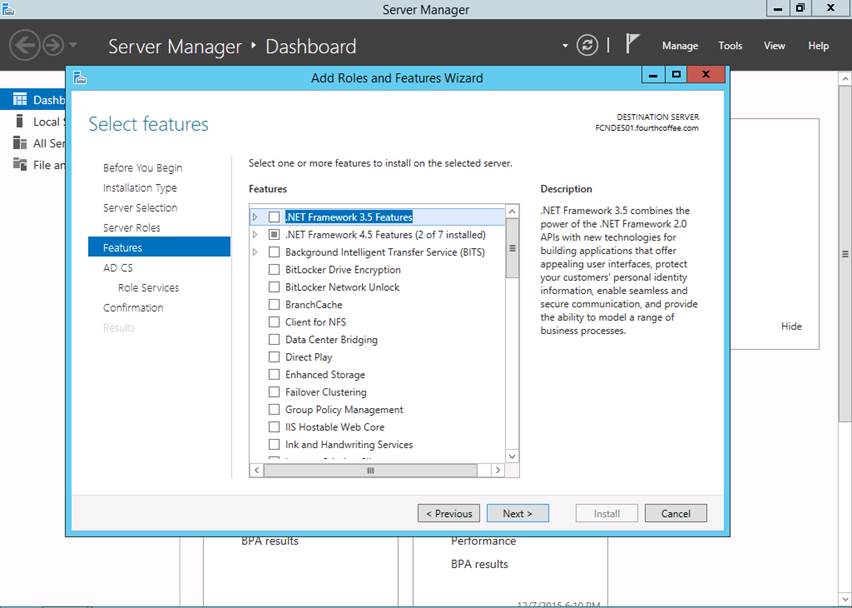
Step 9: On the Select features page of the wizard, click Next
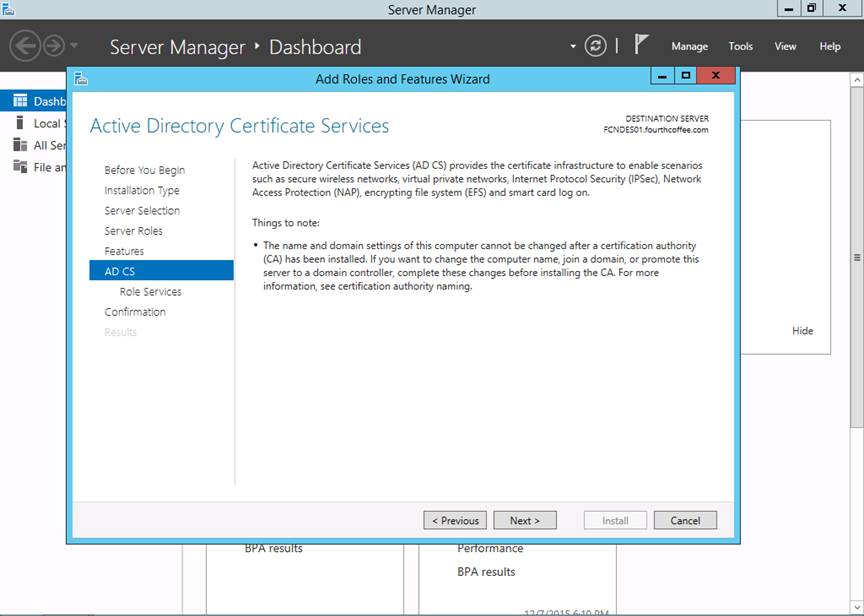
Step 10: On the Active Directory Certificate Services page, click Next
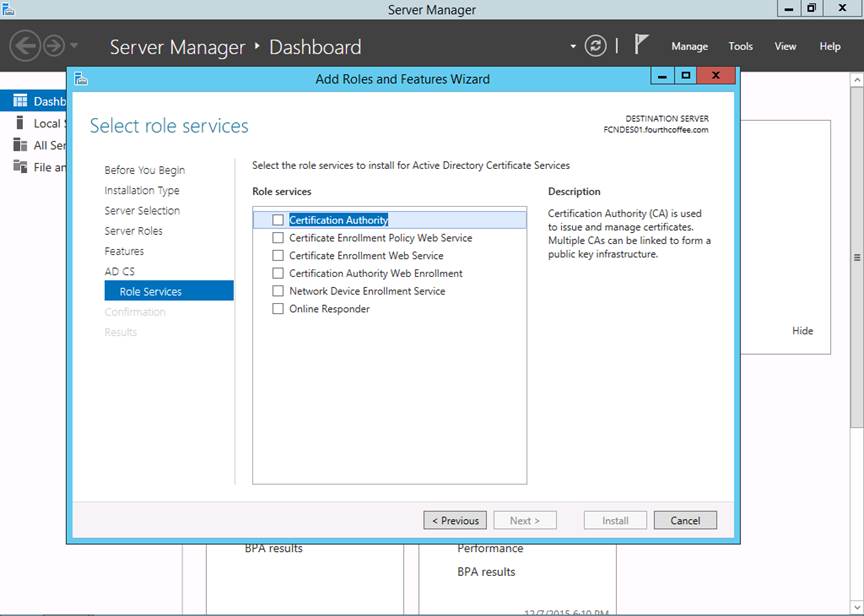
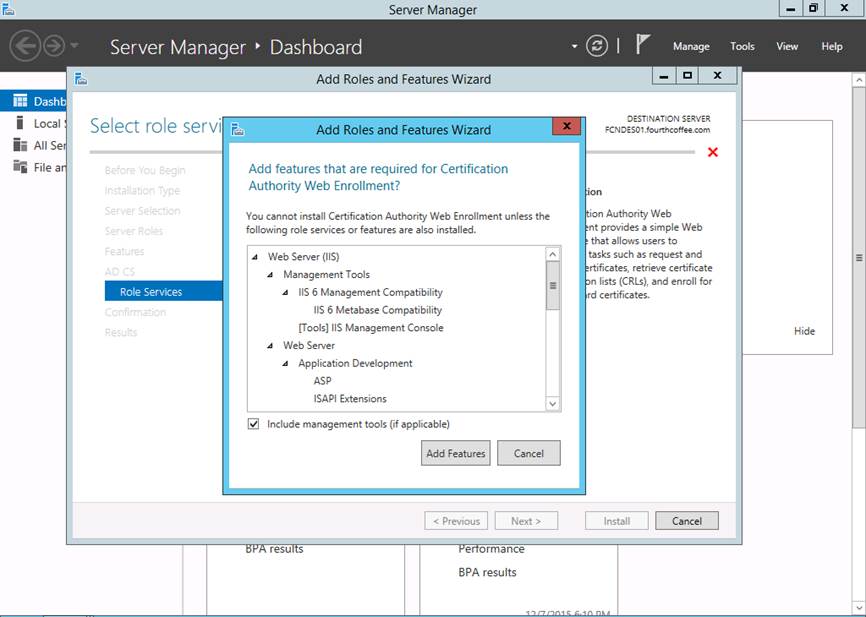
Step 11: On the Select role services page, select Certification Authority Web Enrollment (Note: The reason for selecting this role is so that the CertSrv virtual directory will be visible in IIS)
Step 12: When prompted add the features, click Add Features
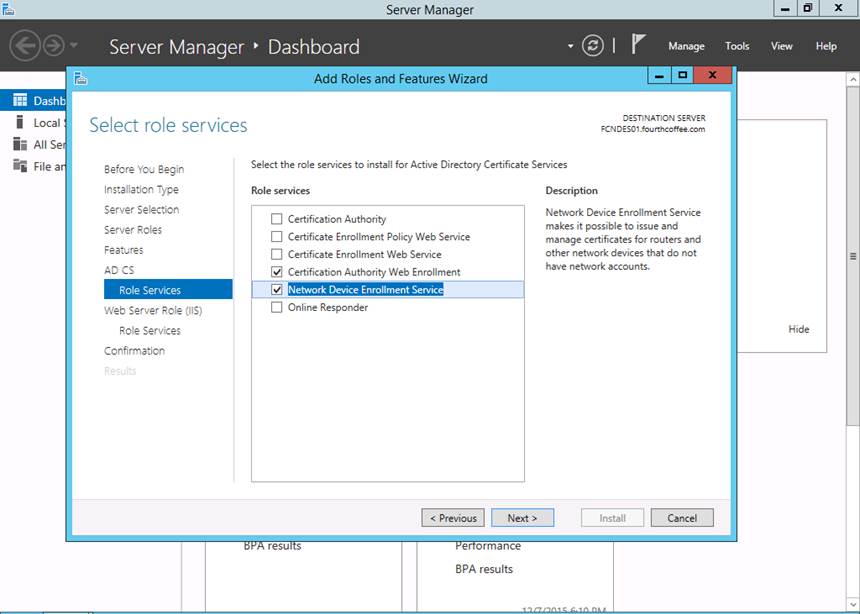
Step 13: Select Network Device Enrollment Service and then click Next
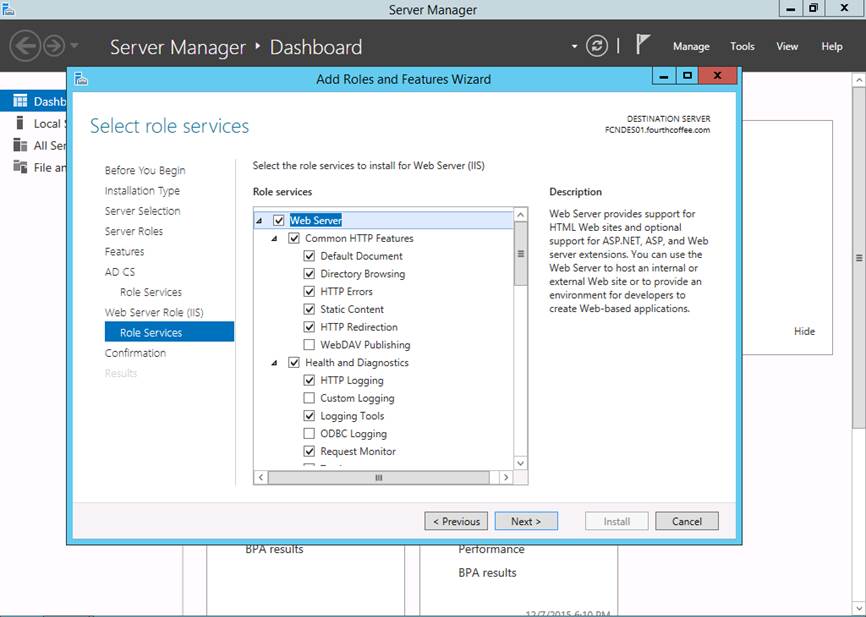
Step 14: On the Web Server Role (IIS) page, click Next
Step 15: On the Select role service page, click Next
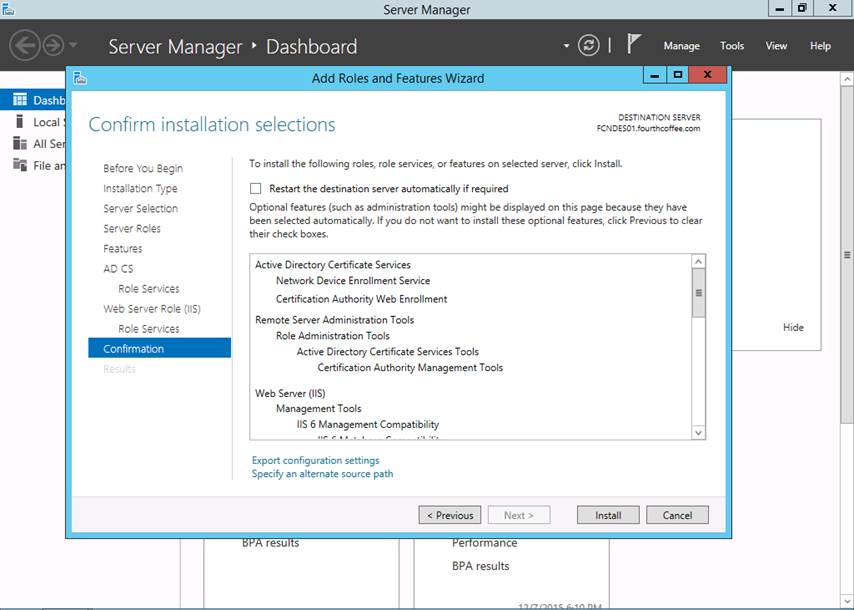
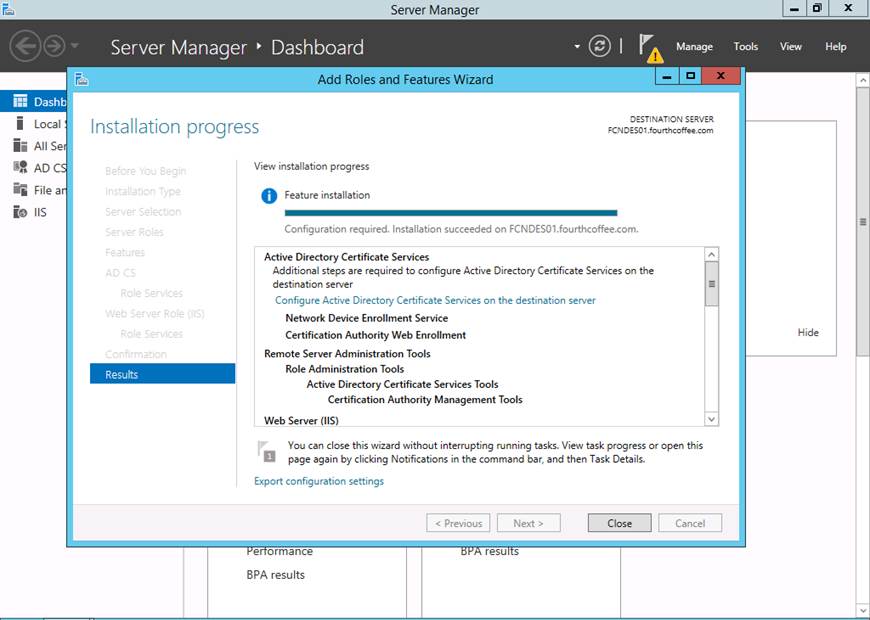
Step 16: On the Confirm installation selection page, click Install
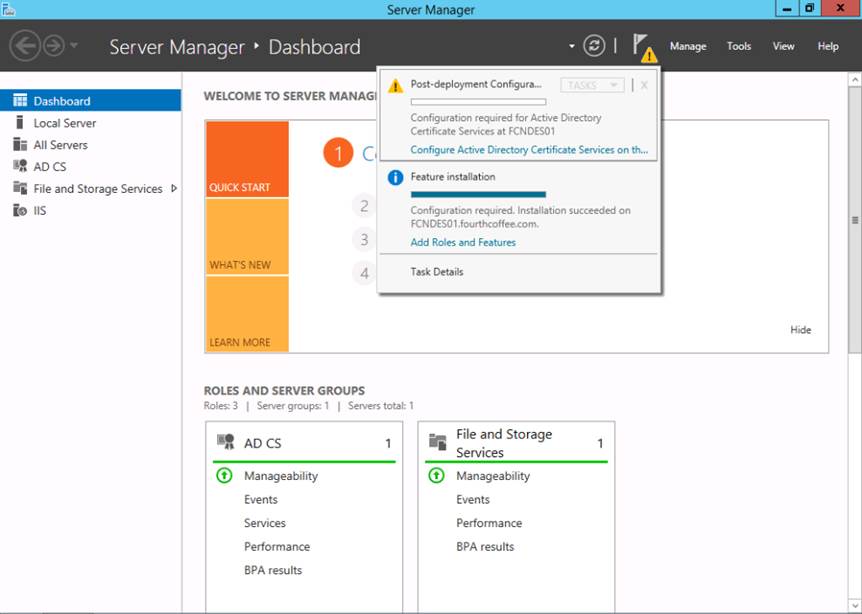
Step 17: When installation completes, click Close
Step 18: In Server Manager click on the warning symbol and then select Configure Active Directory Certificate Services on th…
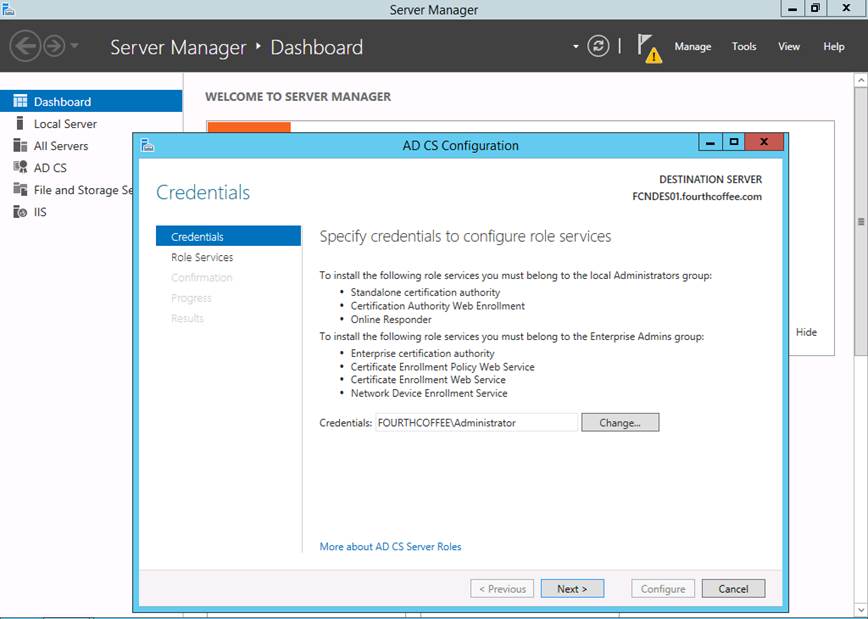
Step 19: On the Specify credentials to configure role services page ensure that the account selected is a member of the Enterprise Admins group, and then click Next
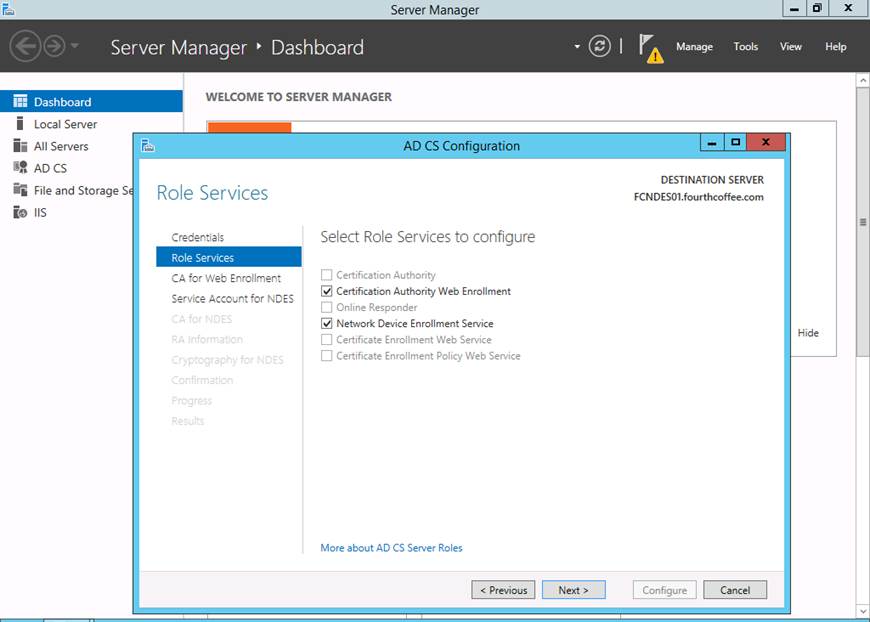
Step 20: On the Select Role Services to configure page of the wizard select Certification Authority Web Enrollment and Network Device Enrollment Service, then click Next
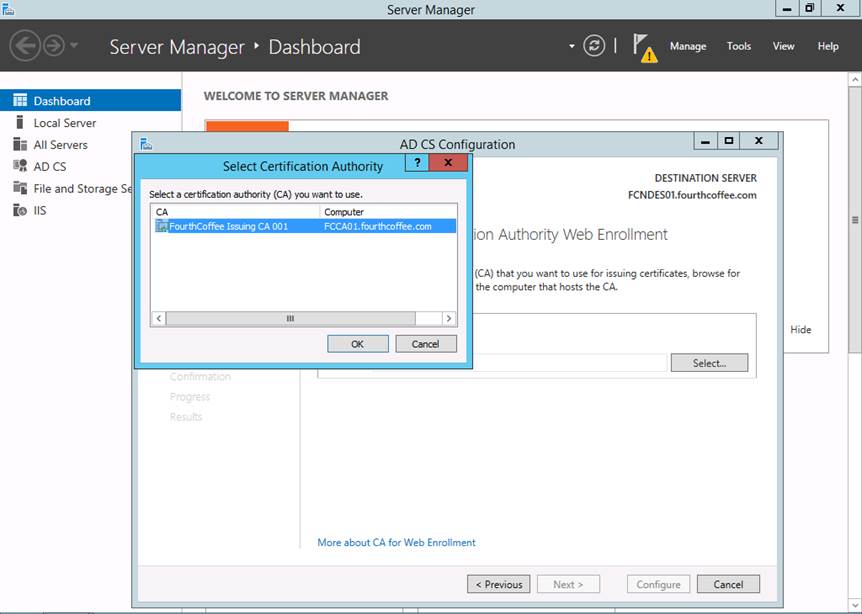
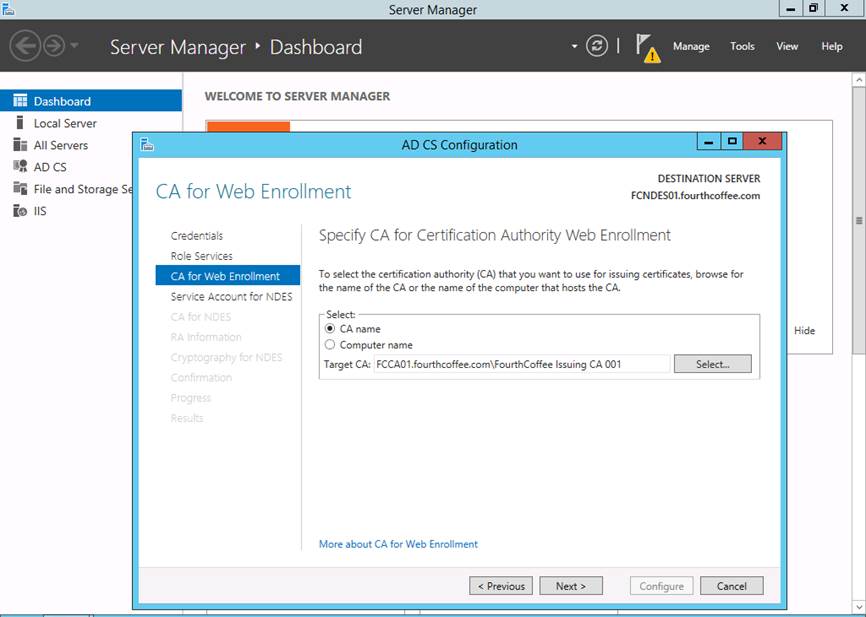
Step 21: On the CA for Web Enrollment page, click Select…
Step 22: Select the appropriate CA and then click OK
Step 23: Click Next
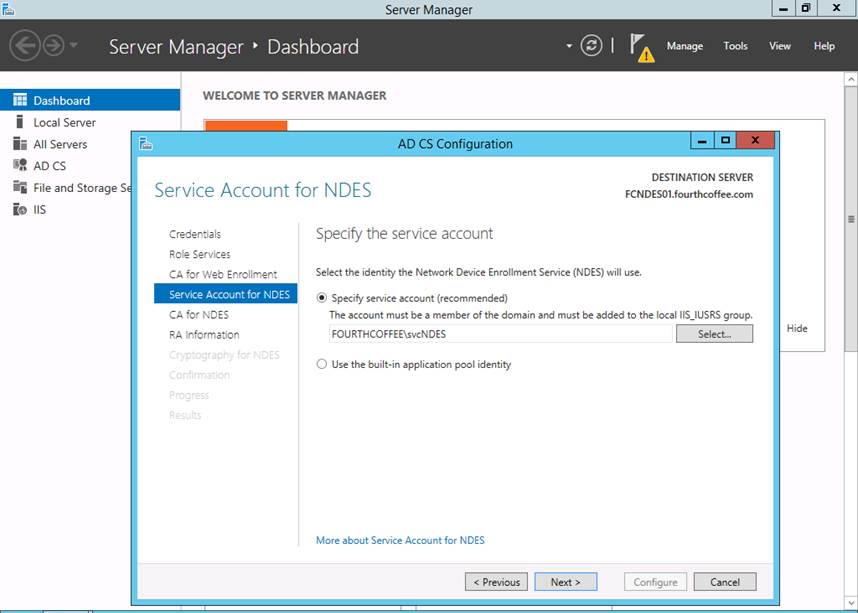
Step 24: On the Service Account for NDES page, click Select…
Step 25: Enter the username and password for the NDES service account and then click OK
Step 26: Click Next
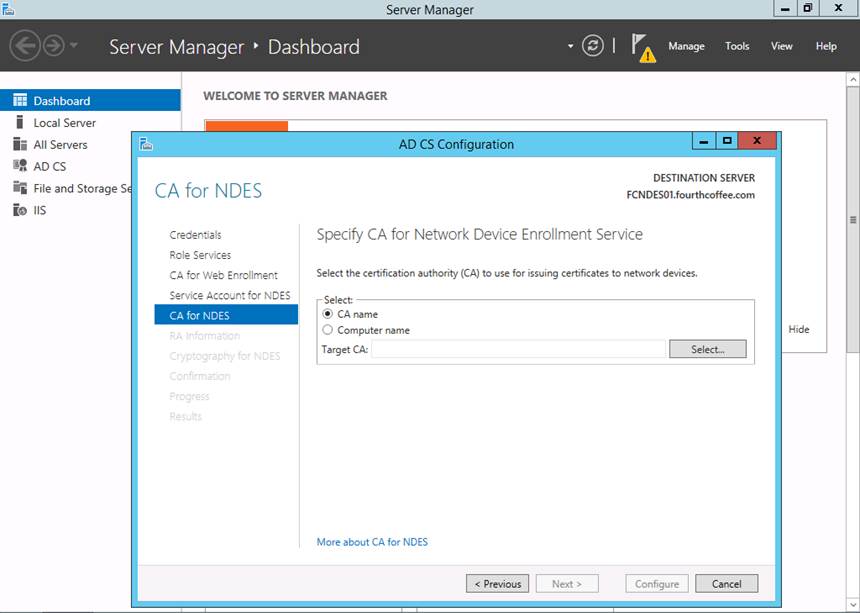
Step 27: On the CA for NDES page, click Select…
Step 28: Select the appropriate CA and then click OK
Step 29: Click Next
Step 30: On the RA Information page, fill out any information that your organization requires and then click Next
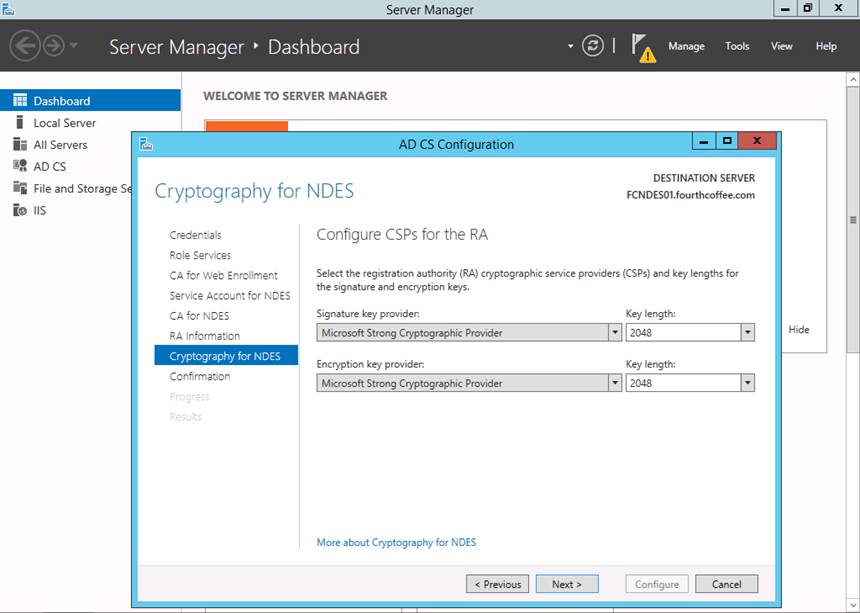
Step 31: On the Cryptography for NDES page click Next
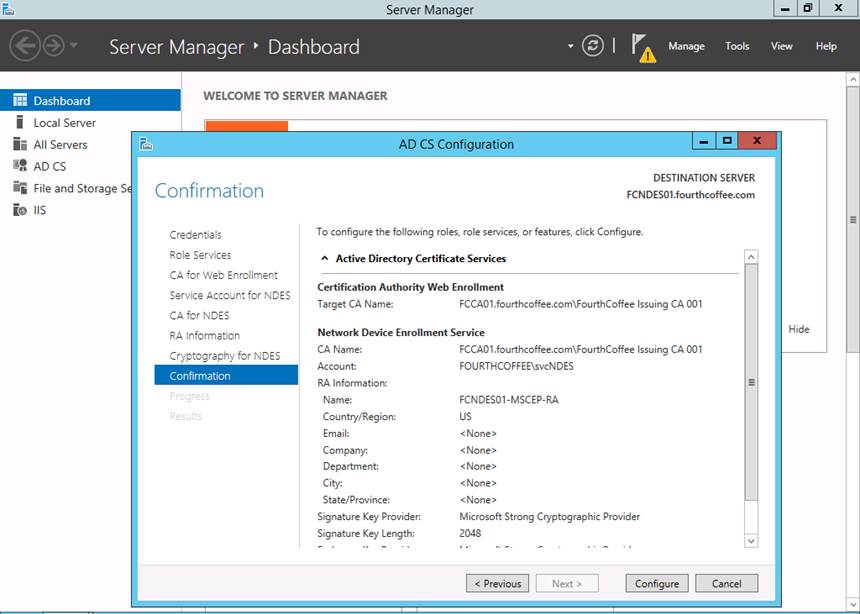
Step 32: On the Confirmation page, click Configure
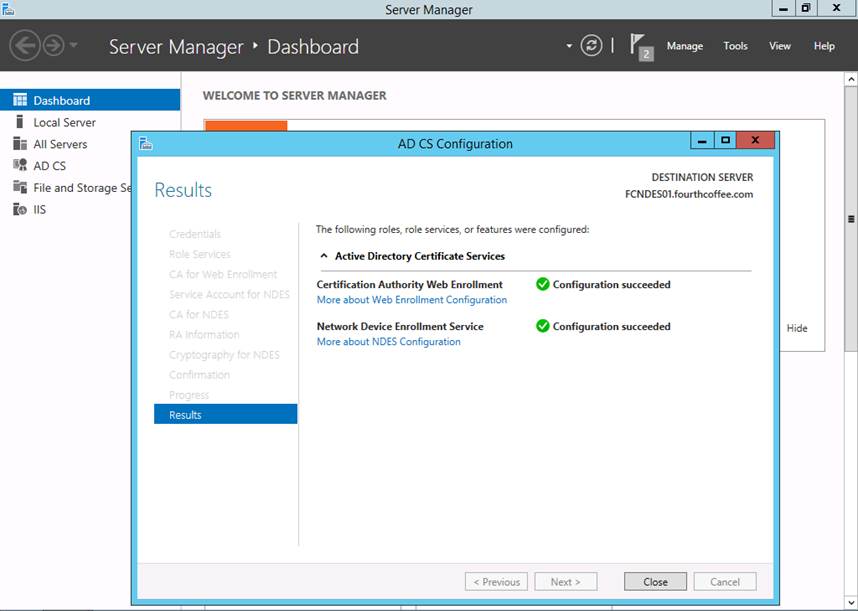
Step 33: On the Results page, click Close
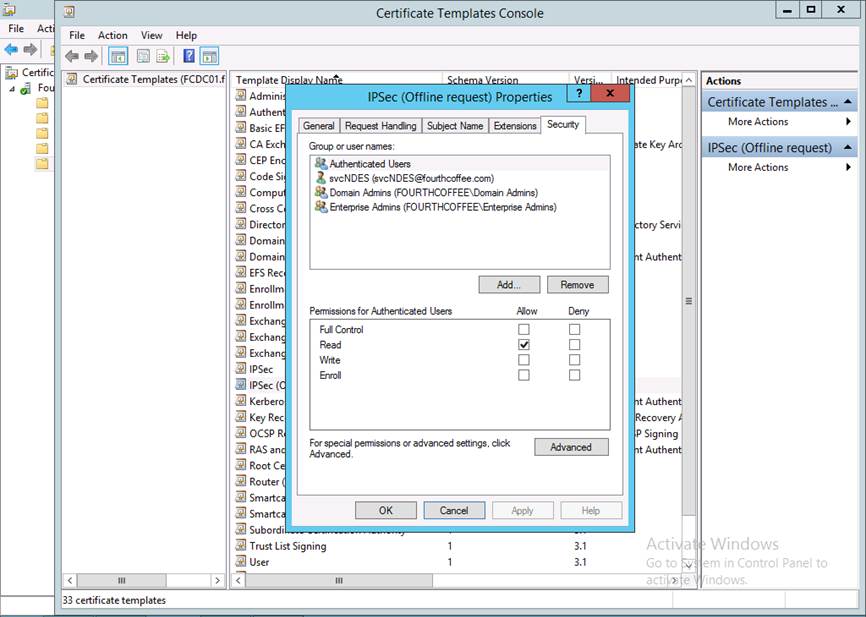
Provision Permission to Request Certificates via NDES
Step 1: Open the Certification Authority MMC (certsrv.msc)
Step 2: Right-click on Certificate Templates, then select Manage
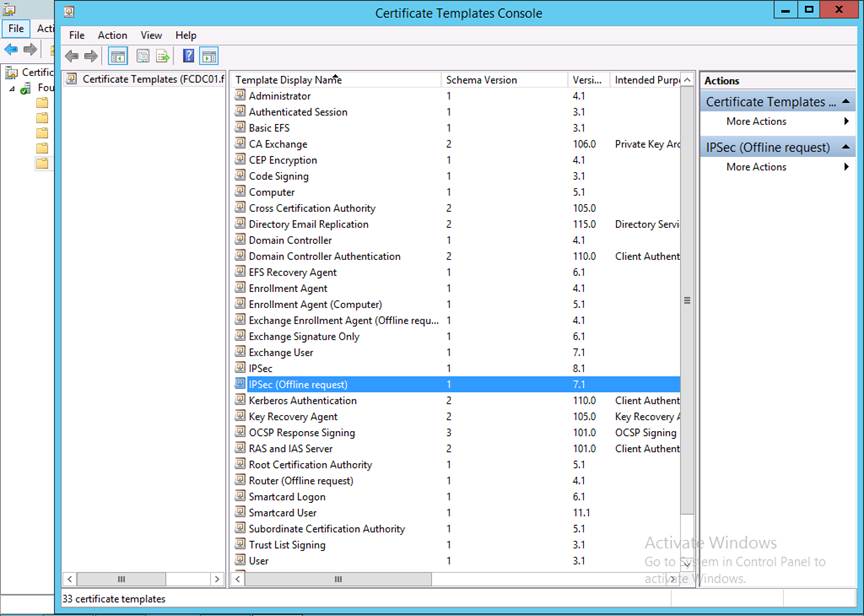
Step 3: Open the IPSEC (Offline request) certificate template
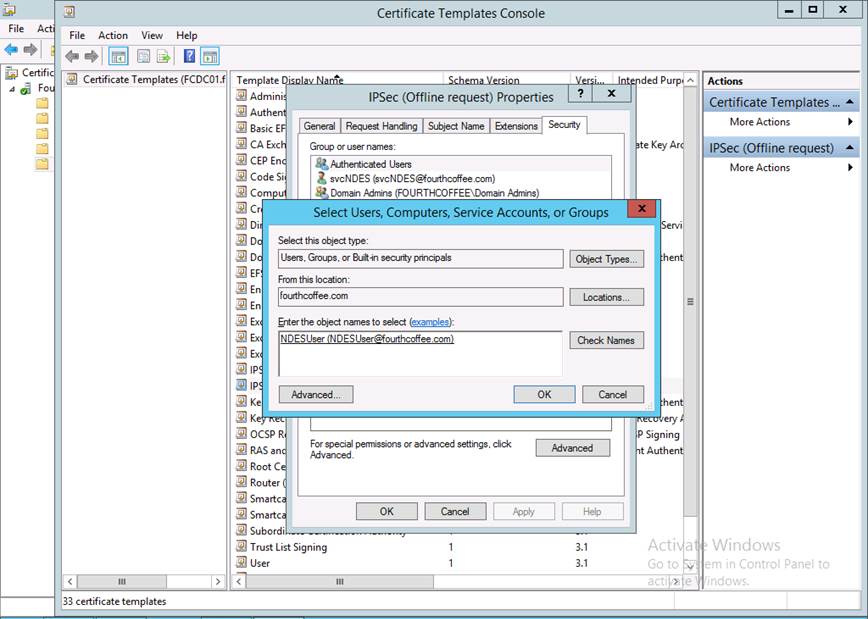
Step 4: Click the Add… button
Step 5: Enter the name of the user or group for which you want to grant access, click Check Names, and then click OK
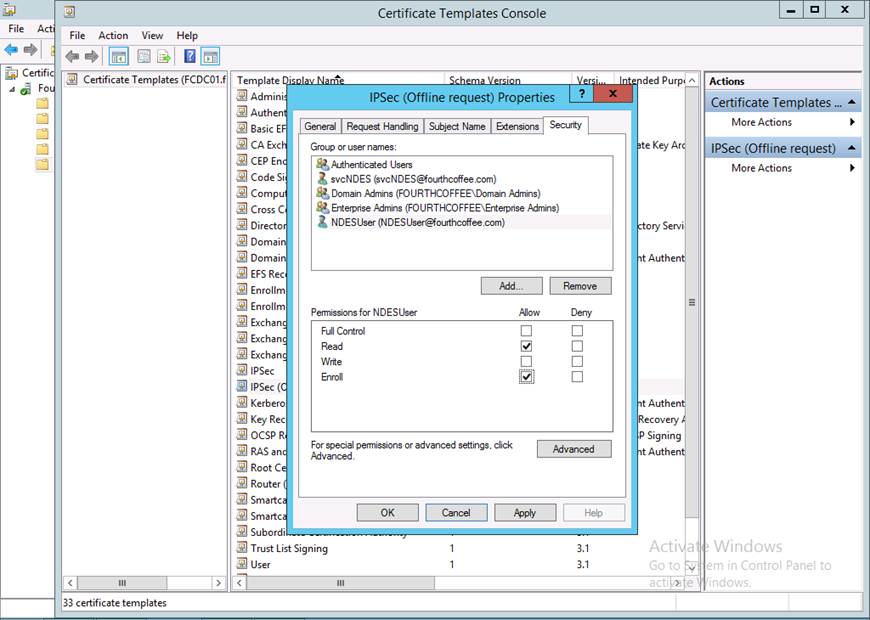
Step 6: With that group selected, select Allow Enroll permission, and then click OK
Step 7: Open a web browser running under the context of that newly provisioned user and verify that the user is given an enrollment challenge password. If they do they have been successfully provisioned.
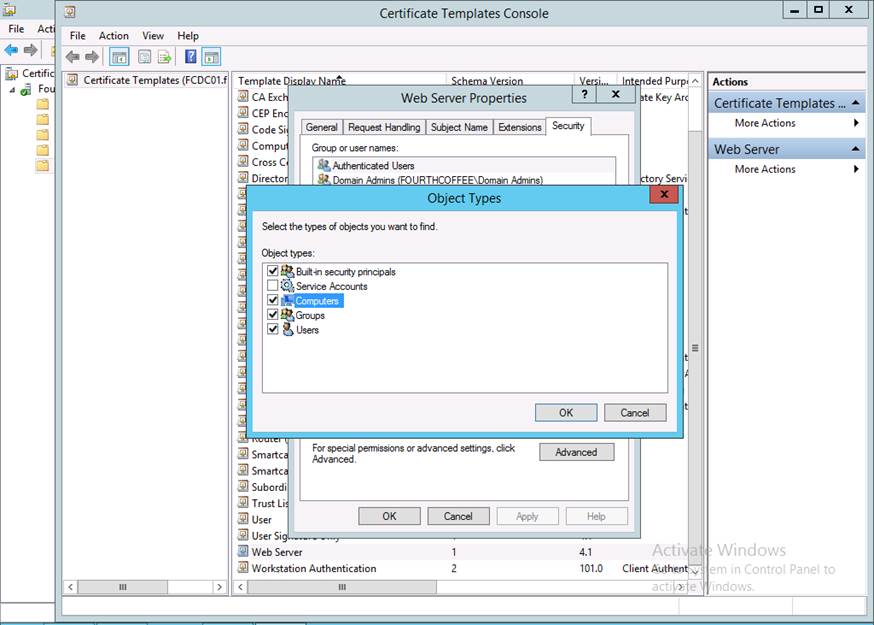
Enabling SSL on the Web Enrollment Pages and mscep_admin page
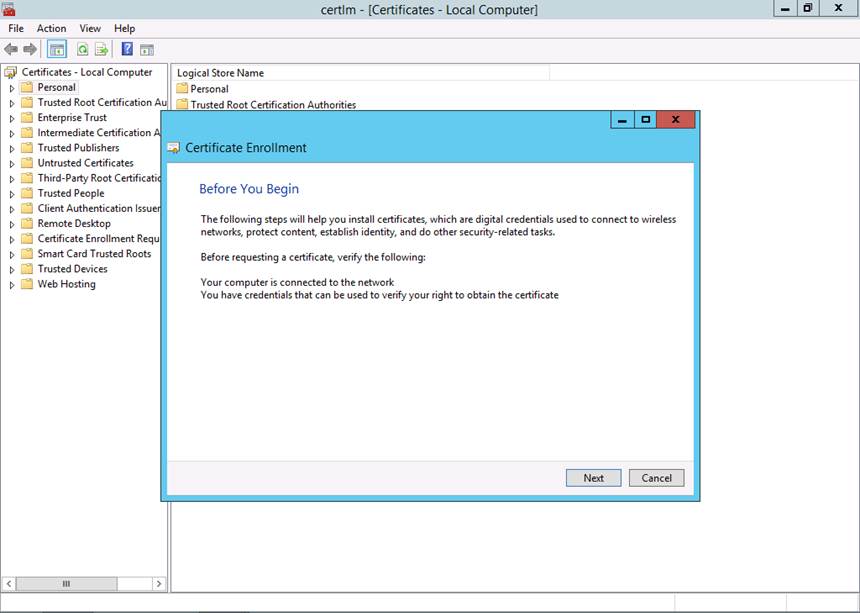
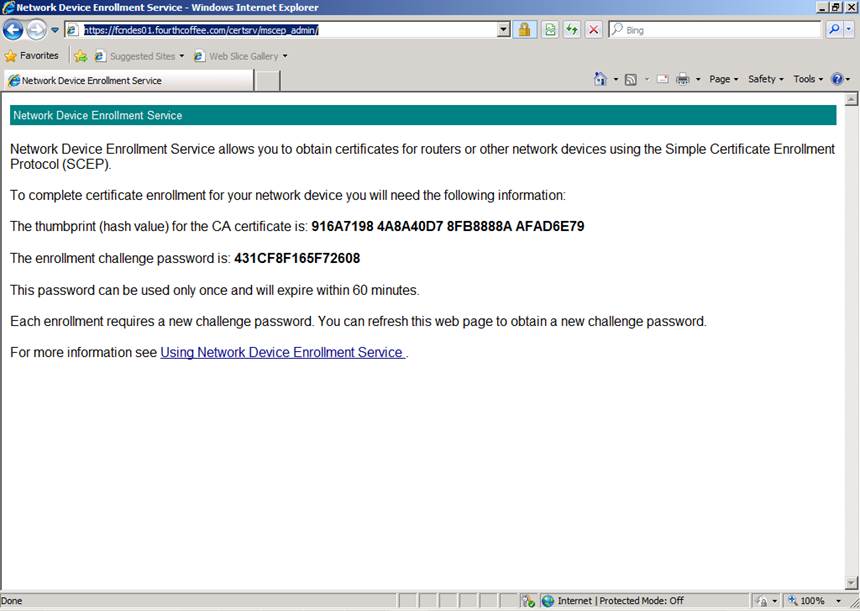
Step 1: Open the Certification Authority MMC (certsrv.msc)
Step 2: Right-click on Certificate Templates, then click Manage
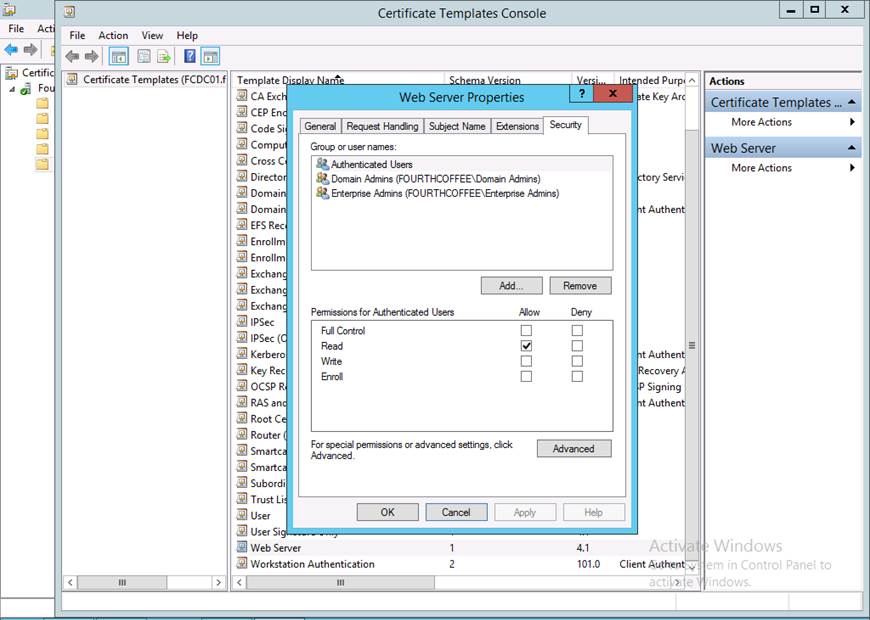
Step 3: Open the Web Server template or whichever Certificate Template your organization uses to issue SSL certificates
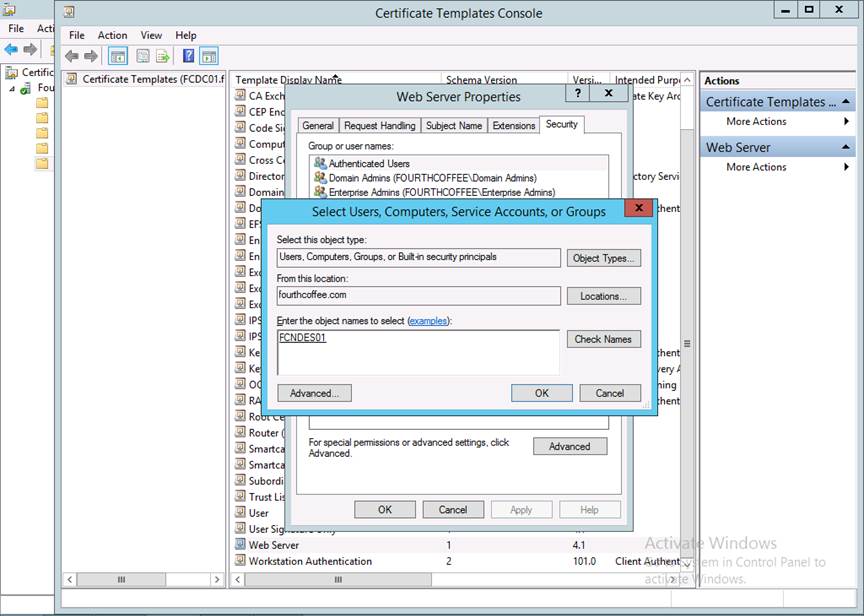
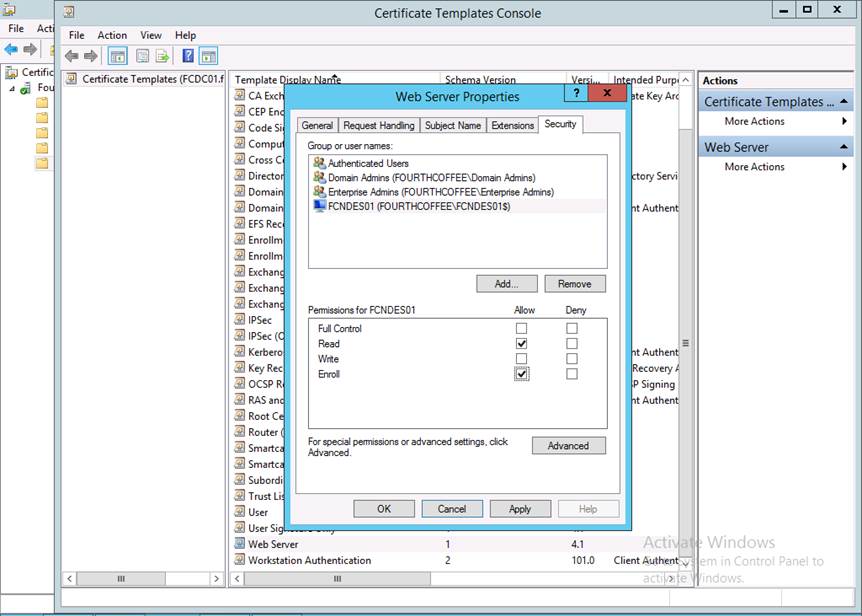
Step 4: Navigate to the Security tab
Step 5: Click Add…
Step 6: Click Object types…
Step 7: Check, Computers and then click OK
Step 8: Enter the hostname of the machine hosting NDES, click Check Names, and then OK
Step 9: Make sure the machine you just added is selected and the click Enroll under the Allow column
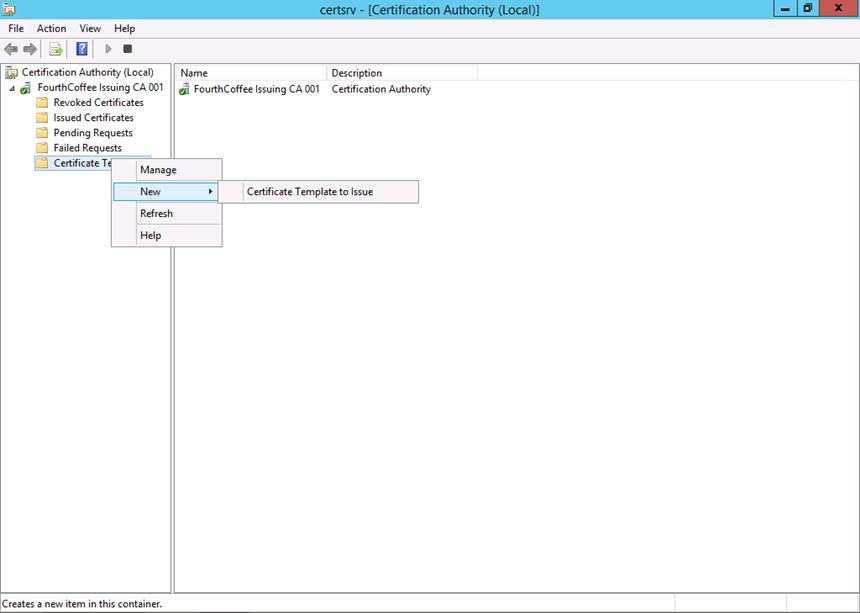
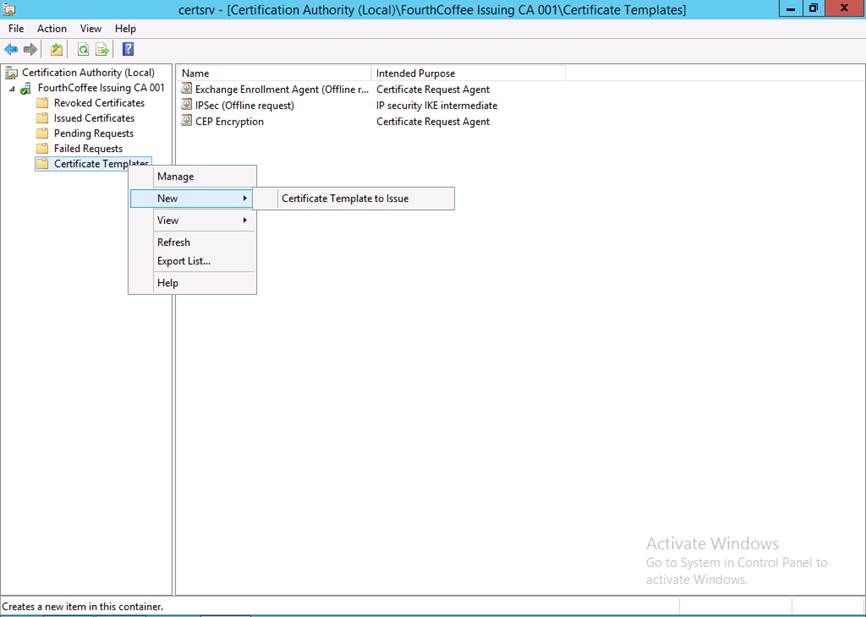
Step 10: In the Certification Authority MMC, right-click on Certificate Templates and select New and then Certificate Template to Issue
Step 11: Select the Web Server template or whichever template your organization uses to issue SSL certificates, then click OK
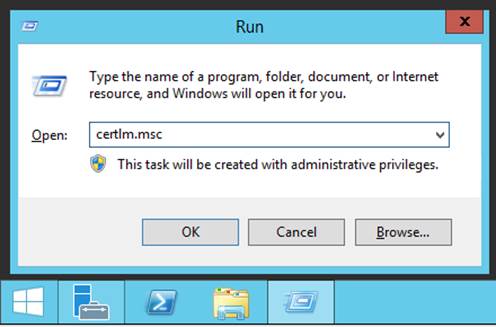
Step 12: On the NDES server, run certlm.msc
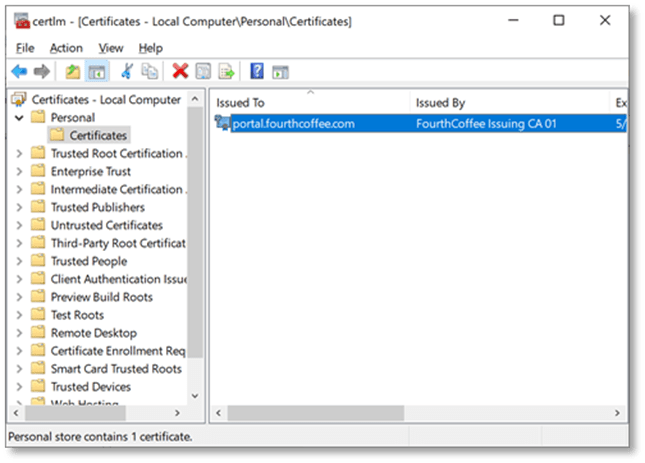
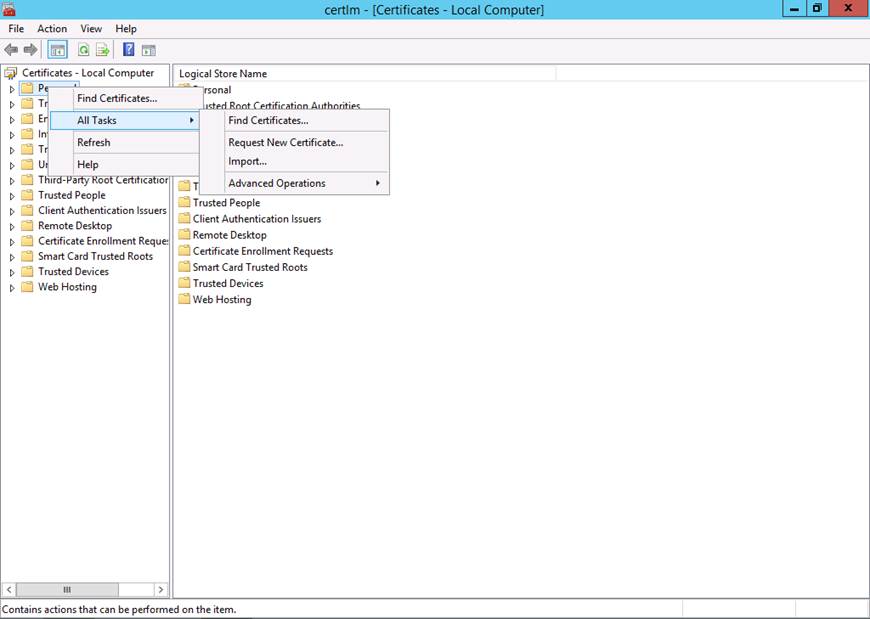
Step 13: Within the Certificates MMC locate the Personal node
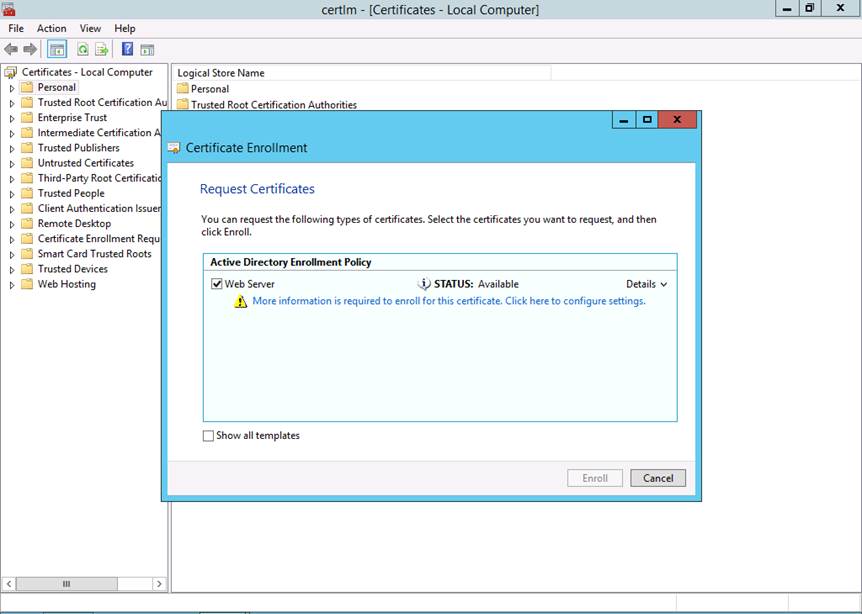
Step 14: Right-click on the Personal node select All Tasks, and then Request New Certificate…
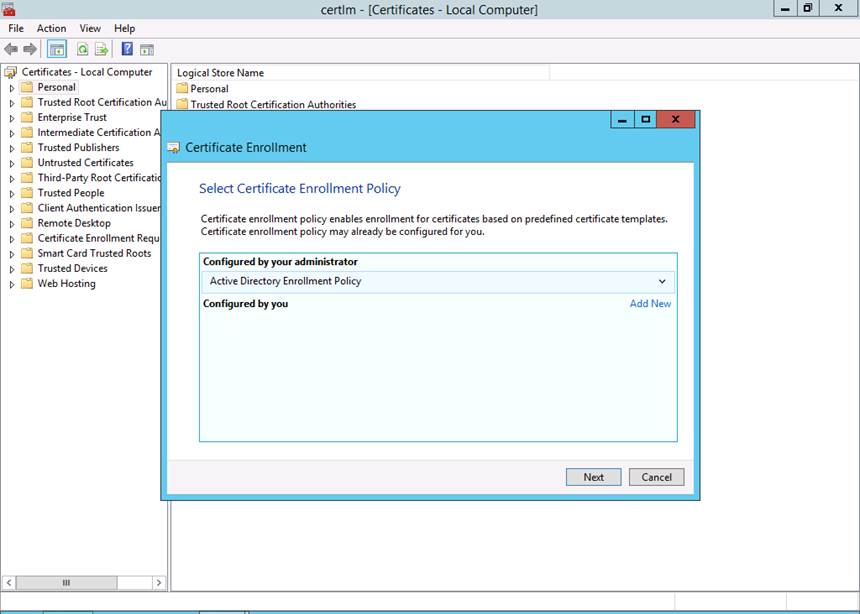
Step 15: On the Select Certificate Enrollment Policy page, click Next
Step 16: On the Before You Begin page, click Next
Step 17: Select the Web Server certificate template or whichever Certificate Template your organization uses to issue SSL certificates
Step 18: Click the More information is required to enroll for this certificate. Click here to configure settings. hyperlink.
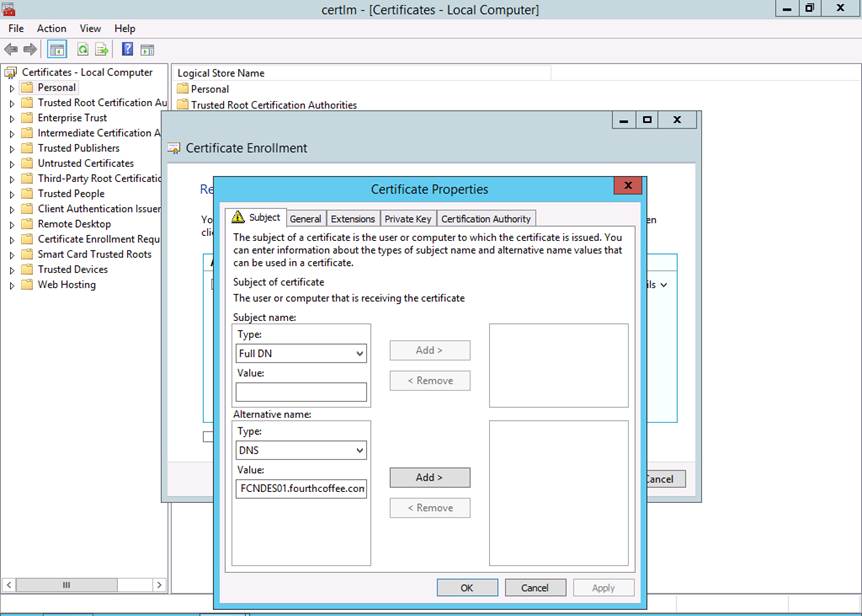
Step 19: On the Subject Tab, under Alternative Name, change the type to DNS
Step 20: Under value enter the DNS name for the NDES server, and then click Add
Below is the result of the previous step.
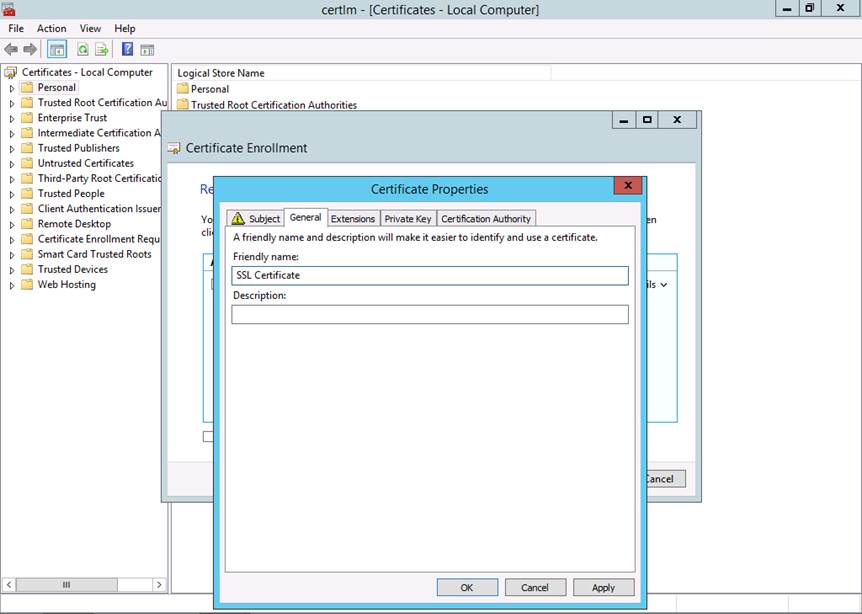
Step 21: Click on the General tab and under Friendly name type SSL Certificate, then click OK
Step 22: Click Enroll
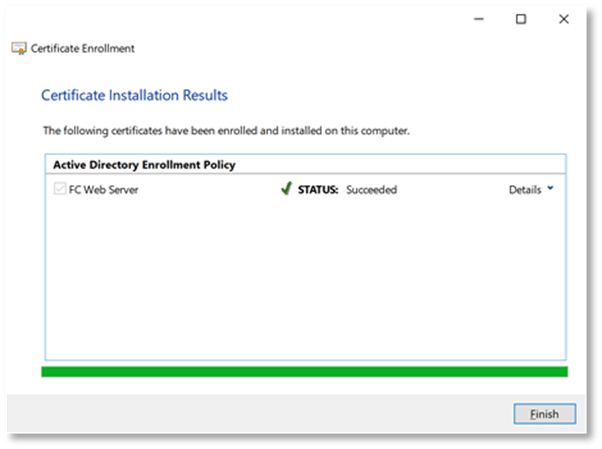
Step 23: On the Certificate Installation Results page, click Finish
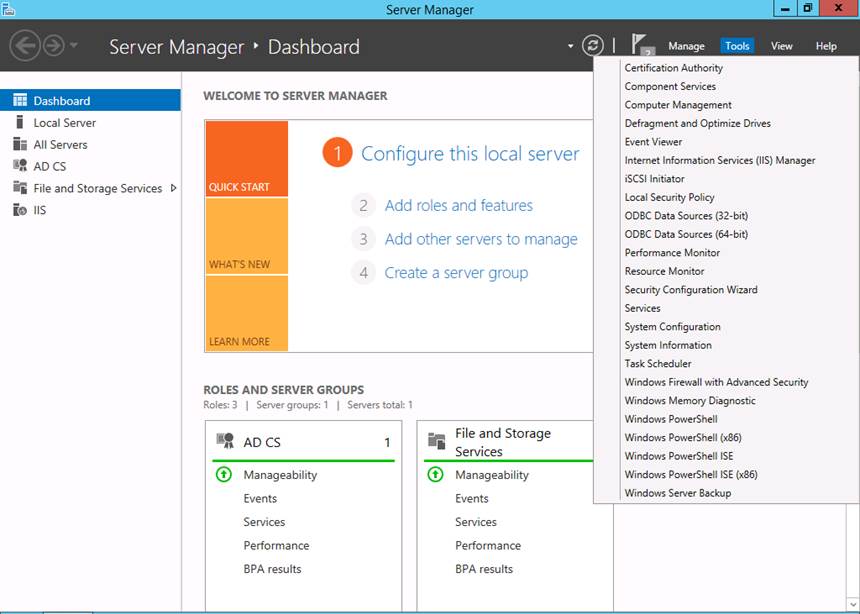
Step 24: Open Server Manager and from the Tools menu select Internet Information Services (IIS) Manager
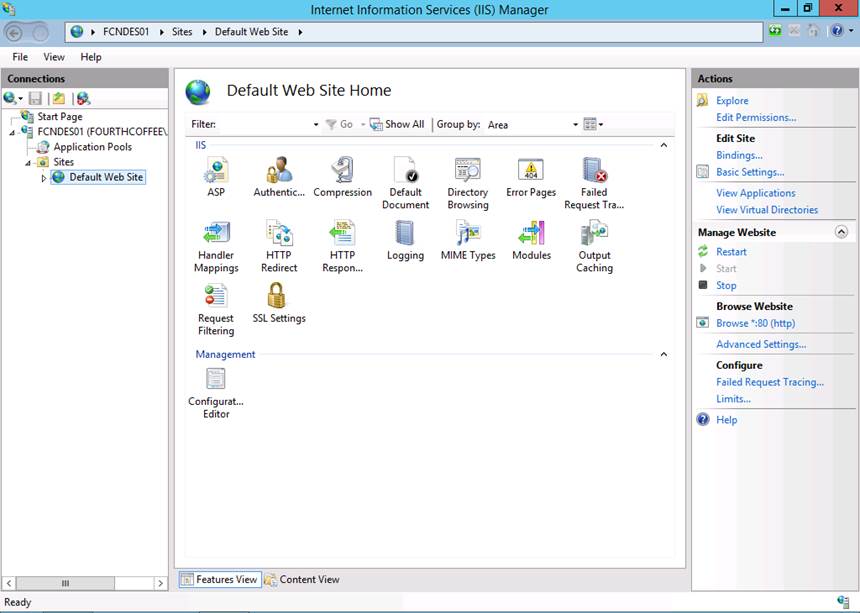
Step 25: In IIS Manager expand the Server Name node and then the Sites node
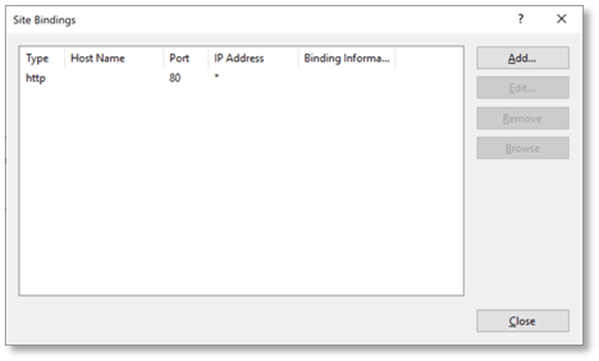
Step 26: In the Actions pane, click Bindings…
Step 27: Click Add…
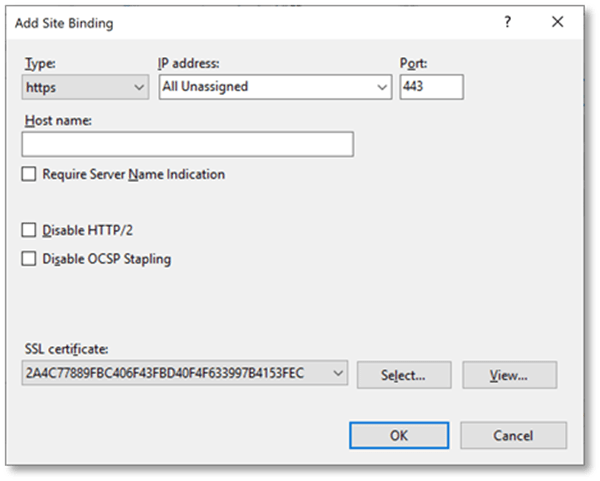
Step 28: Switch type from http to https
Step 29: Switch SSL Certificate from Not selected to SSL Certificate
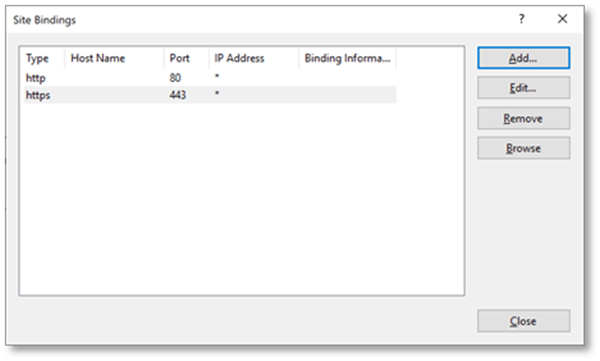
Step 30: Click OK
Step 31: Click Close
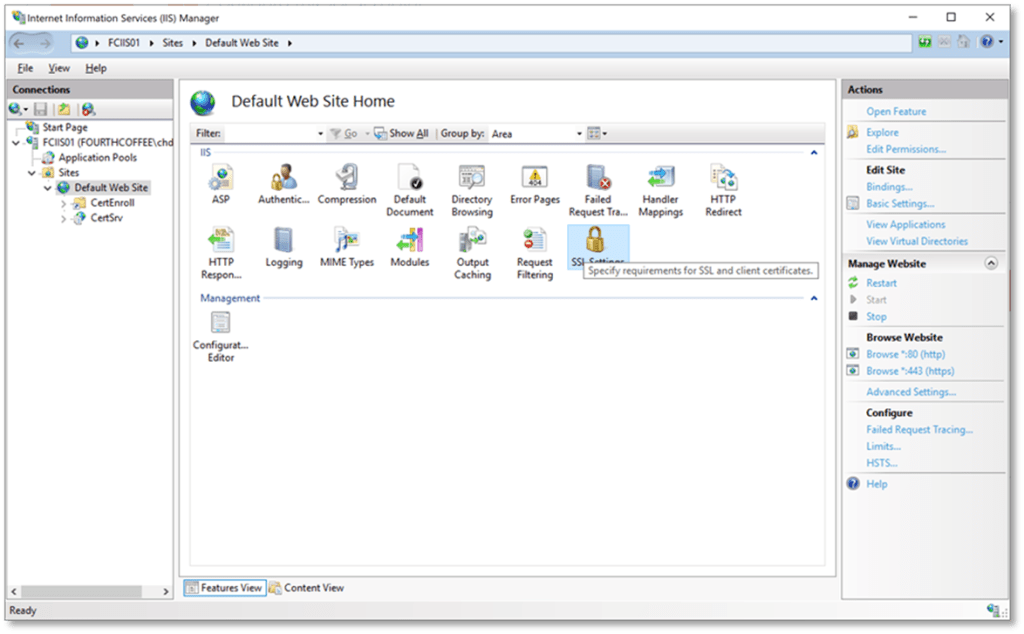
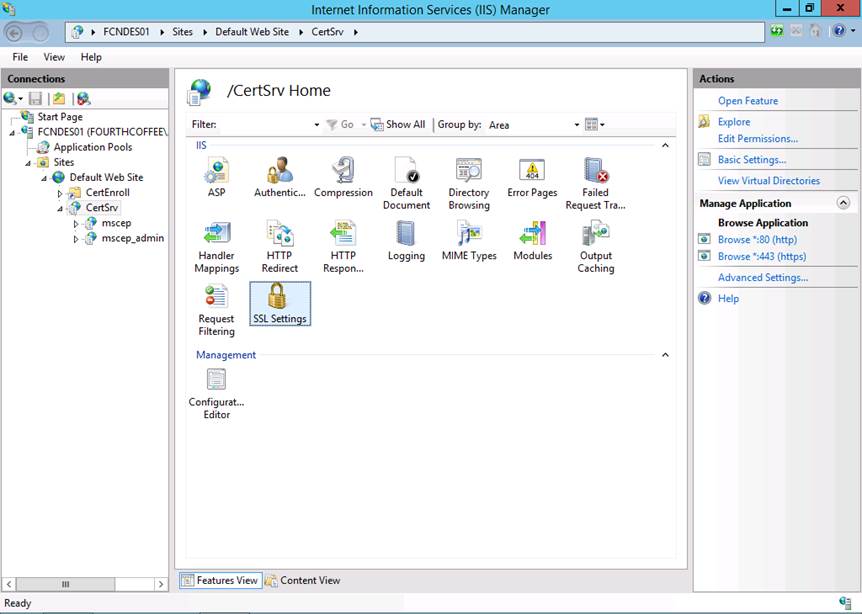
Step 32: Expand Default Web Site and then CertSrv
Step 33: In the middle pane double-click on SSL Settings
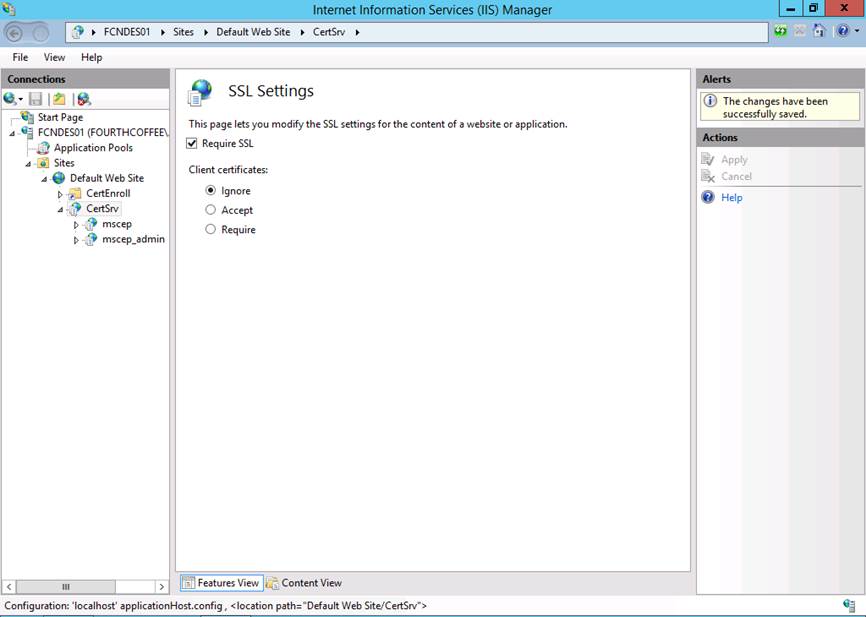
Step 34: Check Require SSL and then click Apply
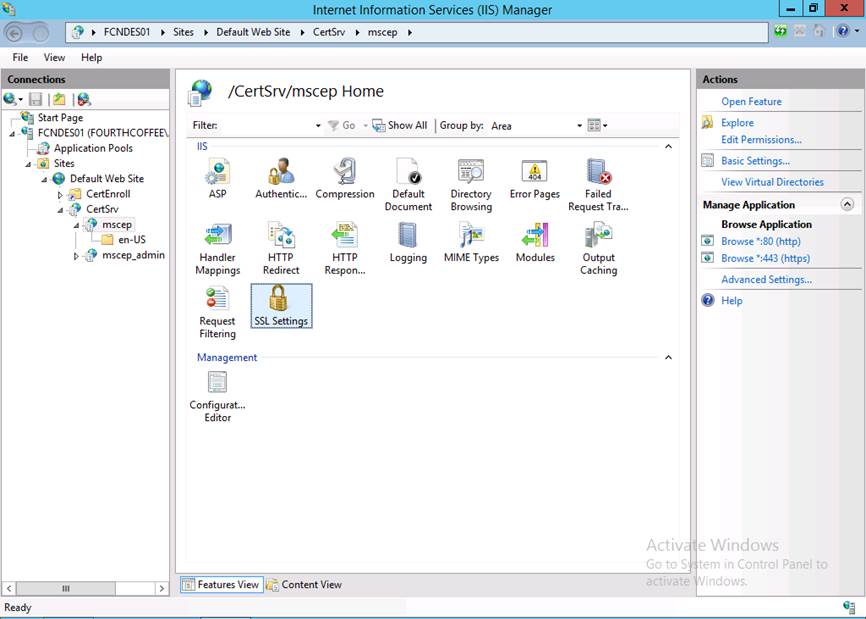
Step 35: Navigate to mscep and the double-click on SSL Settings
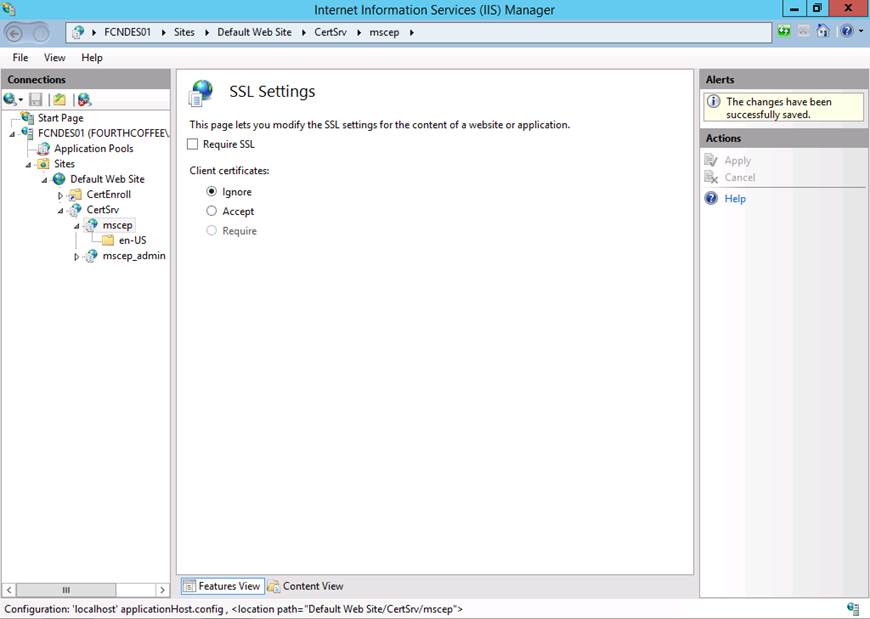
Step 36: Uncheck Require SSL and click Apply
Step 37: Verify that an authorized user can access the mscep_admin web page via https
Below is a blog I wrote quite a long time ago, but never posted. Hopefully, this is helpful.
Account Lockout Settings
The first thing that you will want to contemplate is your Account lockout threshold. If you have this setting set two low this can lead to accounts being locked out. This is because users may make mistakes when entering their passwords, applications may try to authenticate multiple times, as well as the fact that user may have a multitude of devices that have the credentials stored and will repeatedly attempt to log on. Microsoft’s general guidance on the Account lockout threshold is 10. If your Account lockout threshold is lower than that you should consider raising it.
How Account Lockout Occurs
Everytime a user enters the wrong password when logging on using a resource that authenticates to Active Directory, the badPWDCount attribute has a value that is incremented. This value is incremented on the domain controller that the user is attempting to authenticate to. The Domain Controller then retries that authentication attempt with the PDC, since PDC is urgently replicated all password changes. If the authentication attempt on the PDC fails, the PDC increments its copy of the badPWDCount attribute for that user. This structure allows the badPWDCount to increment even if different domain controllers are used for authentication. Once the badPWDCount attribute reaches the Account lockout threshold the account will be locked out.
Troubleshooting Account Lockouts
Domain Controller Auditing
In order to troubleshoot accounts lockouts you will first need to have some auditing in place.
On Domain Controllers, you should have Audit account logon events configured to Audit Success and Failure attempts.
The events that you should be looking for on the Domain Controller are:
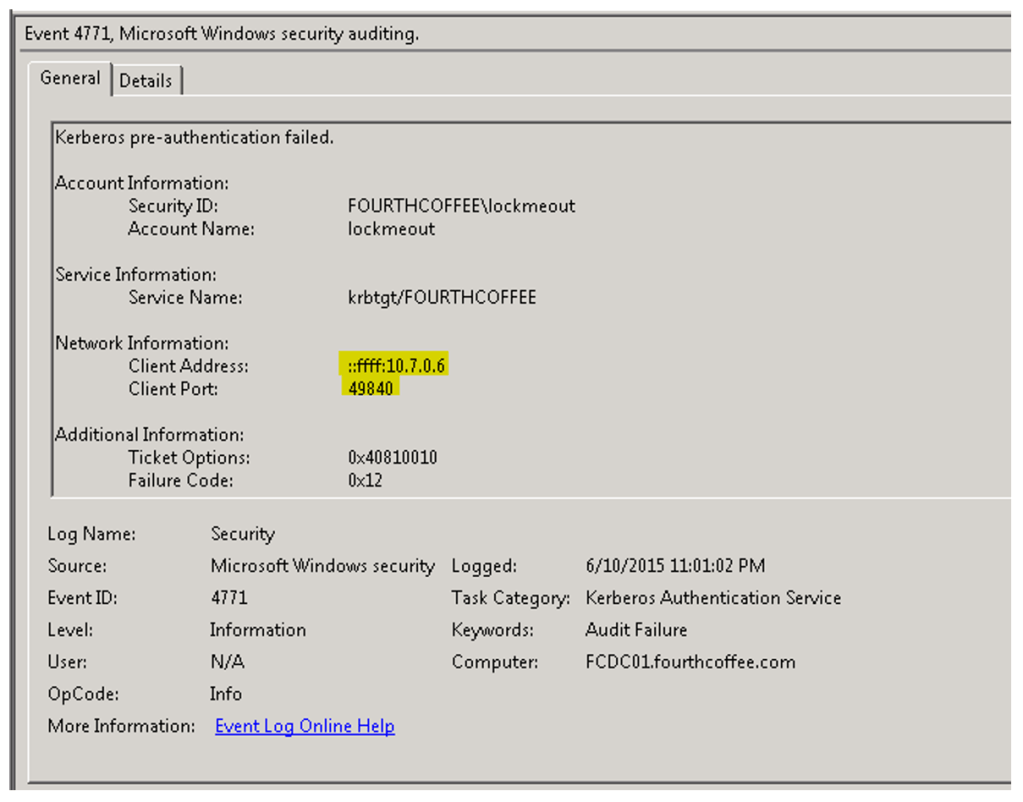
Event 4771, which is a Kerberos Pre-Authentication failure. But be careful this event can be a little misleading since you Windows will intentially fail Pre-Auth the first time to get a list of the DCs encryption capabilities.
Key Information in this event:
Security ID and Accountname tell me which account failed Pre-Authentication.
Under Network Information we see the client address and port, so this can help us identify the source of the failed authentication.
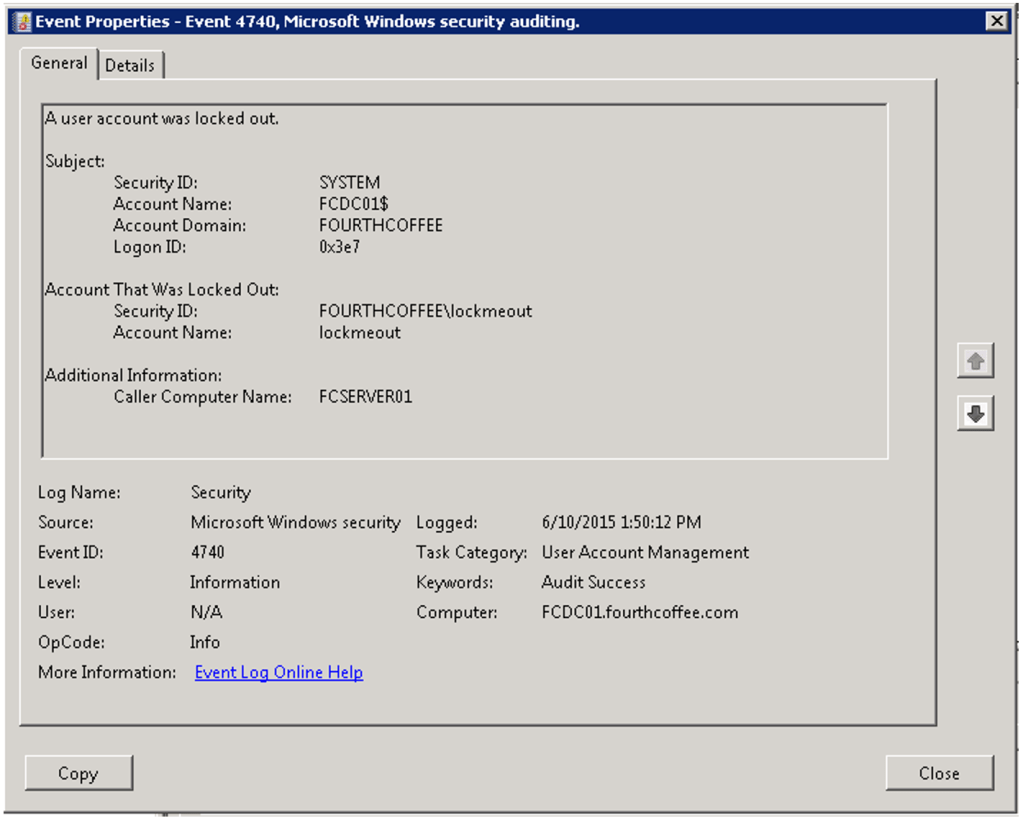
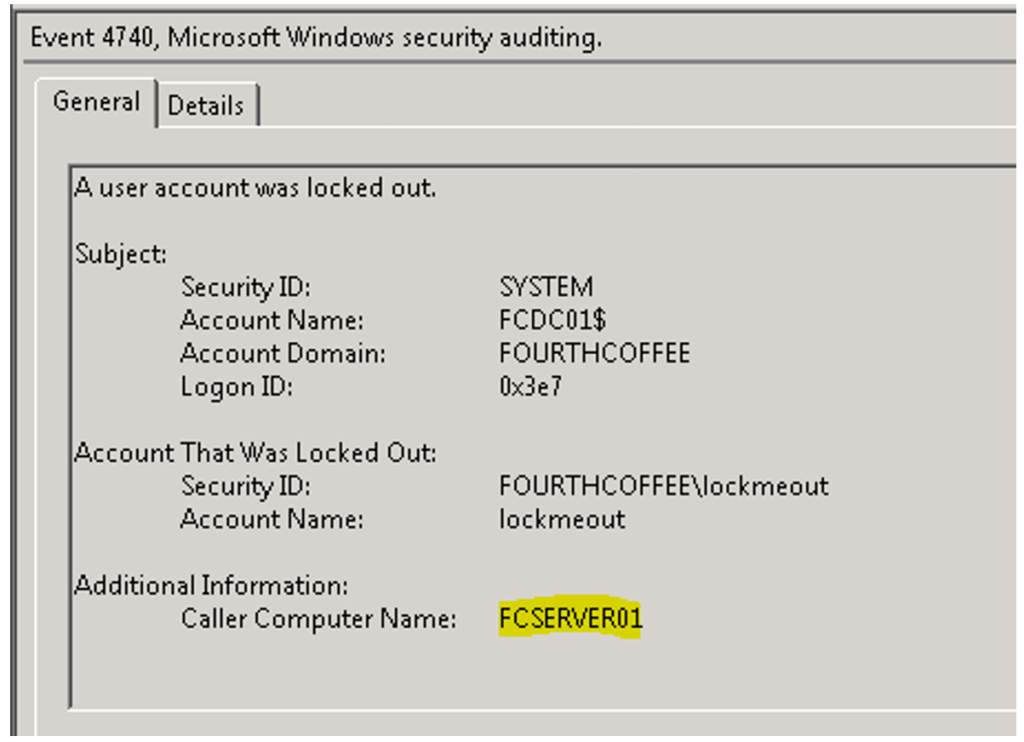
Event 4740, which shows that an account has been locked out.
We see that the Caller Computer Name is listed, which lets us identify the source of the account lockout.
Server and client auditing and logging
On the server or client to which you are trying to authenticate to will need to have Audit logon events enabled for Success and Failure.
Events you will see on the server or client to which you are authenticating to you should look for the following events:
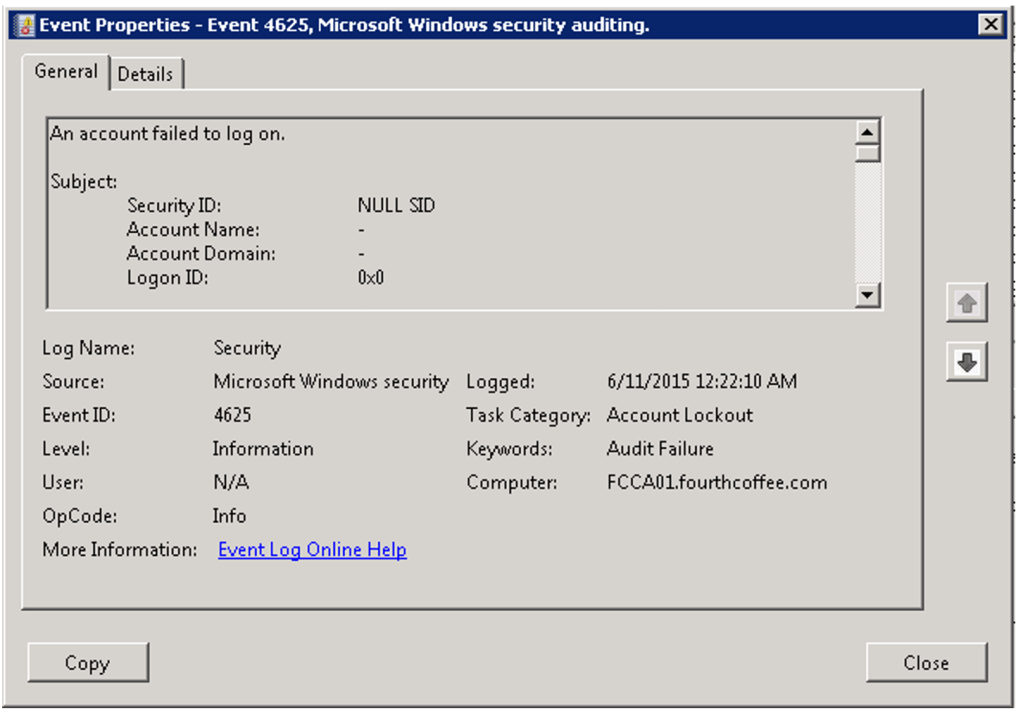
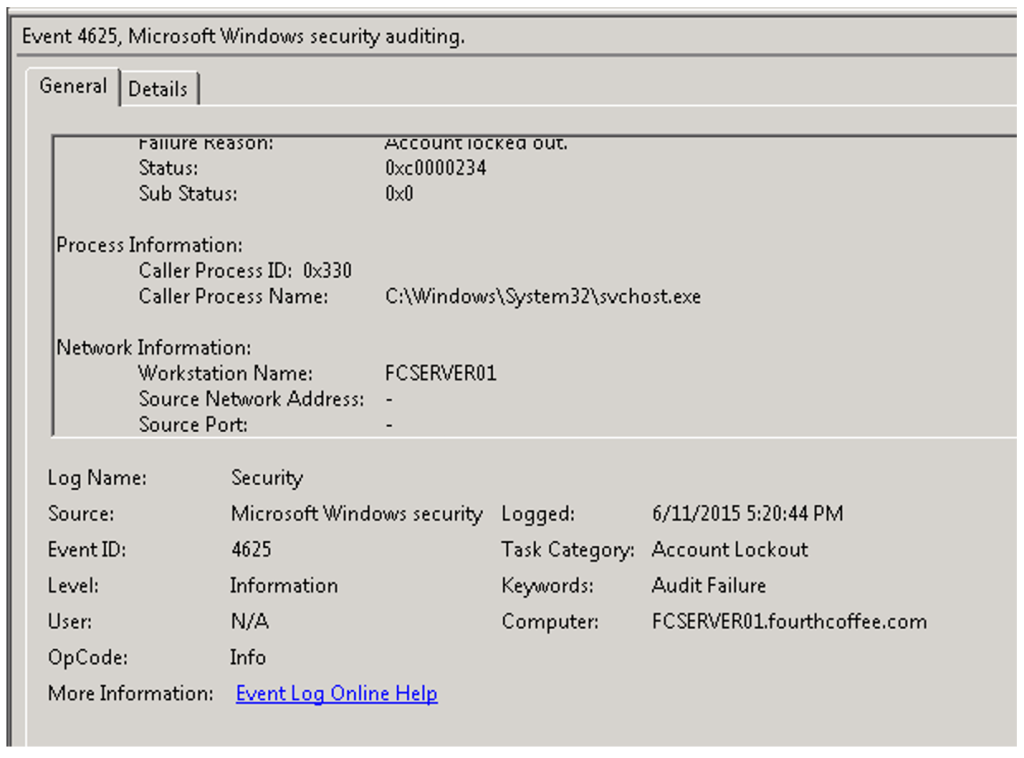
Event 4625, which shows you that an account failed to log on.
Key information in this event include:
Security ID, Account Name, Caller Process, Caller Process Name, Workstation Name, Source Network Address, and Source Port
So how do you find which accounts are locked out?
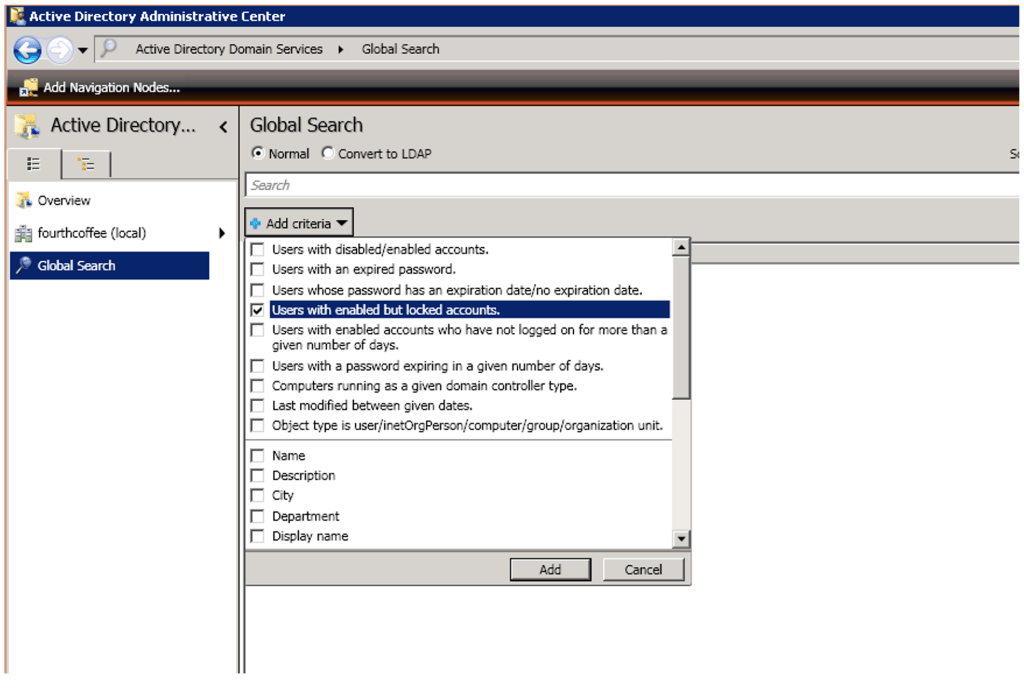
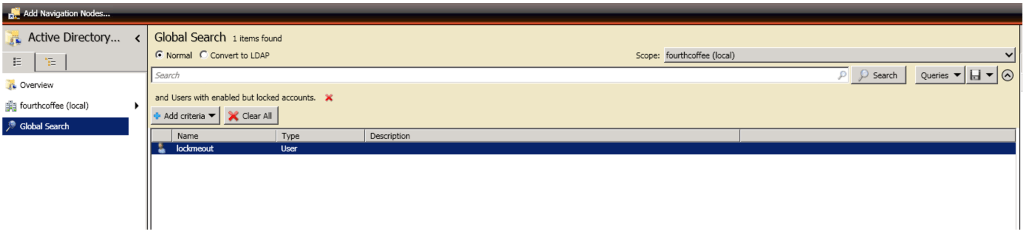
Step 1: Open the Active Directory Administrative Center
Step 2: Click on Global Search
Step 3: Select the checkbox for Users with enabled but locked accounts
Step 4: Click Add
Step 5: Ensure that the Scope is set to match the location you wish to search
Step 6: Click Search
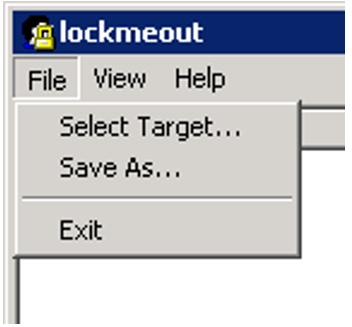
So how do you determine the DC that the user was logging on to when they get locked out?
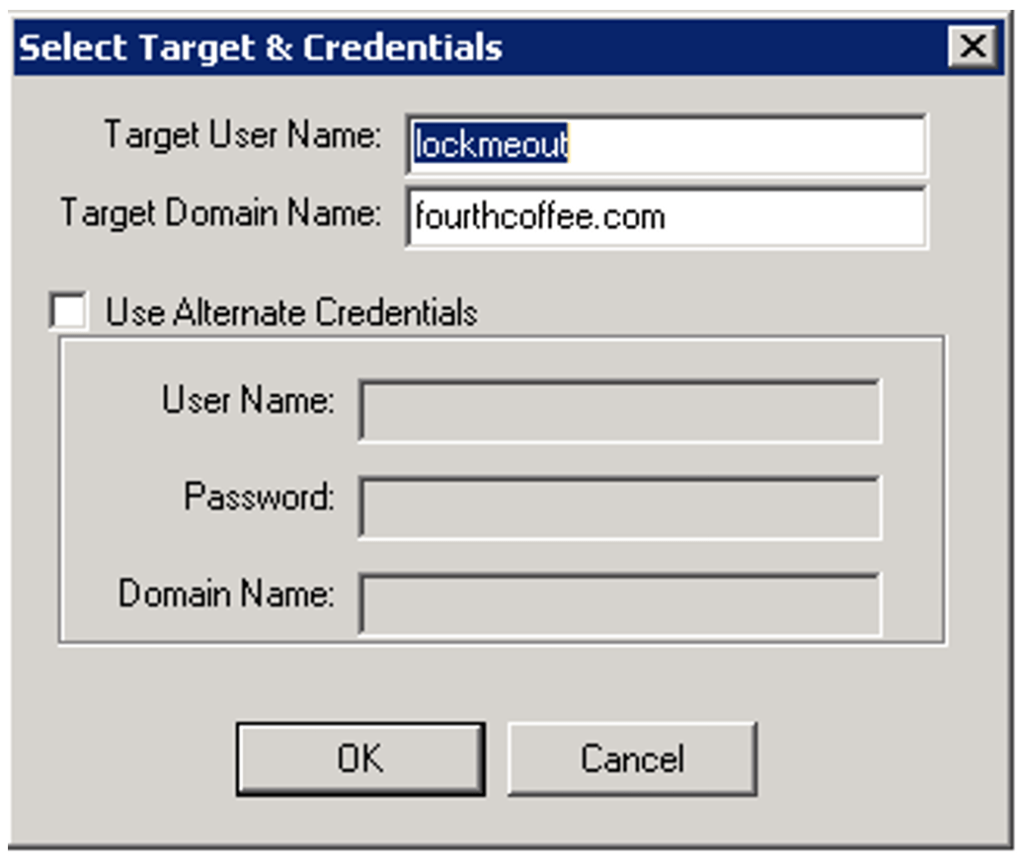
Step 3: Enter the Target User Name and Domain Name and click OK
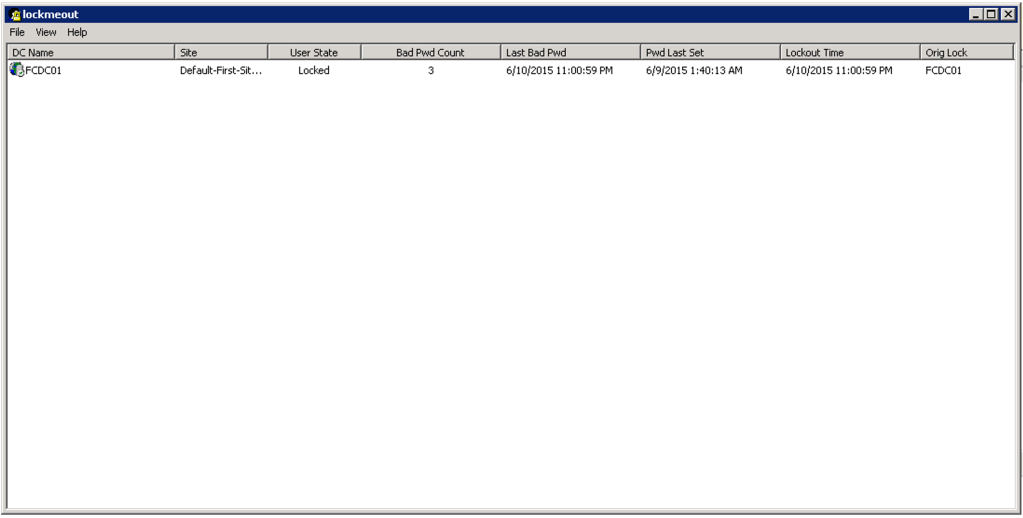
Step 4: In the lockoutstatus tool view the Orig Lock column.
How do you find the server where the Account Lockout originated?
Option 1: Once you locate the DC where the lock originated you can view the 4740 event and view the Caller Computer Name if it is present.
Option 2: Alternatively you can view the 4771 event and the Client Address should identify the source of the Account Lockout. It is important that you correlate this to 4740 event to ensure that you are looking at the correct Pre-Authentication failure.
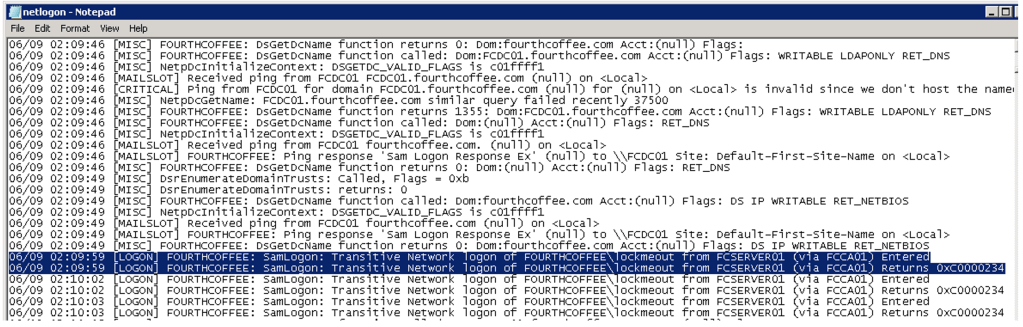
Option 3: If you still cannot locate the source, you can enable Netlogon Diagnostic logging. The following article contains the steps used to enable this logging as well as Fix It scripts that will enable/disable it for you: https://support.microsoft.com/en-us/kb/109626. All data will be logged to %windir%\debug\netlogon.log and netlogon.bak
In this example, I see that the user lockmeout attempted to authenticate to FCCA01 from the machine FCServer01. Ultimately an 0xc0000234 was returned, which means the account was locked out.
How do I find out which process caused the account lockout?
On the server or client to which you are trying to authenticate to will need to have Audit logon events enabled for Success and Failure.
As illustrated in the example below the process ID and Name are listed in the event.
If you wish to dig deeper into this you can grab the process ID from the event.
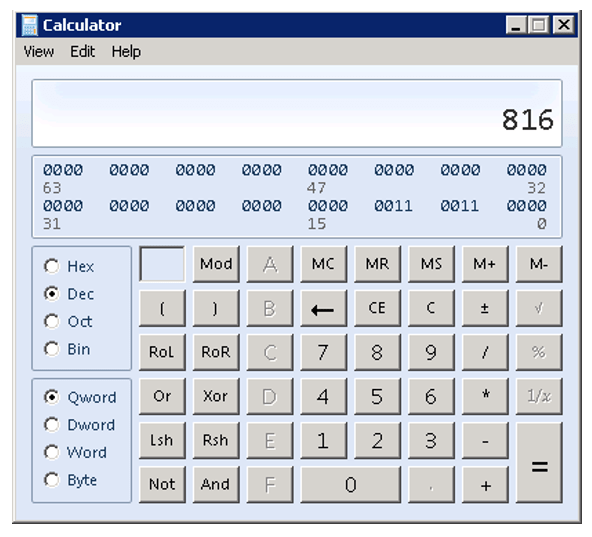
In this example the Caller Process ID is 0x330
We can convert the hex into decimal by using calc. Simply select Hex, enter 330 and then toggle the radio button to Dec. In this example, this gives us 816 which is the PID of the process.
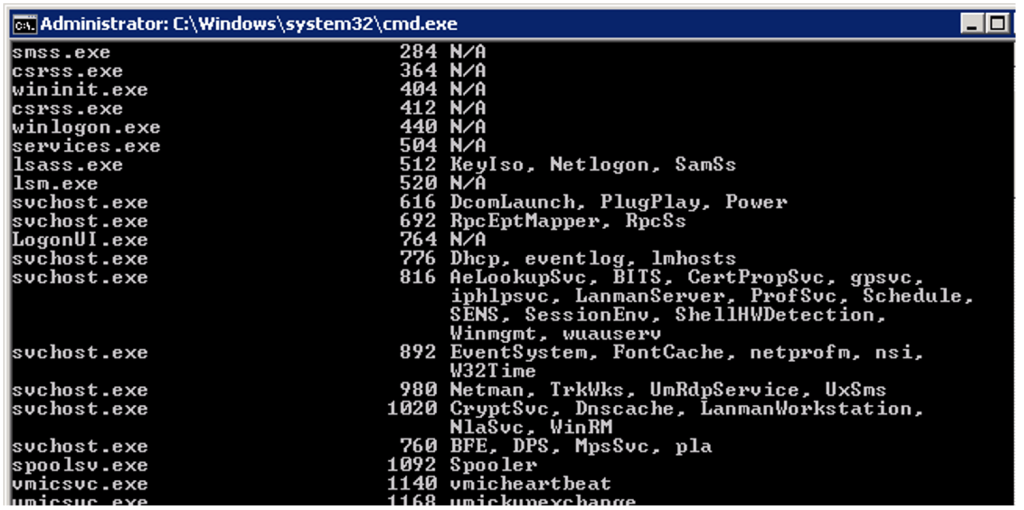
Then if you run tasklist /svc, you will get a list of PIDs and what processes are associated with them.
So, I recently did some work with an organization that uses the VPN features of the Palo Alto firewall.
The desired configuration was to have users use autoenrollment to get user certificates that would be used to connect to the VPN. If for some reason a user was not able to autoenroll for a certificate they would be provisioned a certificate from the firewall. The firewall used the SCEP protocol to enroll for a certificate from the Network Device Enrollment Server (NDES).
We were able to get the firewall to work with an NDES certificate, but not an autoenrolled certificate. After some troubleshooting, we realized that when a certificate was enrolled from the NDES server that the VPN requested an additional field in the subject. That field was serial number and it included a guid as the value data for that attribute. We realized that that serial number was key to authenticating the client. In fact it is mentioned in Palo Alto’s documentation: